Sriracha is basically Thai “ketchup” and is named after a town called Si Racha!
I am totally shocked when people ask me, “What is Sriracha?” Sriracha is America’s #1 condiment! According to the Huy Fong Food Co., Sriracha is made of sun ripened chiles ground into a paste with garlic.
Photo via The Washigton Times 4/23/14. This photo depicts a Sriracha demonstration in CA as residents fought to shut down the Irwindale plant because the air was “too spicy.”
The fight was over by the end of May. The Sriracha plant, 1, the eyes and nasal passages of residents, 0.
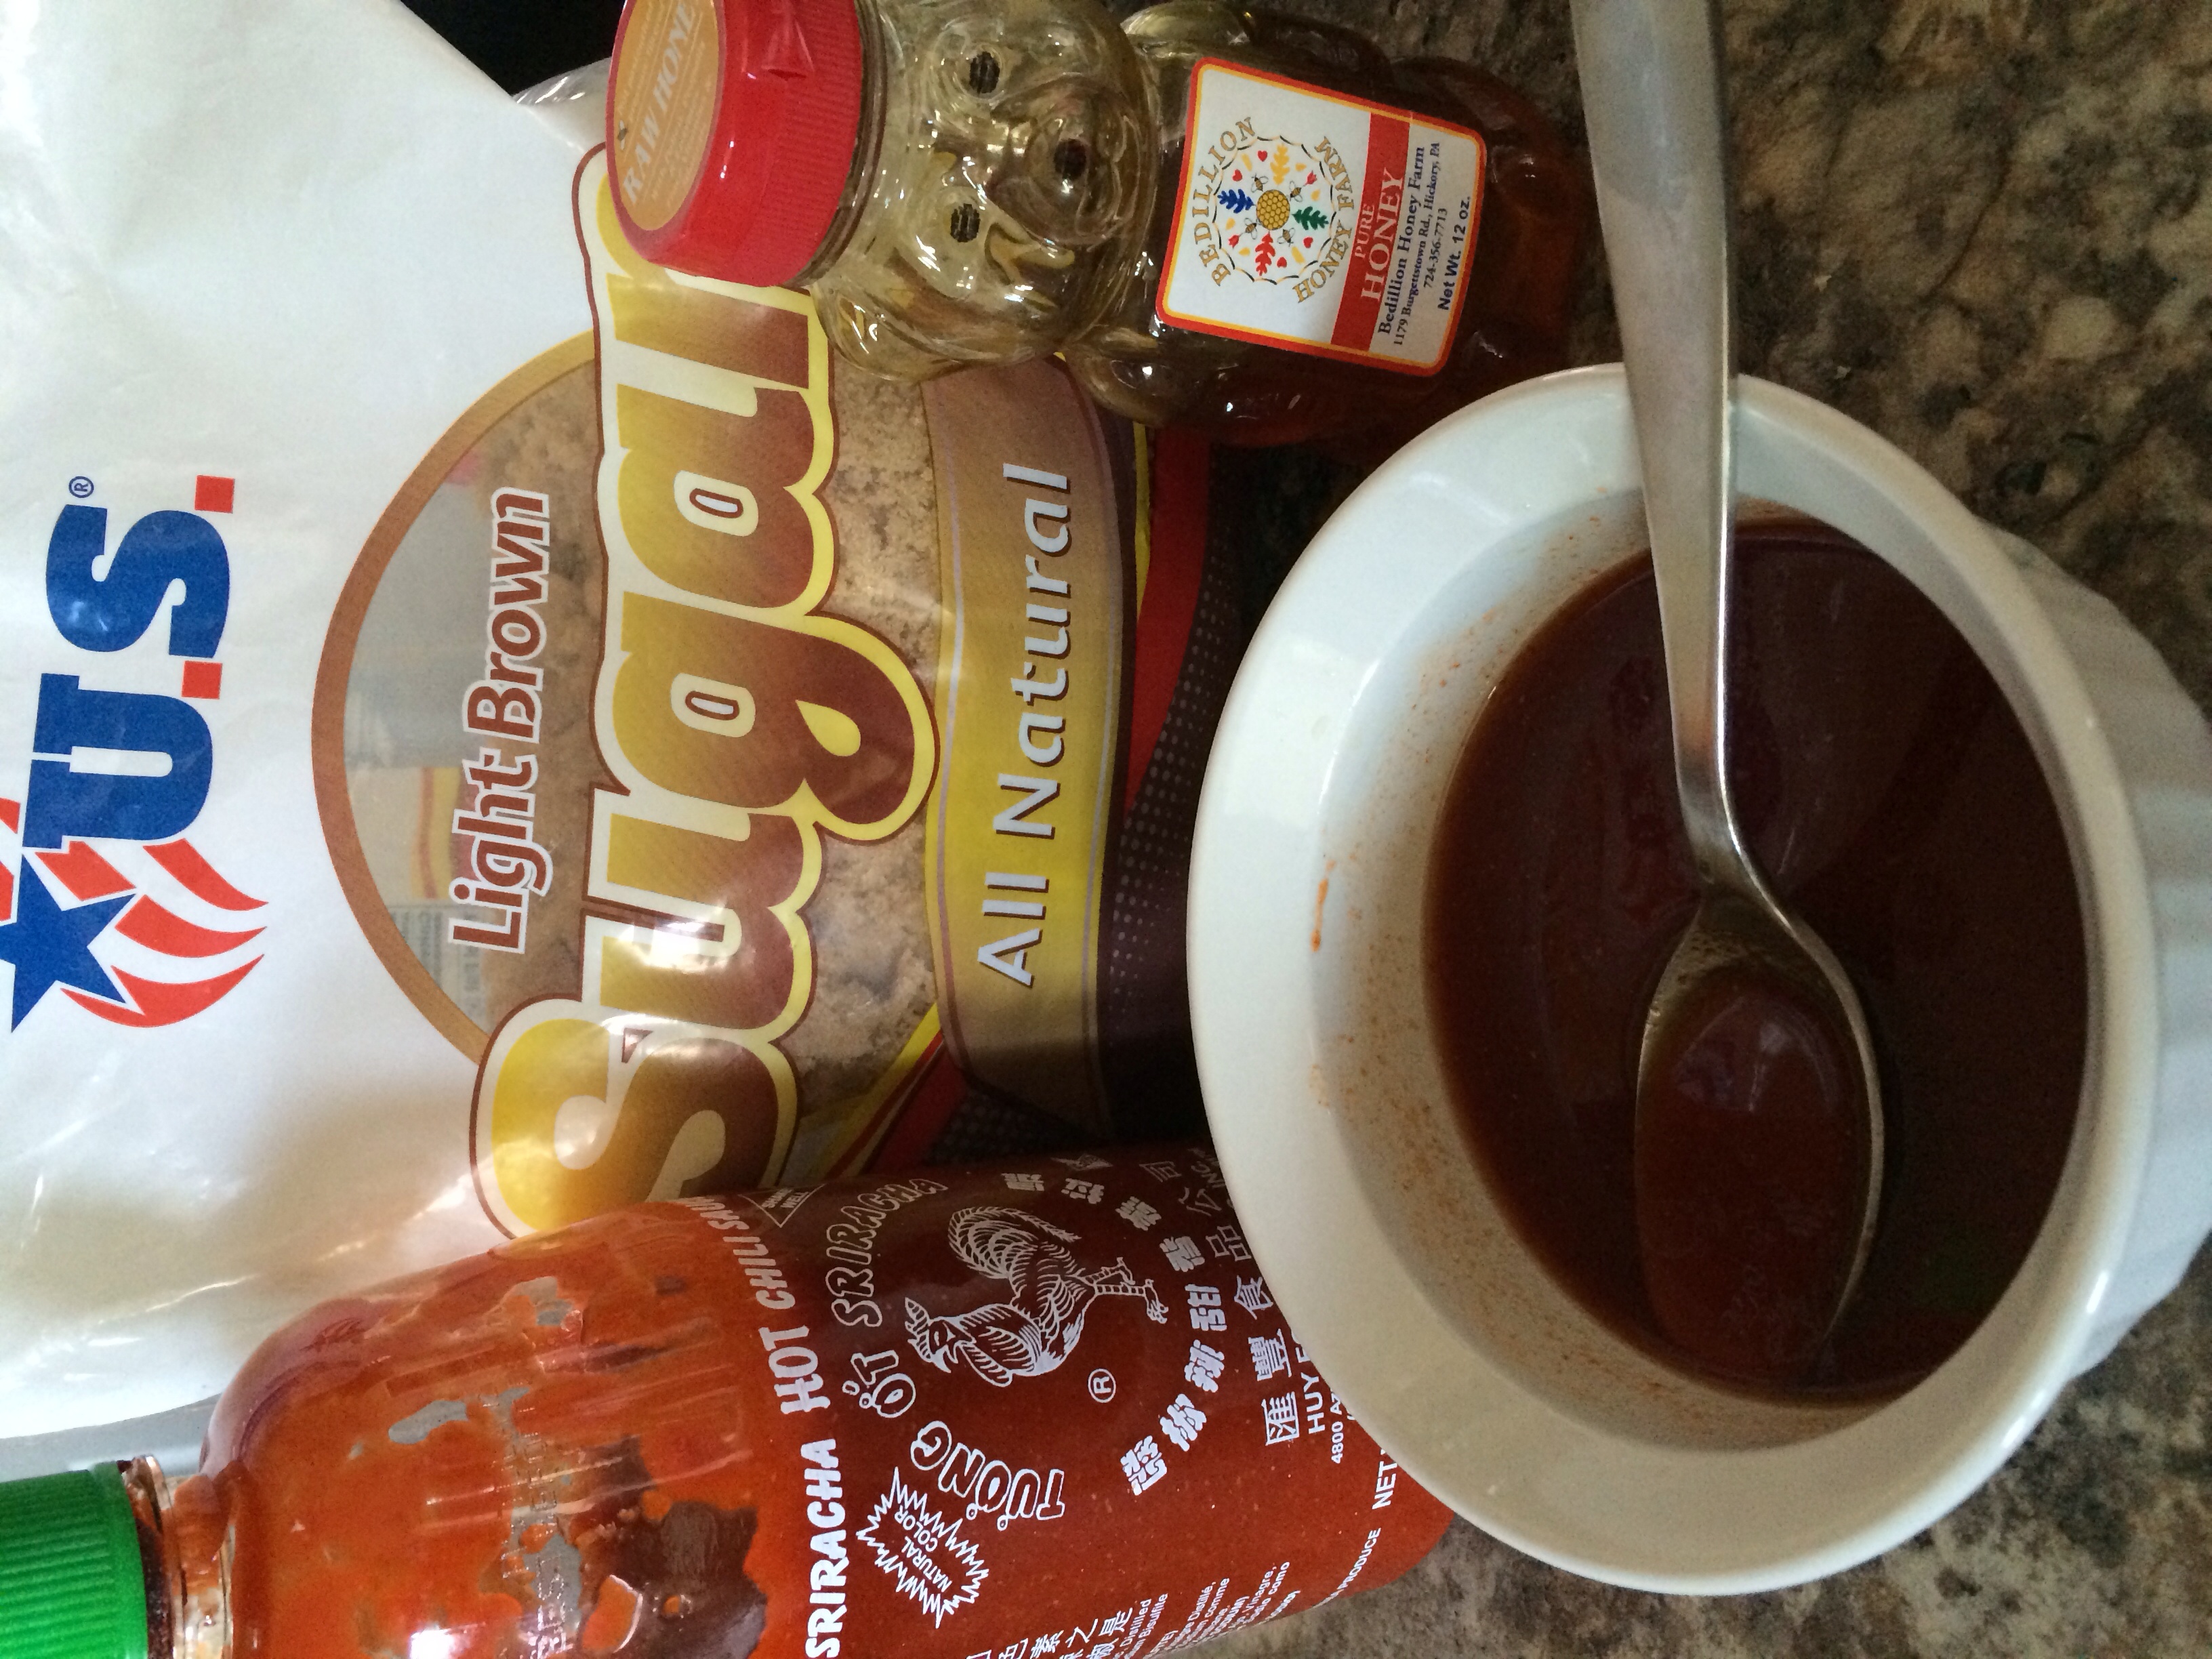
I have created an amazing spicy, sweet sauce using a Sriracha, honey, brown sugar base. Since being featured by Emeril Lagassee on Good Morning America, fans have asked that I simplify the recipe for a quick sauce. I have been experimenting with the base ingredients and the result is an intense, flavorful 3 ingredient sauce!!
Here is the full recipe: Parmesan Princess on GMA
So far this amazing sauce has made the most mouthwatering pulled pork, pork chops, chicken, shrimp, and even grilled veggies!
Spicy Sweet -The Perfect Sauce!
Ingredients:
1/4 cup brown sugar
1/4 cup water
2 tbsp. Honey
2 tbsp. Sriracha
Directions:
Dissolve brown sugar in water. Stir until smooth.
Mix in other ingredients.
Use sauce as Marinade.
Add additional sauce to browned pork, fish, chicken, etc. To create a saucy layer.
Spicy Sweet Sauce will not disappoint! Try it today!
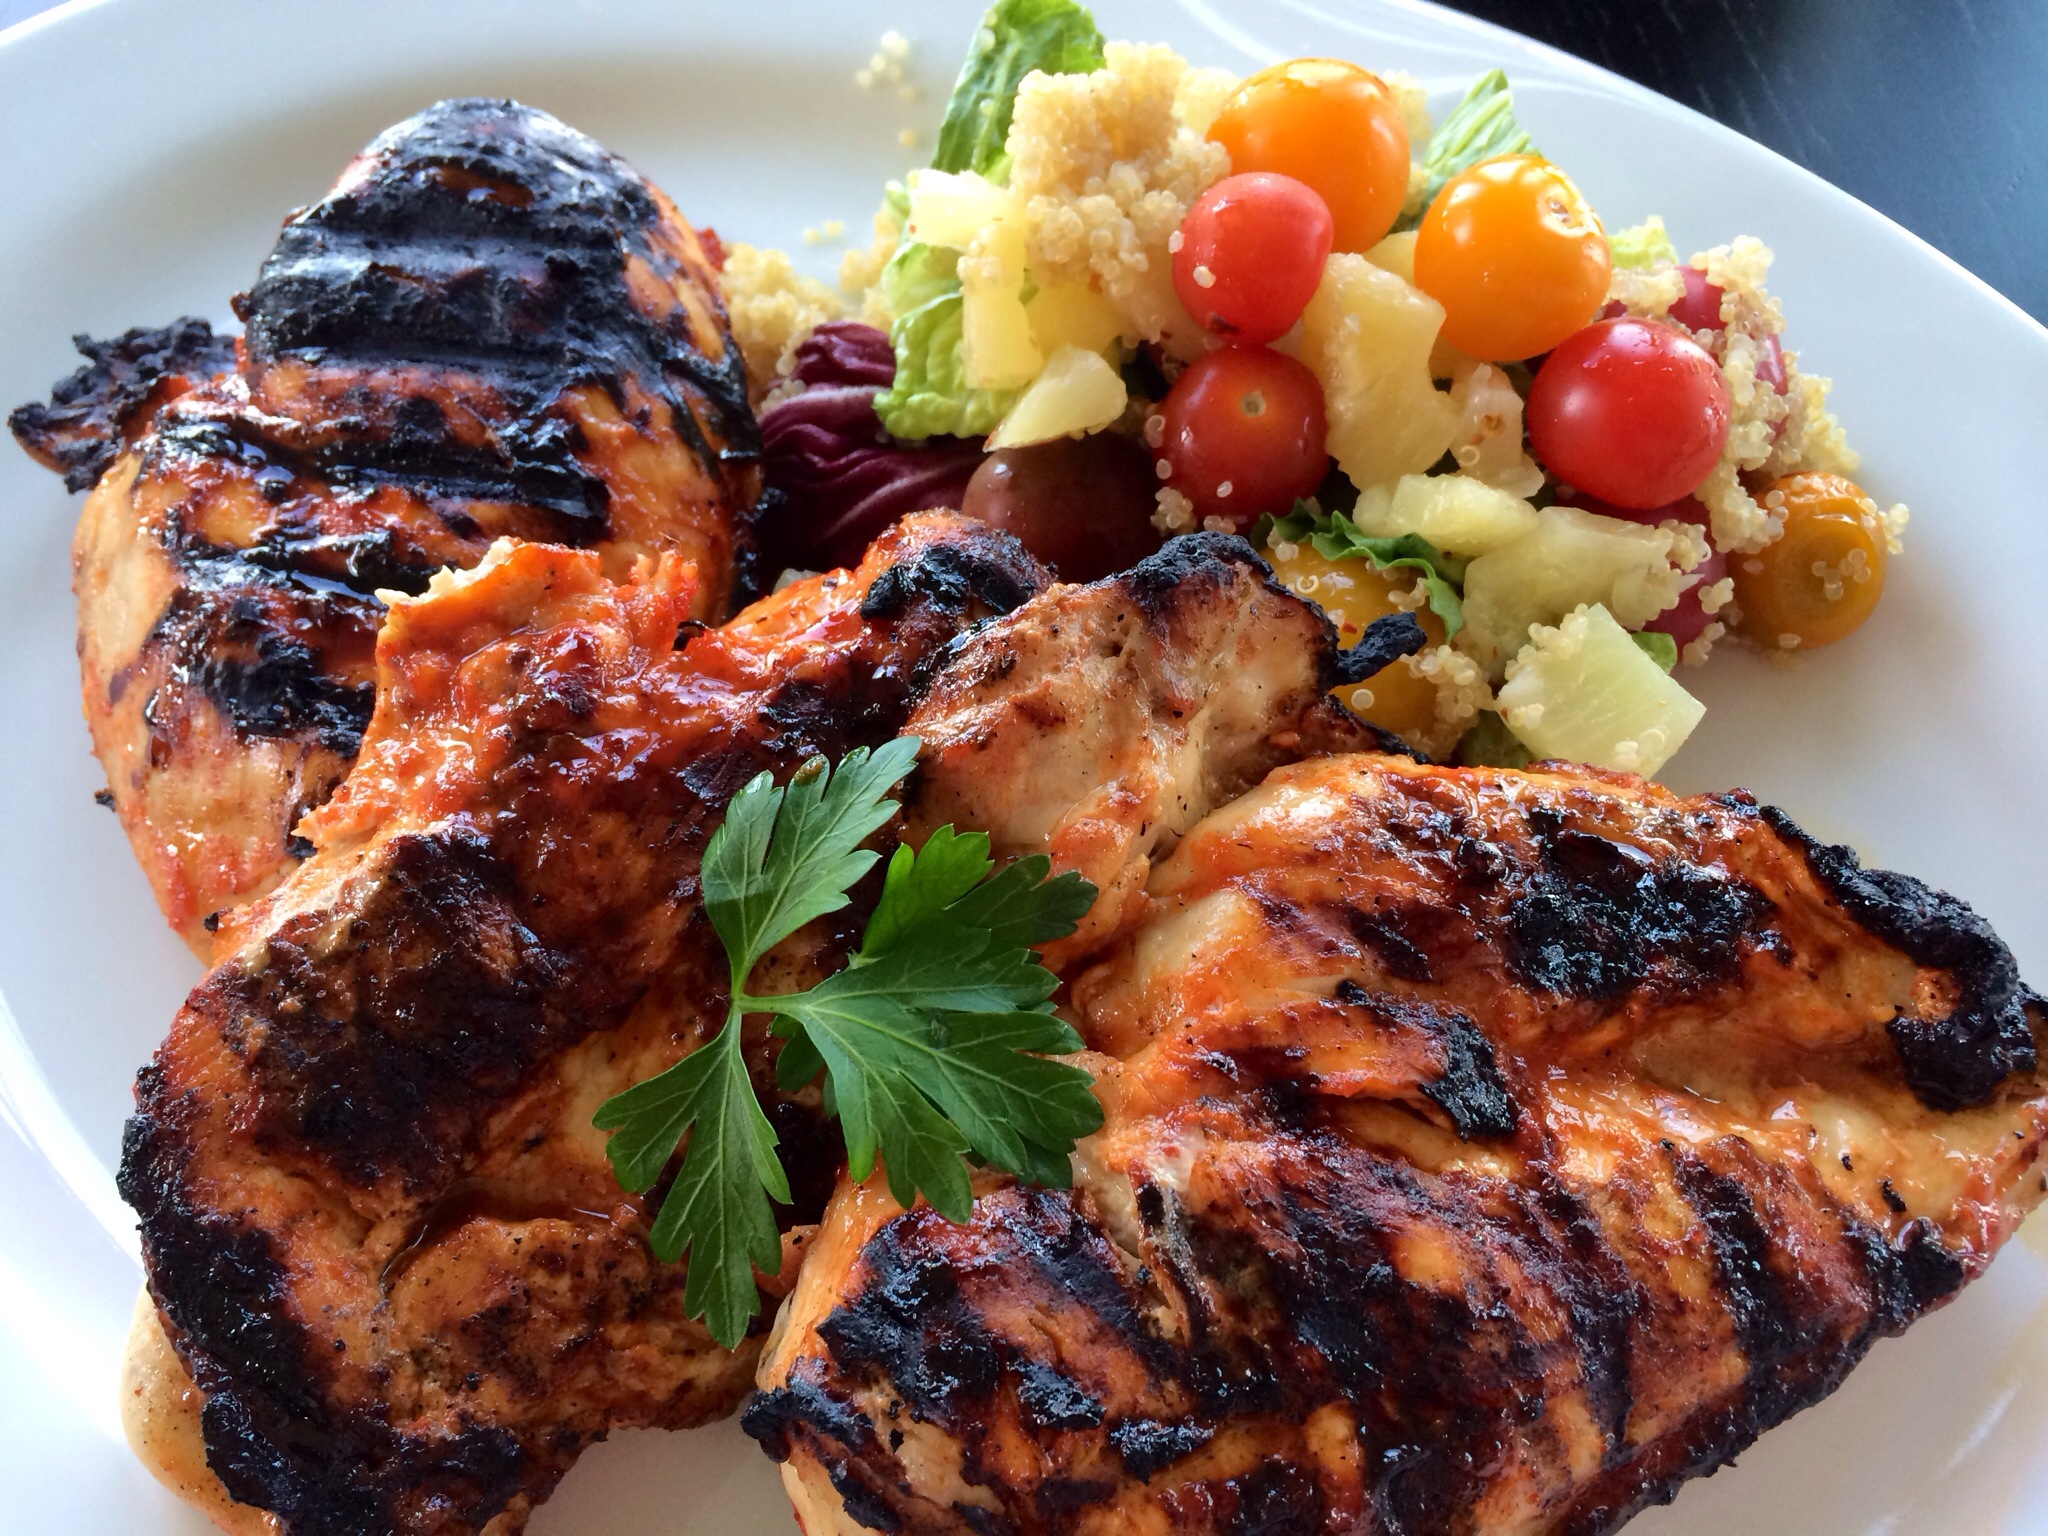
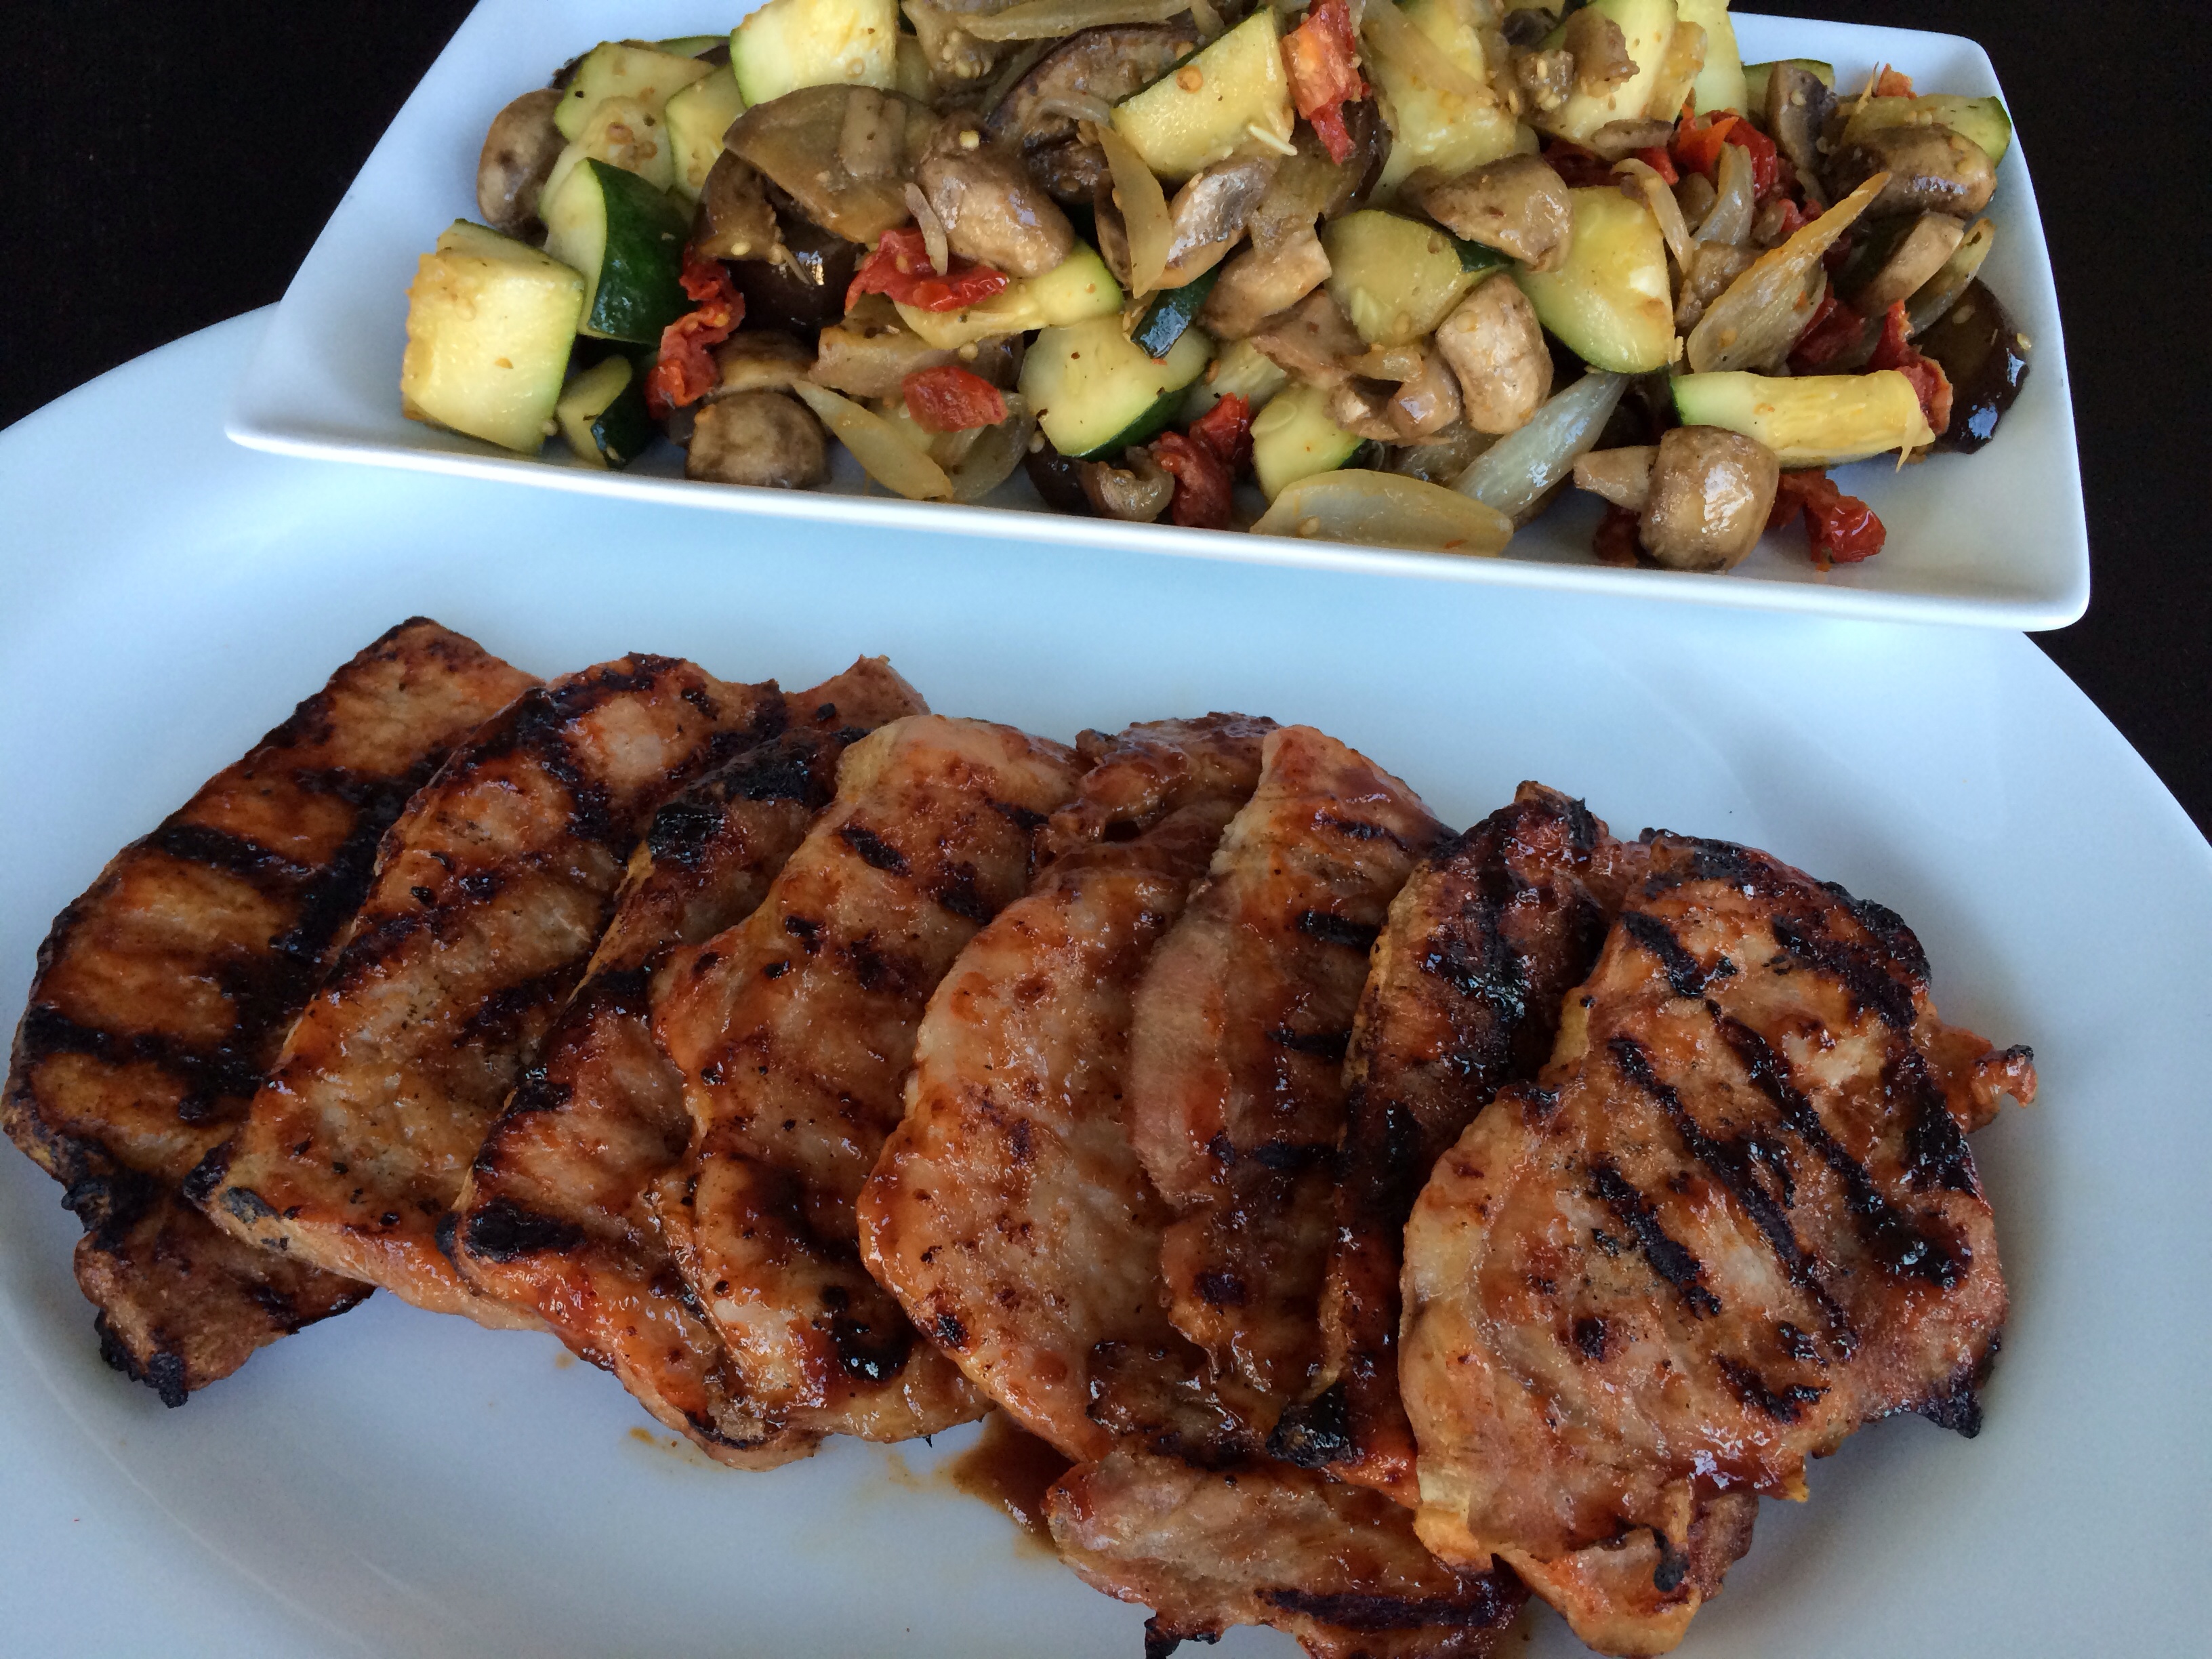
These chops certainly have a kick! I am loving a hint of Sriracha with pork!
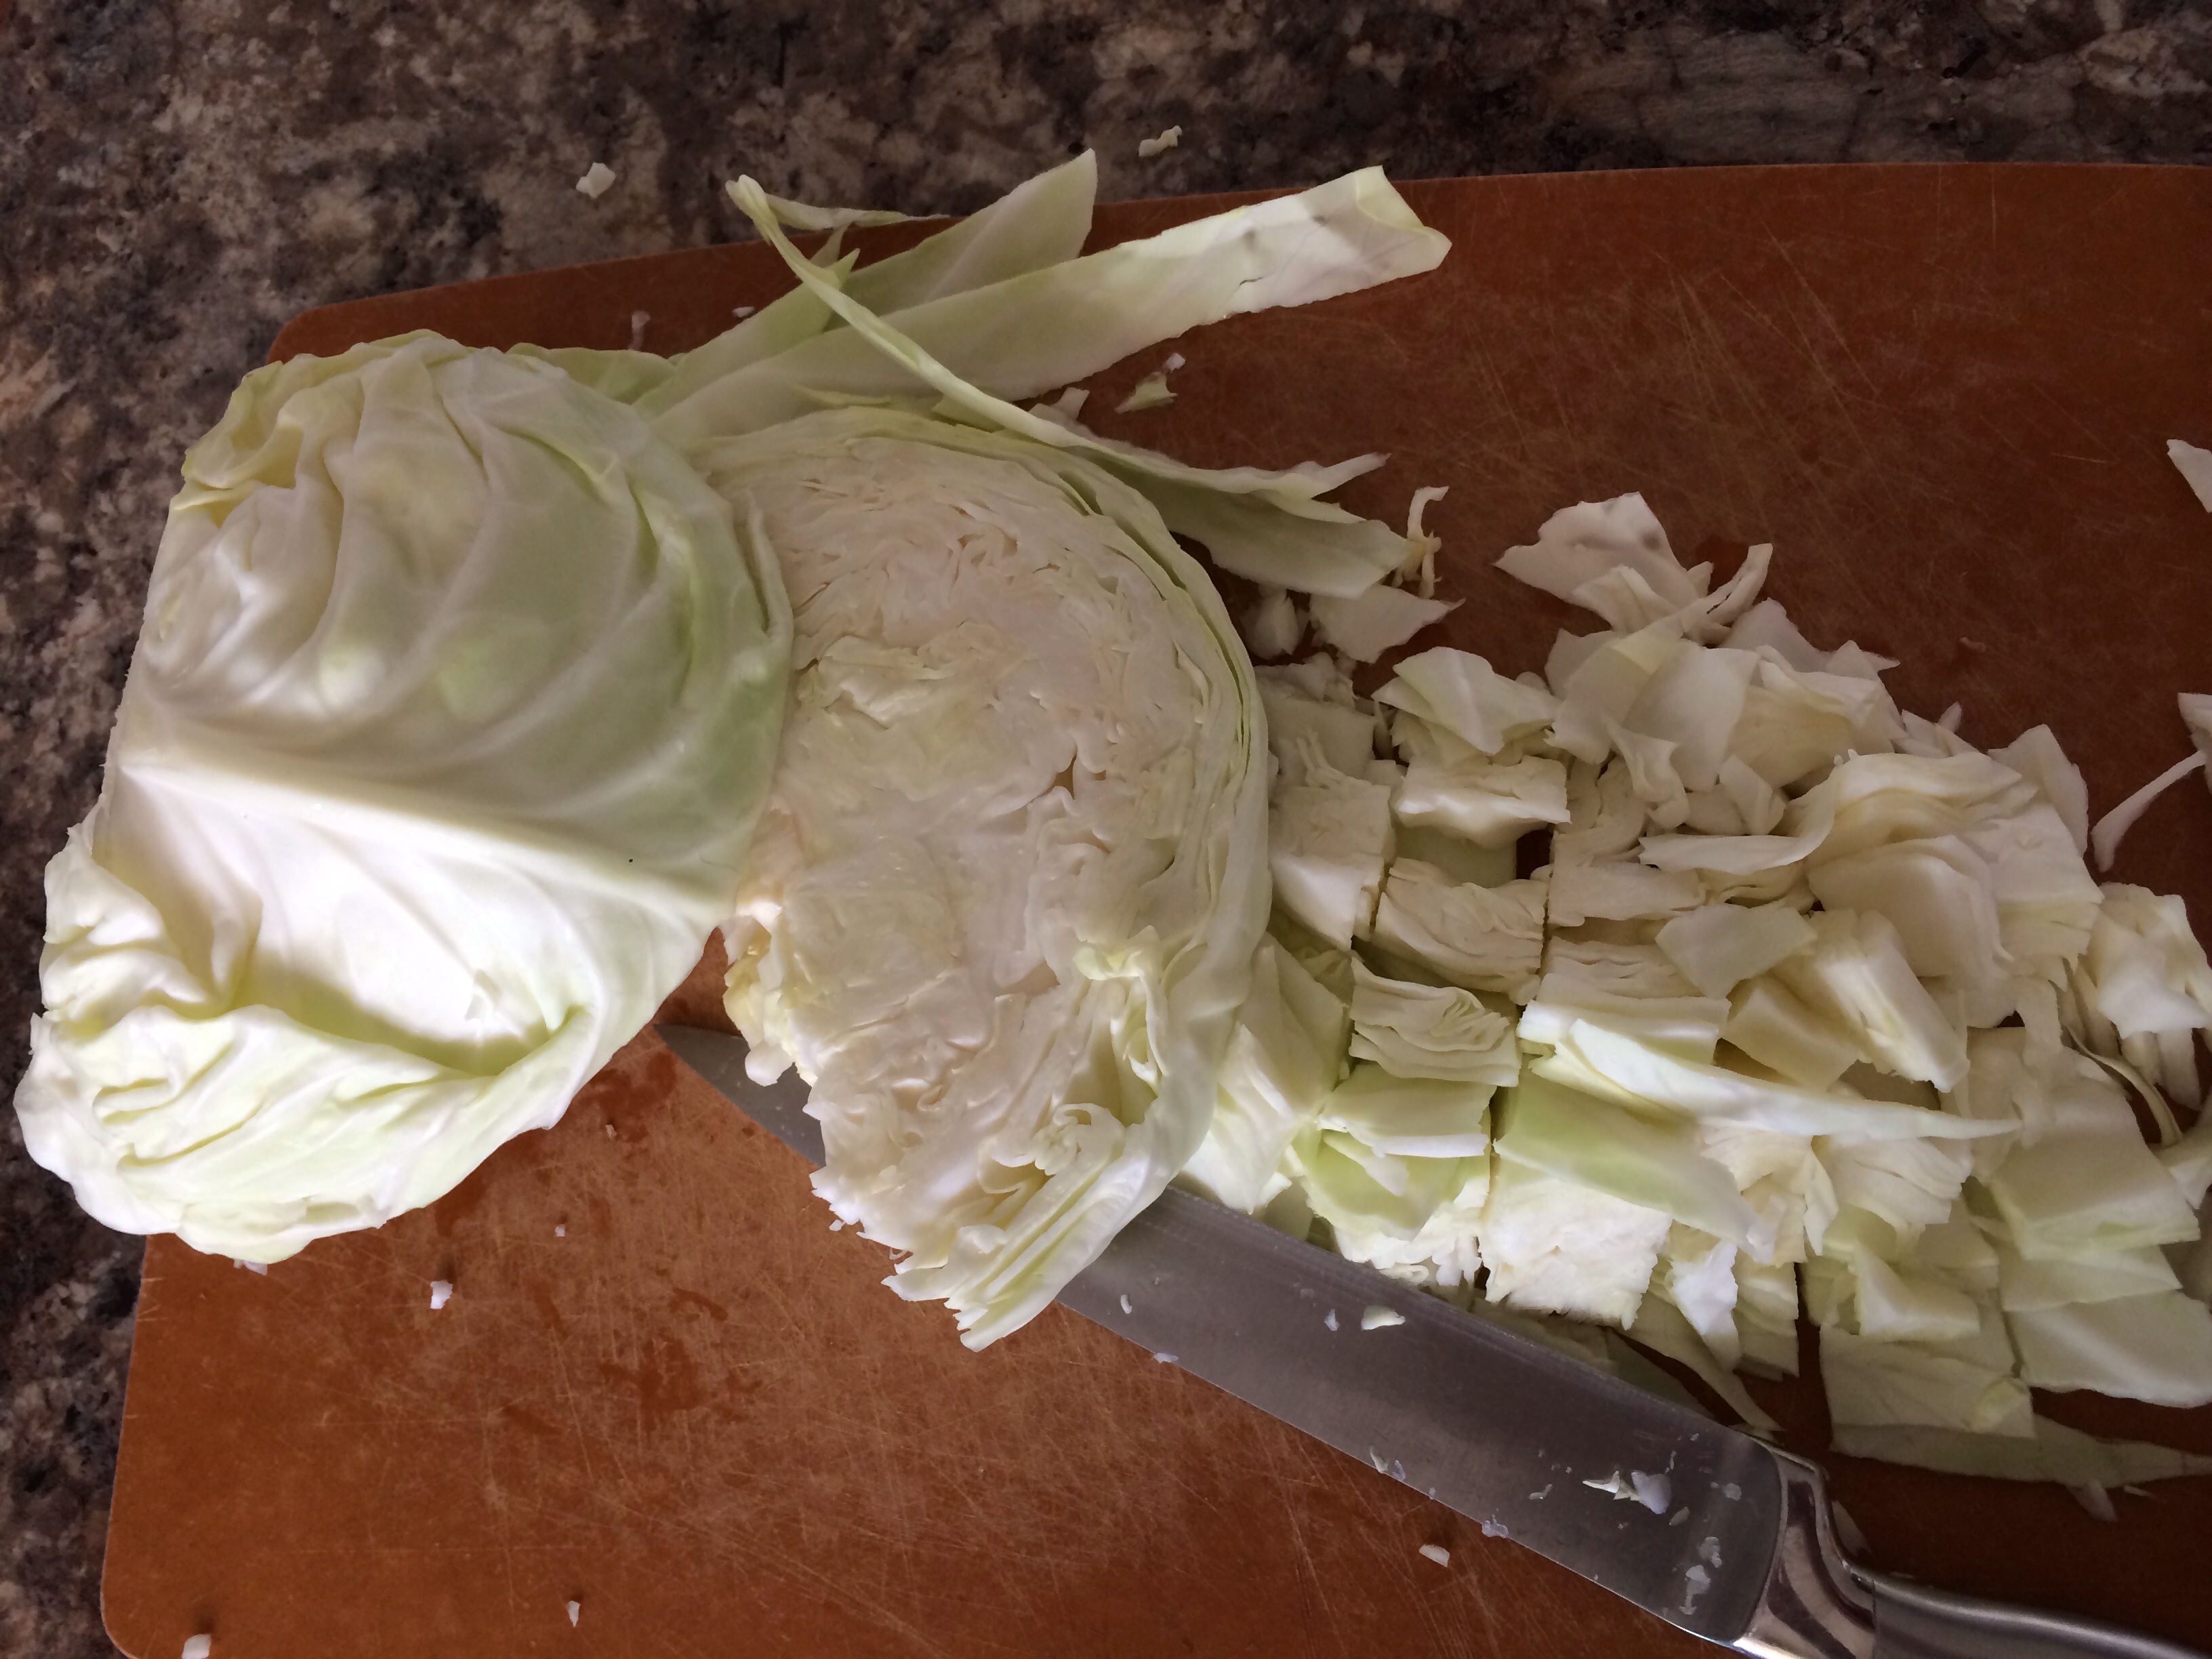
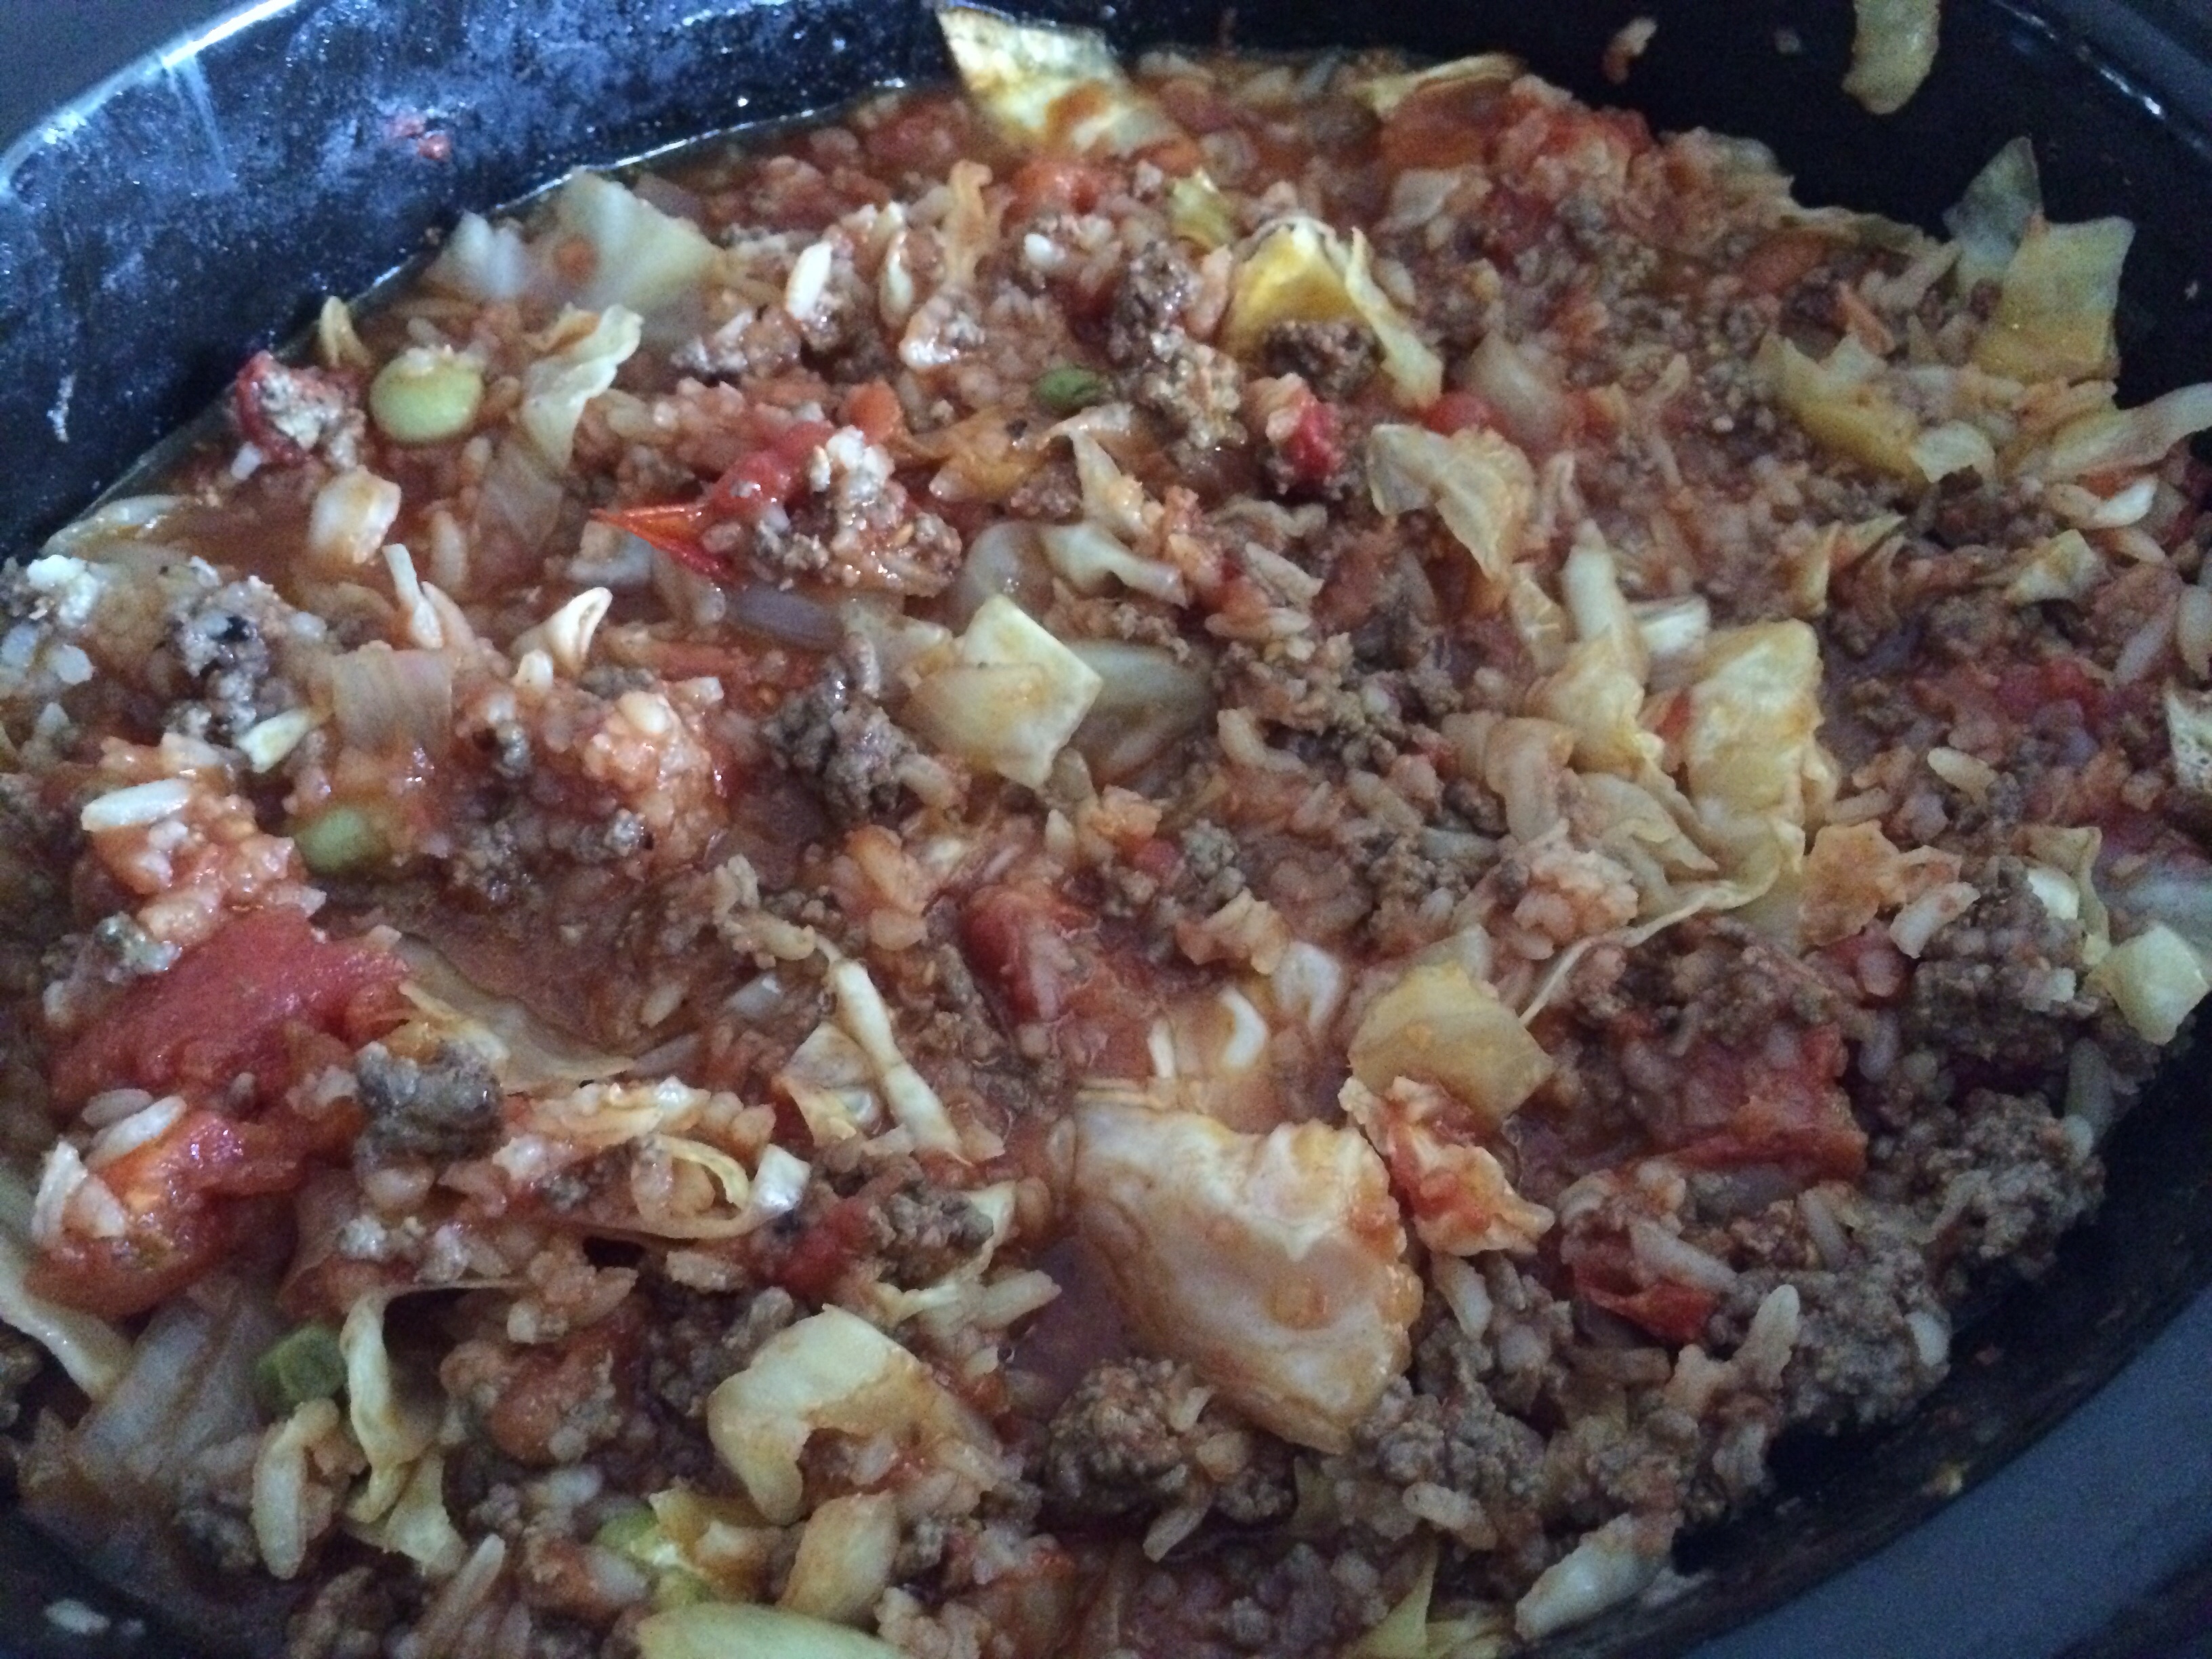
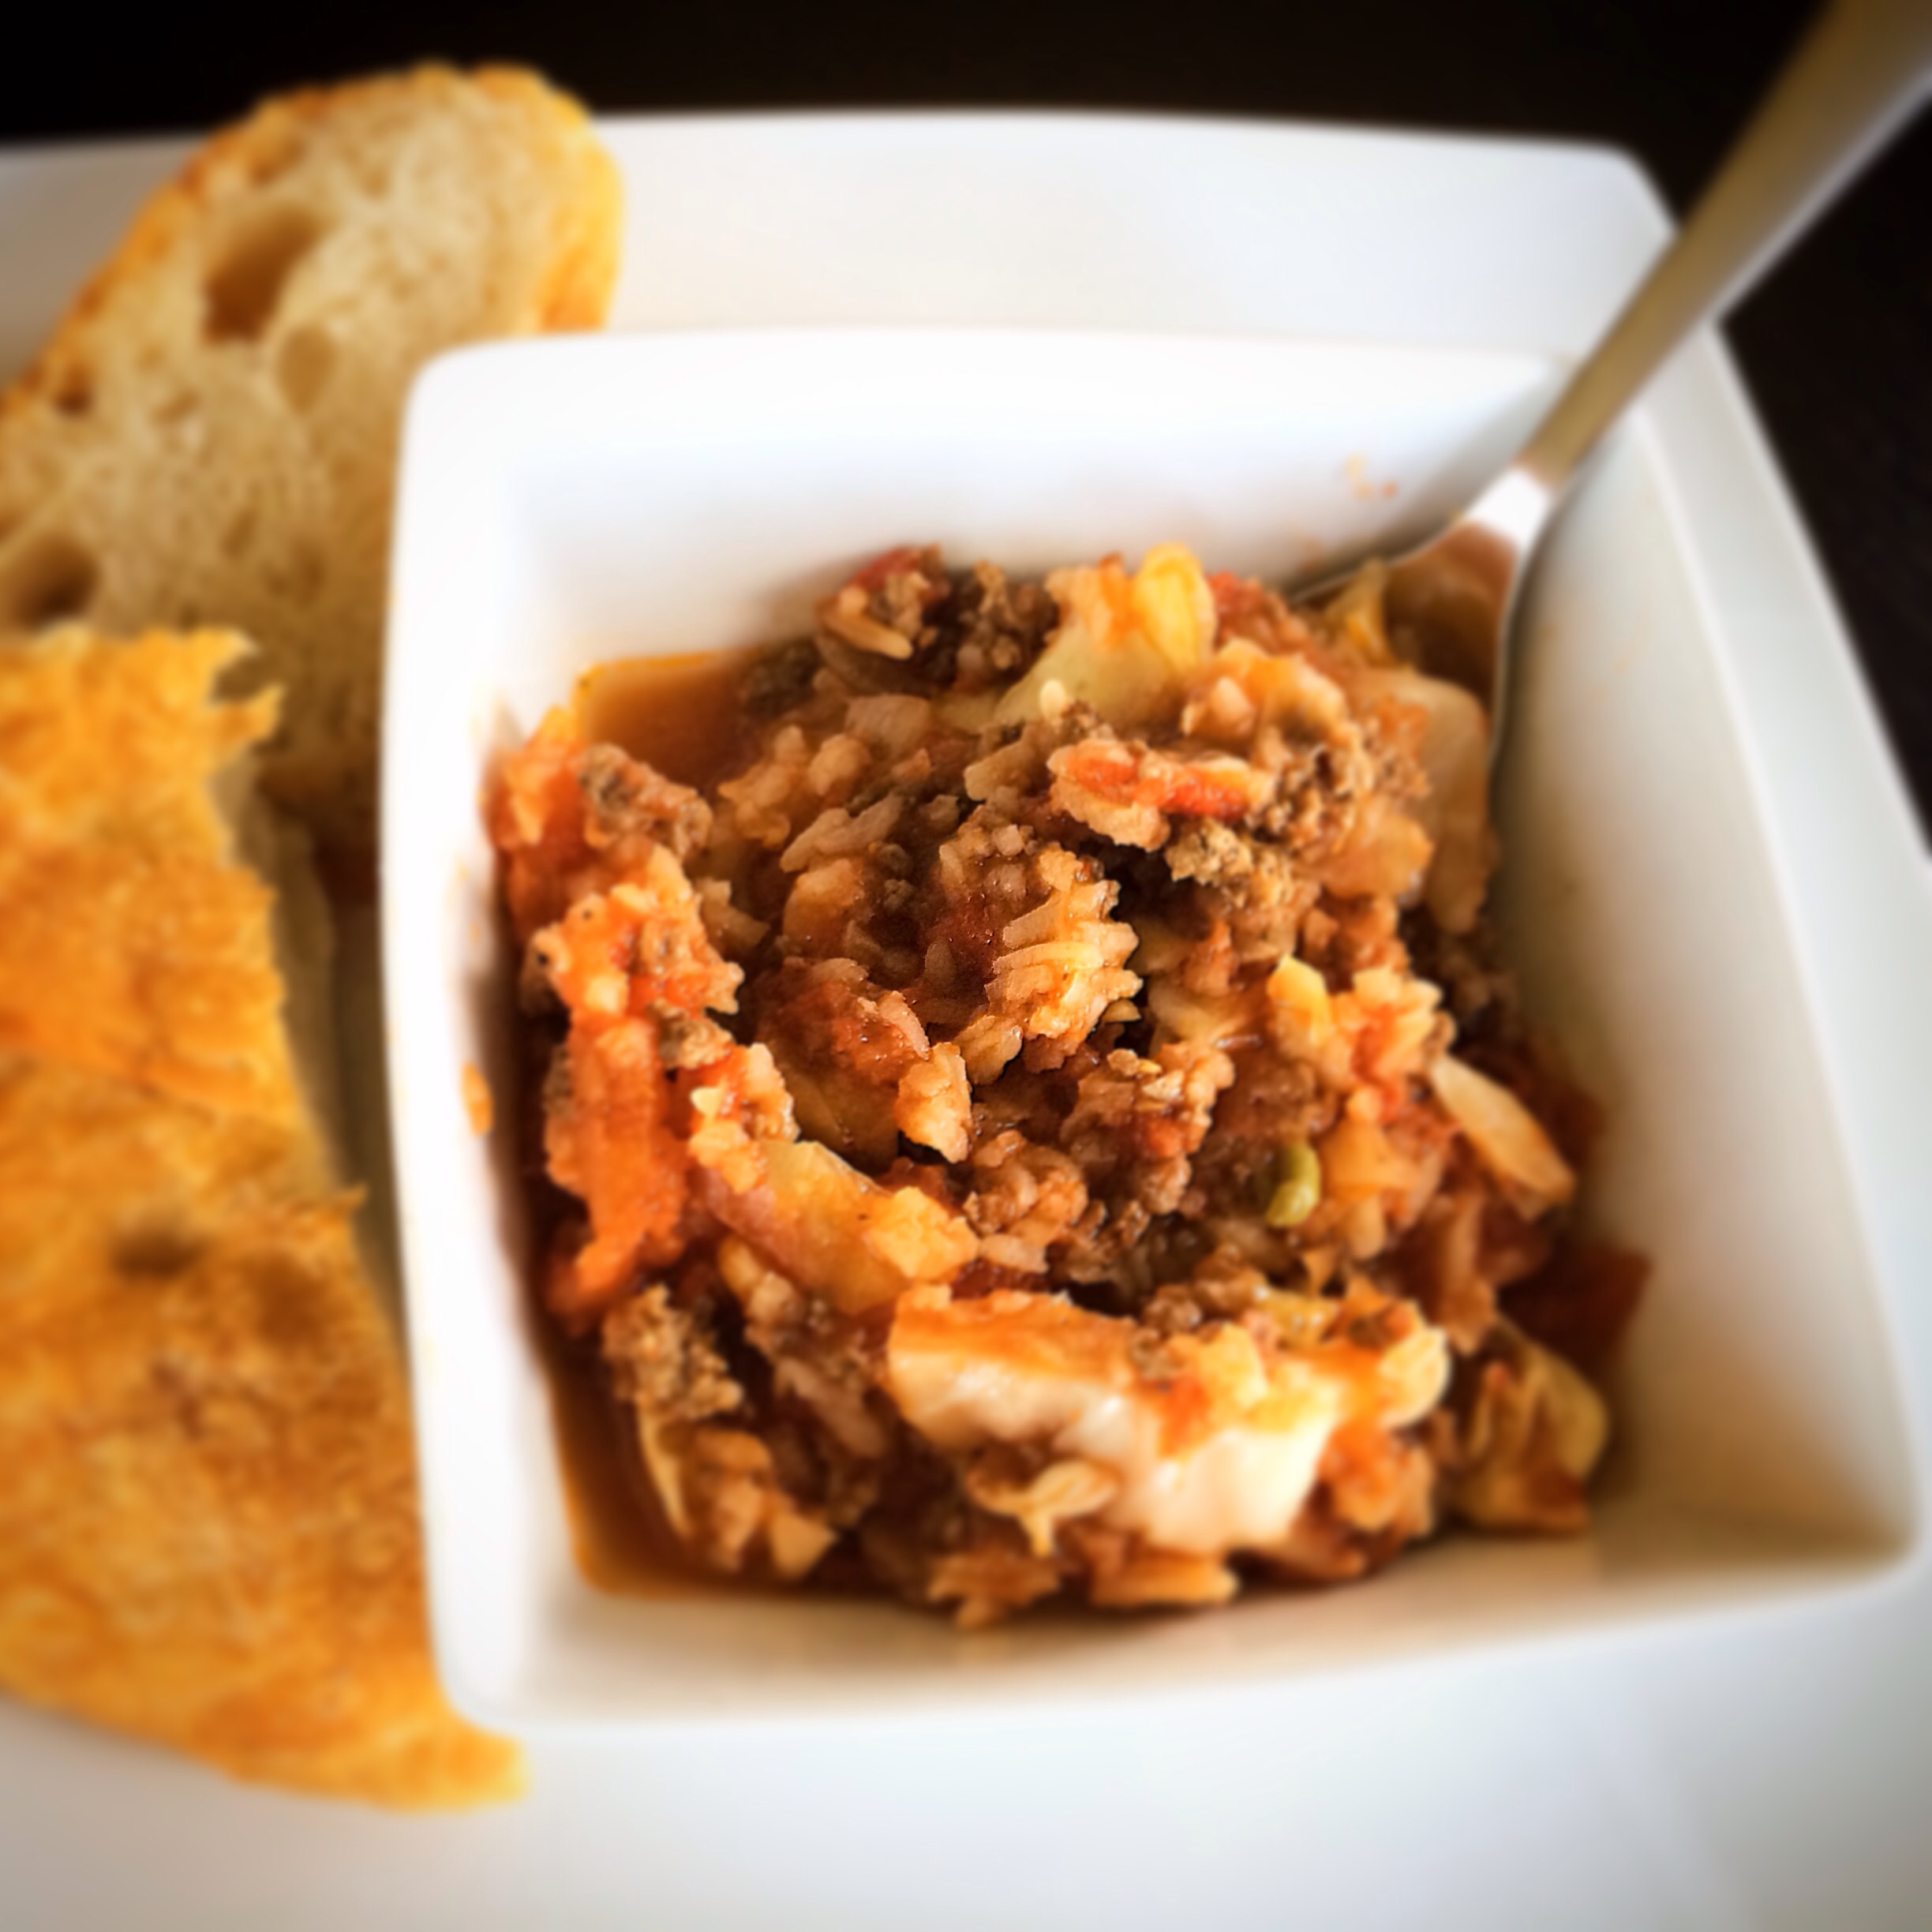
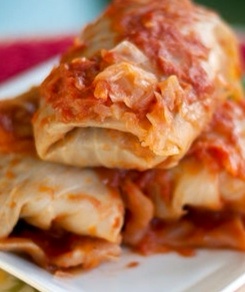
Stuffed cabbage rolls, Halupki or Pigs in the Blanket – for many Western Pennsylvanians- remind us of church festivals, fairs, neighbors from our childhood, and grandparents. I’m not going to lie, the little old Polish ladies make them the best! Halupki can easily be made as a soup, a casserole, or the traditional stuffed cabbage rolls! How much time do you have? With the same ingredients, you can make stuffed cabbage three ways! The only variable is the additon of whole tomatoes. Leave them out for the rolls!
Enjoy!
The cabbage rolls are the most work because of the cabbage leaf boiling step.
Stuffed Cabbage Ingredients:
1 head cabbage
1lb. lean ground beef and/or ground pork mix
1/2 cup uncooked rice
1 28oz. can tomato sauce (keep 1 cup for a sauce for the casserole and the rolls)
1 35oz. can whole tomatoes (except for the rolls)
1 small onion, finely chopped
1/2 cup sauerkraut and extra 1/2 cup shredded cabbage (kept aside for casserole)
Salt/pepper
Directions: For Soup:
Shred or chop with a knife. I draw blood every time I use my box grater.
Shred cabbage and throw all ingredients in the crockpot!
Cook 8 hours on high!
The Stuffed Cabbage Soup is amazing and takes no time to prep! Let it cook all day! No babysitting required!
For casserole:
Preheat oven to 350 degrees.
Cook rice according to the package.
Brown beef and/or pork in a pan with the onions.
Mix sauerkraut, and cabbage together in a bowl.
Mix tomato sauce and tomatoes in a bowl.
In a 9×13 pan-“lasagna style” -layer ingredients, starting with tomato sauce.
Cover sauce with shreded cabbage mixture, a layer of meat and top with tomato sauce, salt and pepper. Repeat layers until pan is 3/4 full. End with 1/2 cup cabbage on top.(2-3 times)
Cover with foil and bake for 45 minutes.
Serve with a spoon or a fork! The casserole can go either way! Don’t add too much tomato sauce. Remember, you can and should serve the stuffed cabbage casserole with sauce on the side!
For cabbage rolls:
Preheat oven to 350 degrees.
Boil 12-15 cabbage leaves until wilted and softened.
When cool, cut leafy sides from hard stem .
Cook rice according to the package.
Brown beef and/or pork in a pan with the onions.
Mix sauerkraut, and cabbage together in a bowl.
Line a 9X13 baking dish with tomto sauce, 1/2 cup shredded cabbage and 1/2 cup sauerkraut.
Set up an assembly line and spoon rice meat mixtures on leaf.
Salt and pepper.
Roll away from you, fold over the right side, then the left, creating an envelope roll.
Line them in the pan and top with tomato mixture.
Salt and pepper again.
Cover with foil and bake 45 minutes-1 hour or until sauce is bubbling and rolls are cooked through.
I always serve stuffed cabbage dinners with fresh grated Parmesan and a beautiful loaf of ciabatta. I don’t think that’s Polish ; )
Here we go. A chill is in the air for the start of football season. Friends and family gather to watch football and your menu is in the game!
Here We Go! Image by Rant Sports
Play good defense and block those polyunsaturated fats, hydrogenated oils, and hefty calories! Football food does not have to be unhealthy!
Football Favorites Healthy Plays:
Snacks:
Vegetable tray– The crunch eases game time nerves! Tackle the dip. Lower calories by opting for a light avocado or bean based dip.
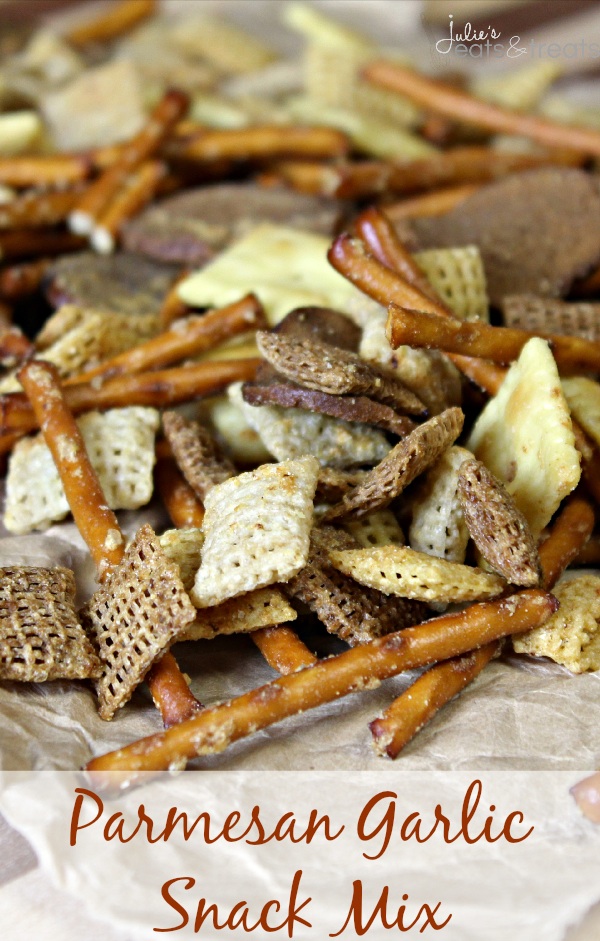
Warmed, flavored Chex Mix– instead of potato chips, run a healthier option. There are many flavor comninations! Garlic Parmesan Chex Mix via Julie’s eats and treats
Photo by Julie’s Eats and Treats
Fresh Guacamole or a hummus bean dip is always a touchdown. Serve with vegetables, tortilla chips, or cucumber chips! Fresh Guacamole By Parmesan Princess
The halftime lineup:
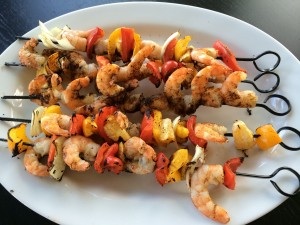
Instead of pizza, wings, french fries and fried chicken, how about pulled chicken/pork, grilled skewers, turkey burgers, and a big salad!
Organic, Gluten Free, Paleo, Vegetarian, Pesatarian…Ok, Ok, but does it taste good? The Nomad Cook says, “yes.” Traditional recipes meet modern health and wellness in the 1st healthy Venezuelan cookbook.
Healthy and delicious!
Like most Mediterranean cooking, the overuse of oils containing polyunsaturated fats and refined sugars, have been proven to cause chronic illnesses such as heart disease, coronary artery disease, and diabetes. The Nomad Cook’s “Healthy Venezuelan Cooking” suggests healthier alternative ingredients, without sacrificing the delicious traditional tastes.
The cumin, oregano, and garlic combination creates a mouthwatering aroma!
After being asked to review this new cookbook with Nicky D Cooks, food writer, cooking instructor, baker, and foodie friend of mine, we decided to make the same recipe two different ways. An excuse to eat, drink and be merry!
Nicky D Cooks (left) and I are fun, but very serious about our food!
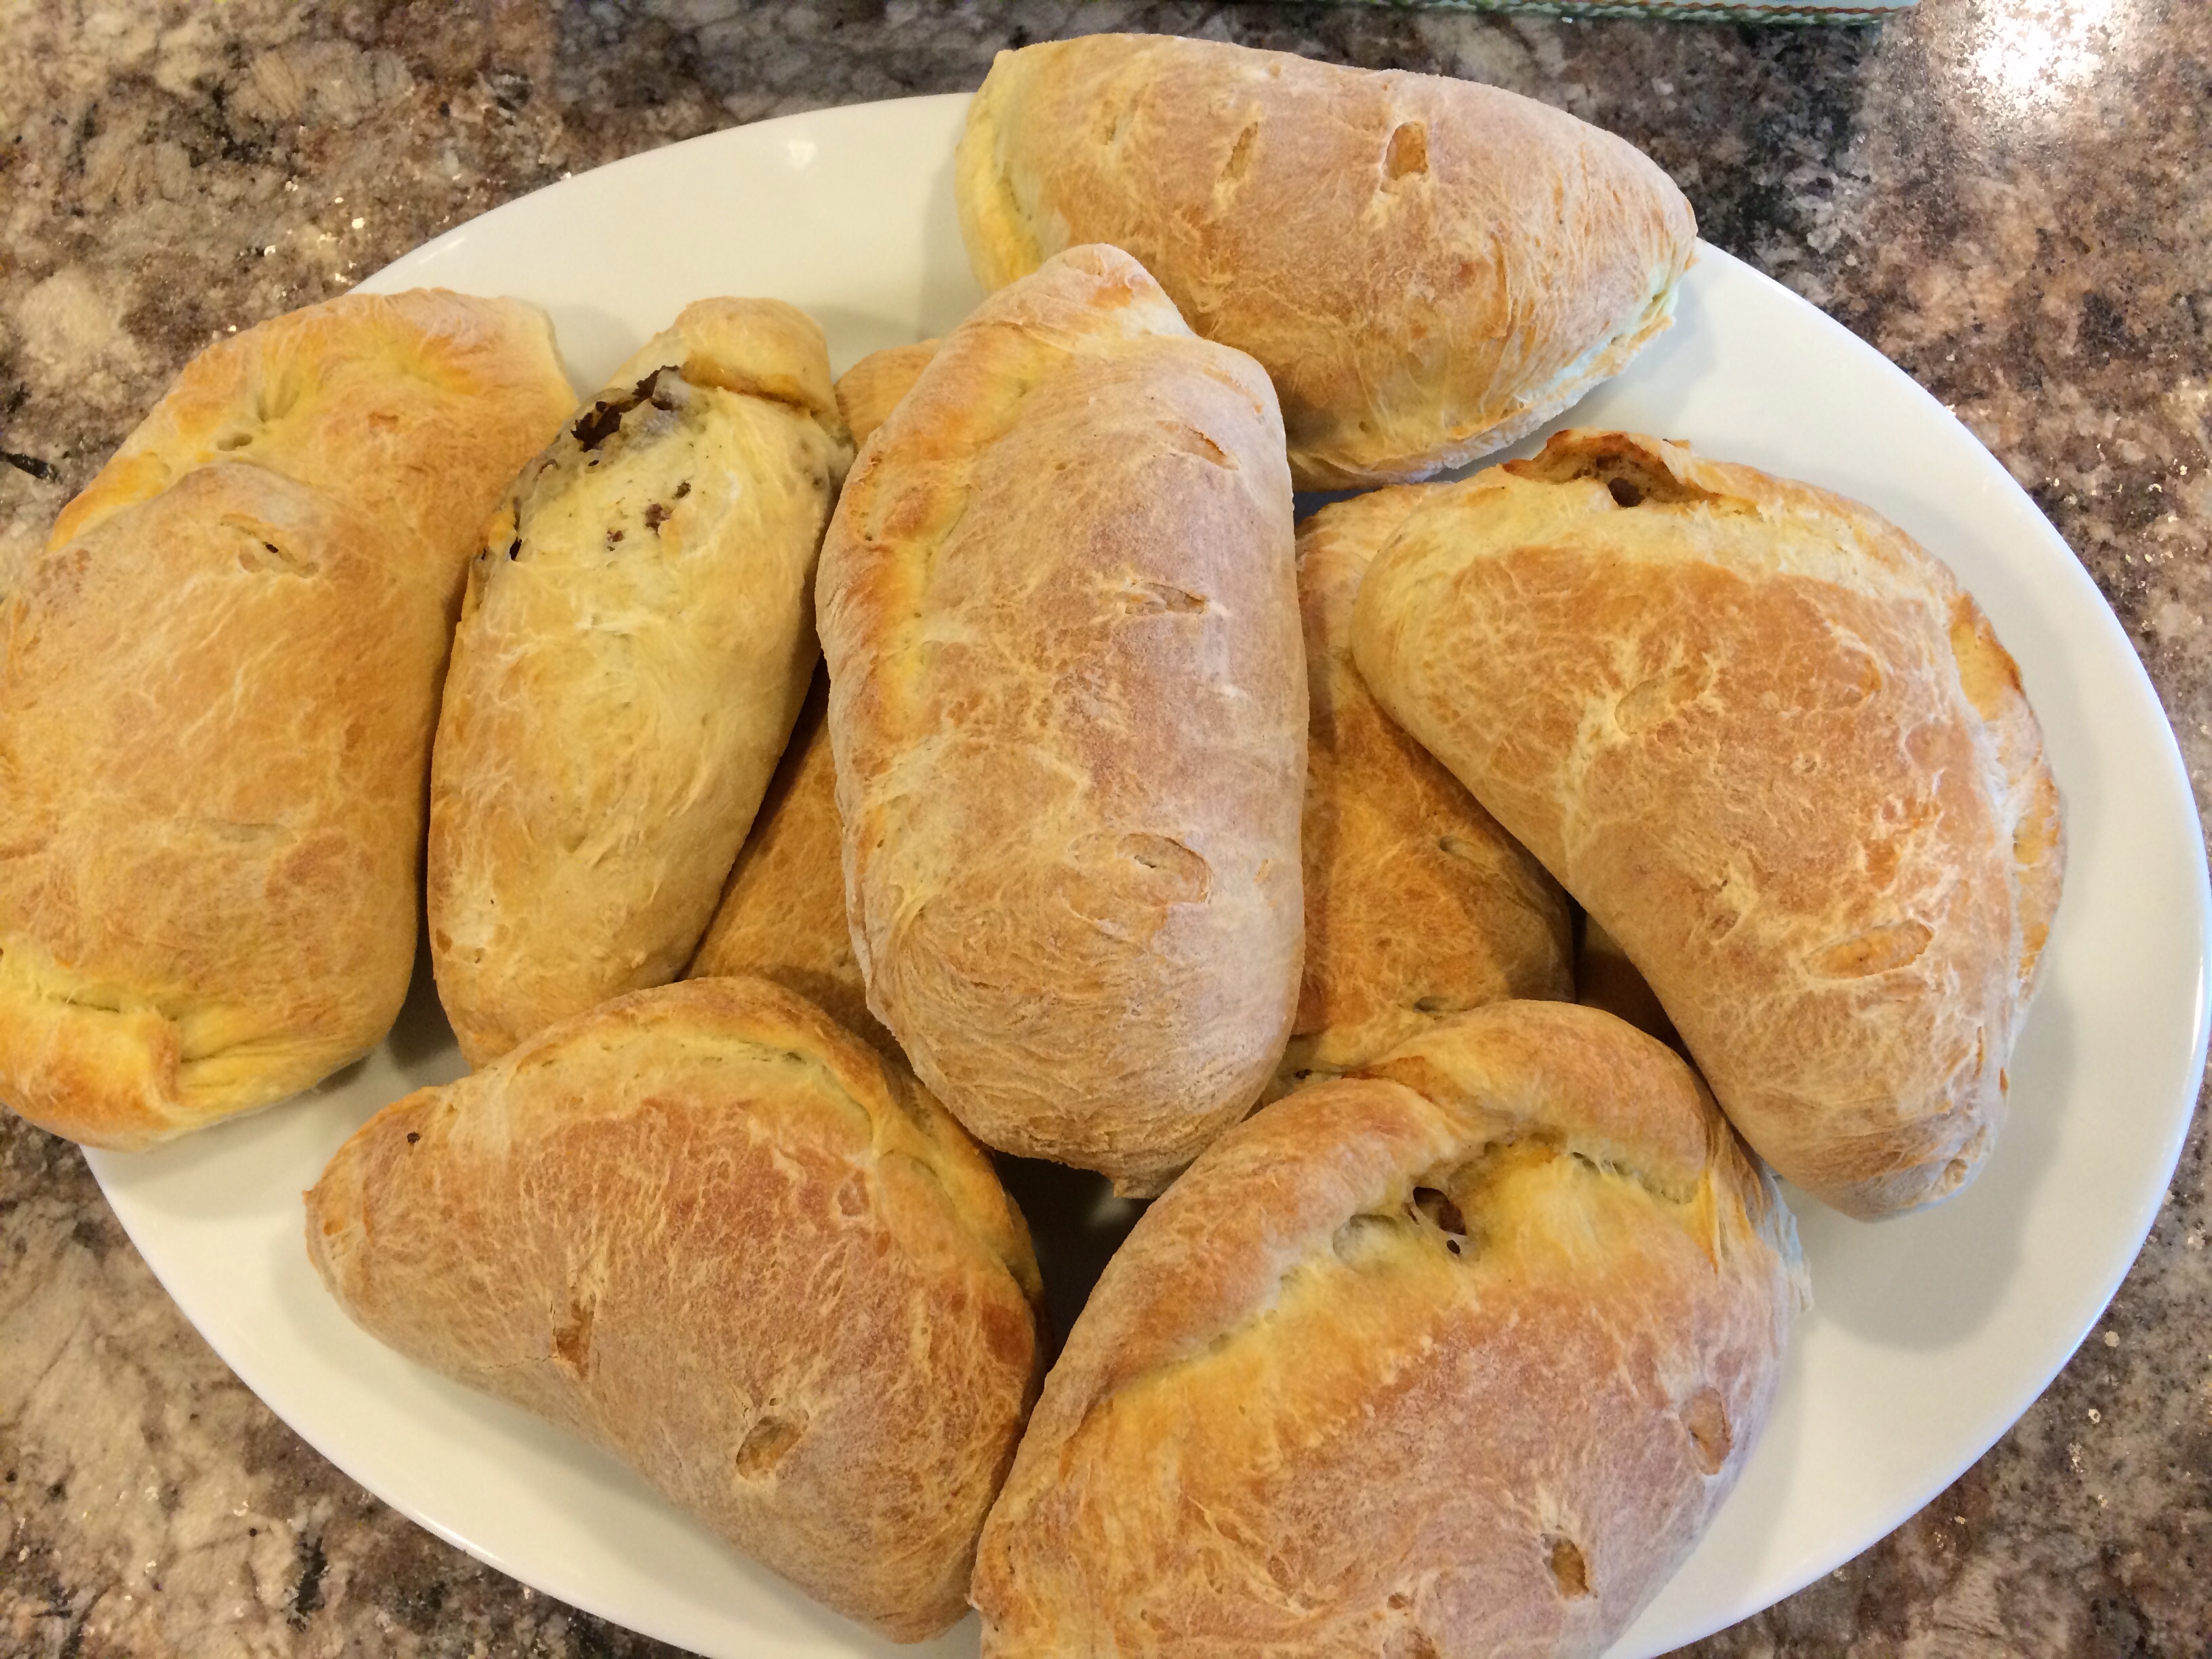
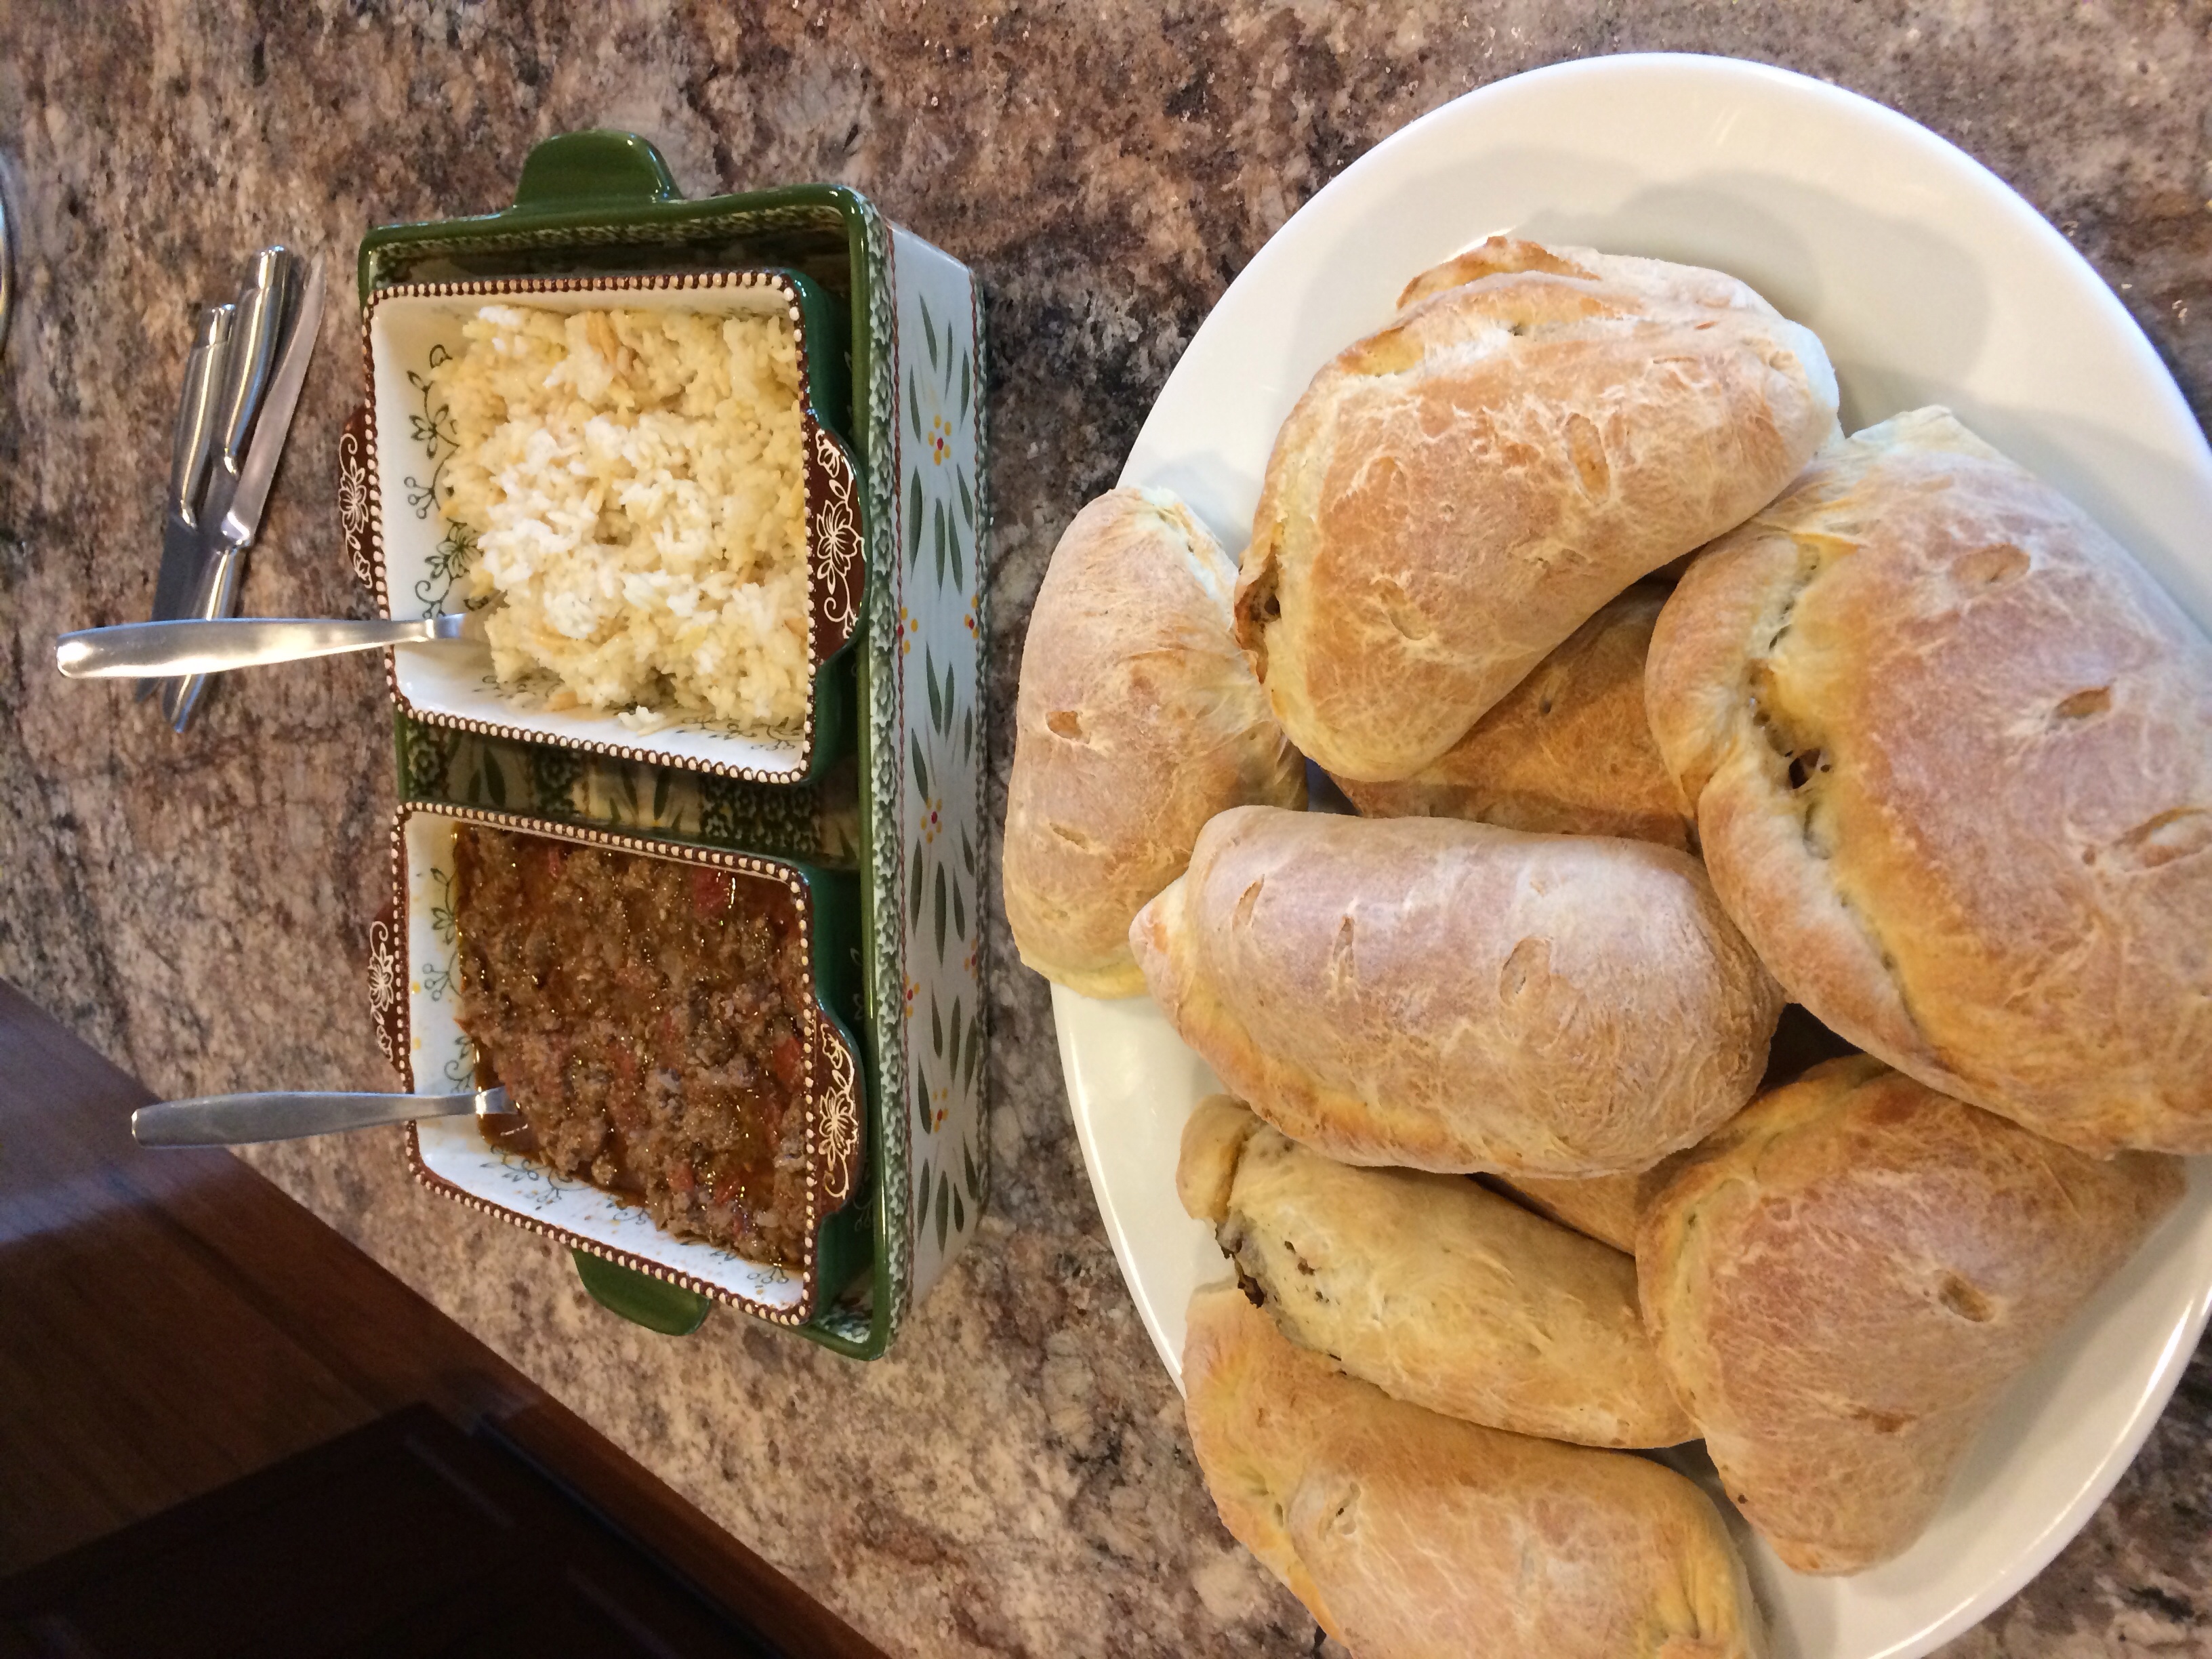
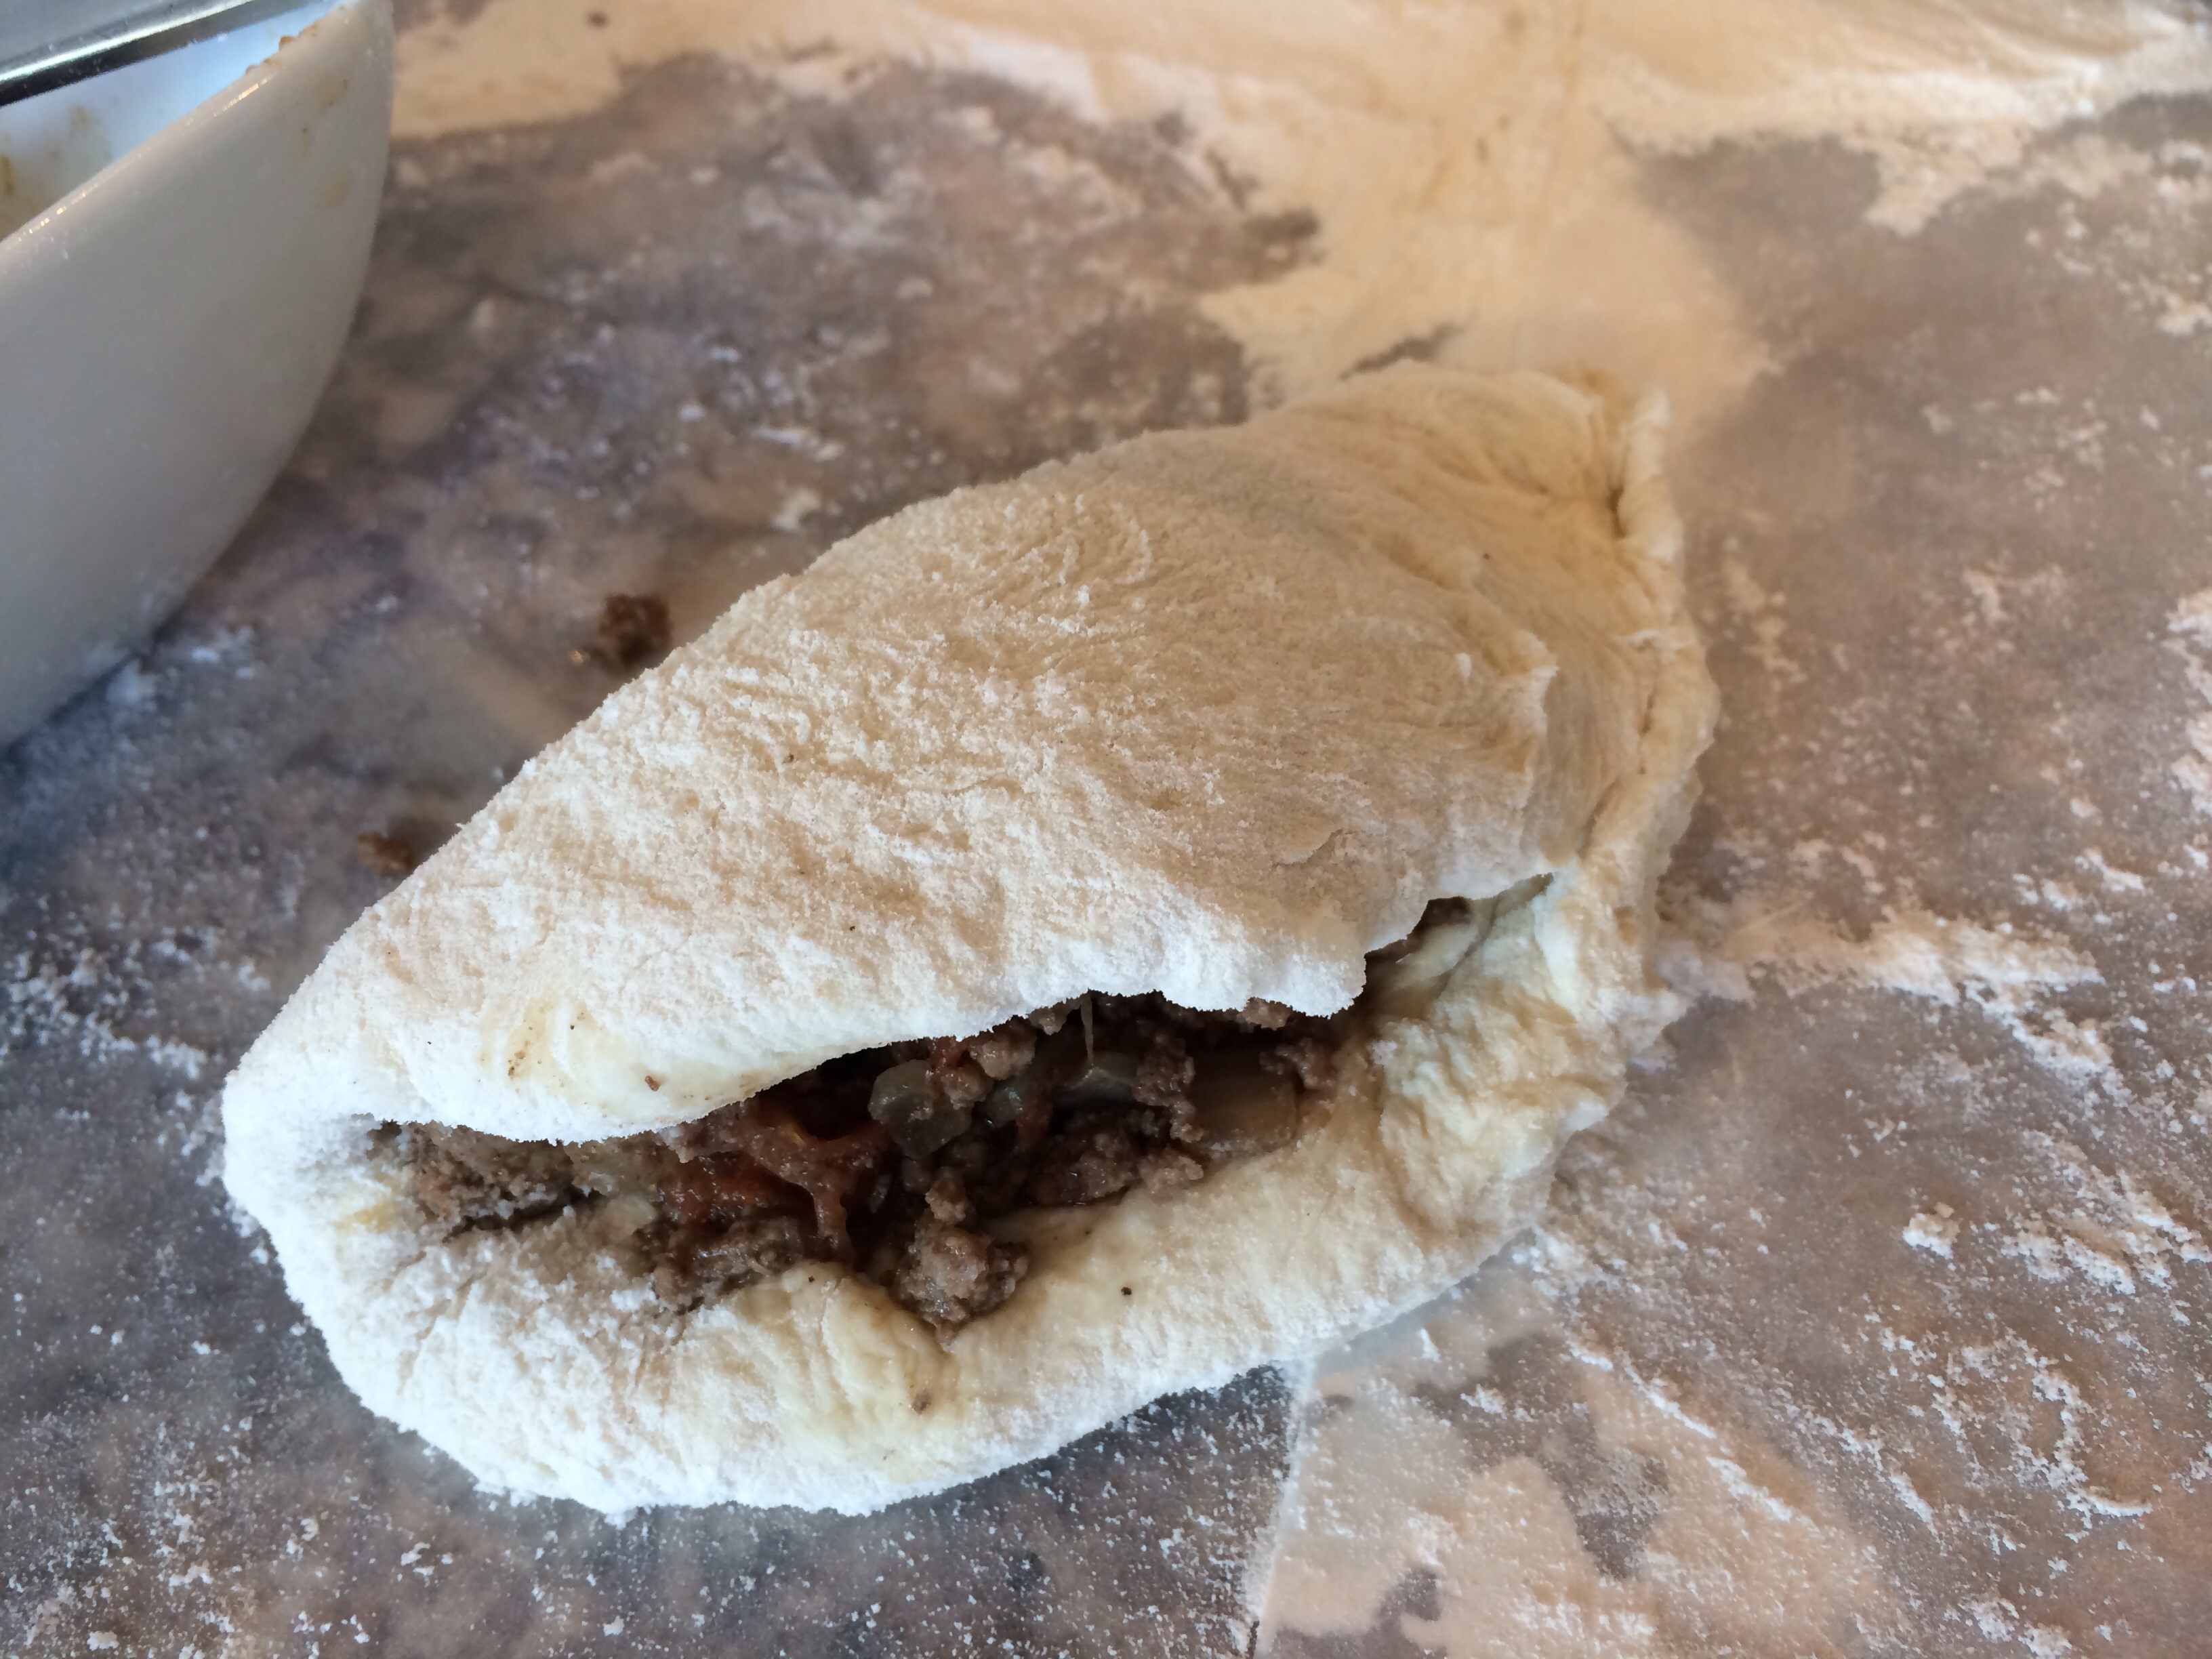
We chose The Nomad Cook’s ground beef and tomatoes recipe.
The Nomad Cook’s Beef and Tomatoes recipe two ways- in empanadas and over rice!
Like many recipes in “Healthy Venezuelan Cooking,” the ground beef and tomatoes recipe can be an empanada filling, served with arepas, or simply served over rice. Since I make Sicilian empanadas, I decided to use The Nomad Cook’s ground beef and tomatoes recipe as an empanada filling. Nicky D Cooks prepared the dish over a delicious rice pilaf.
Here is the recipe:
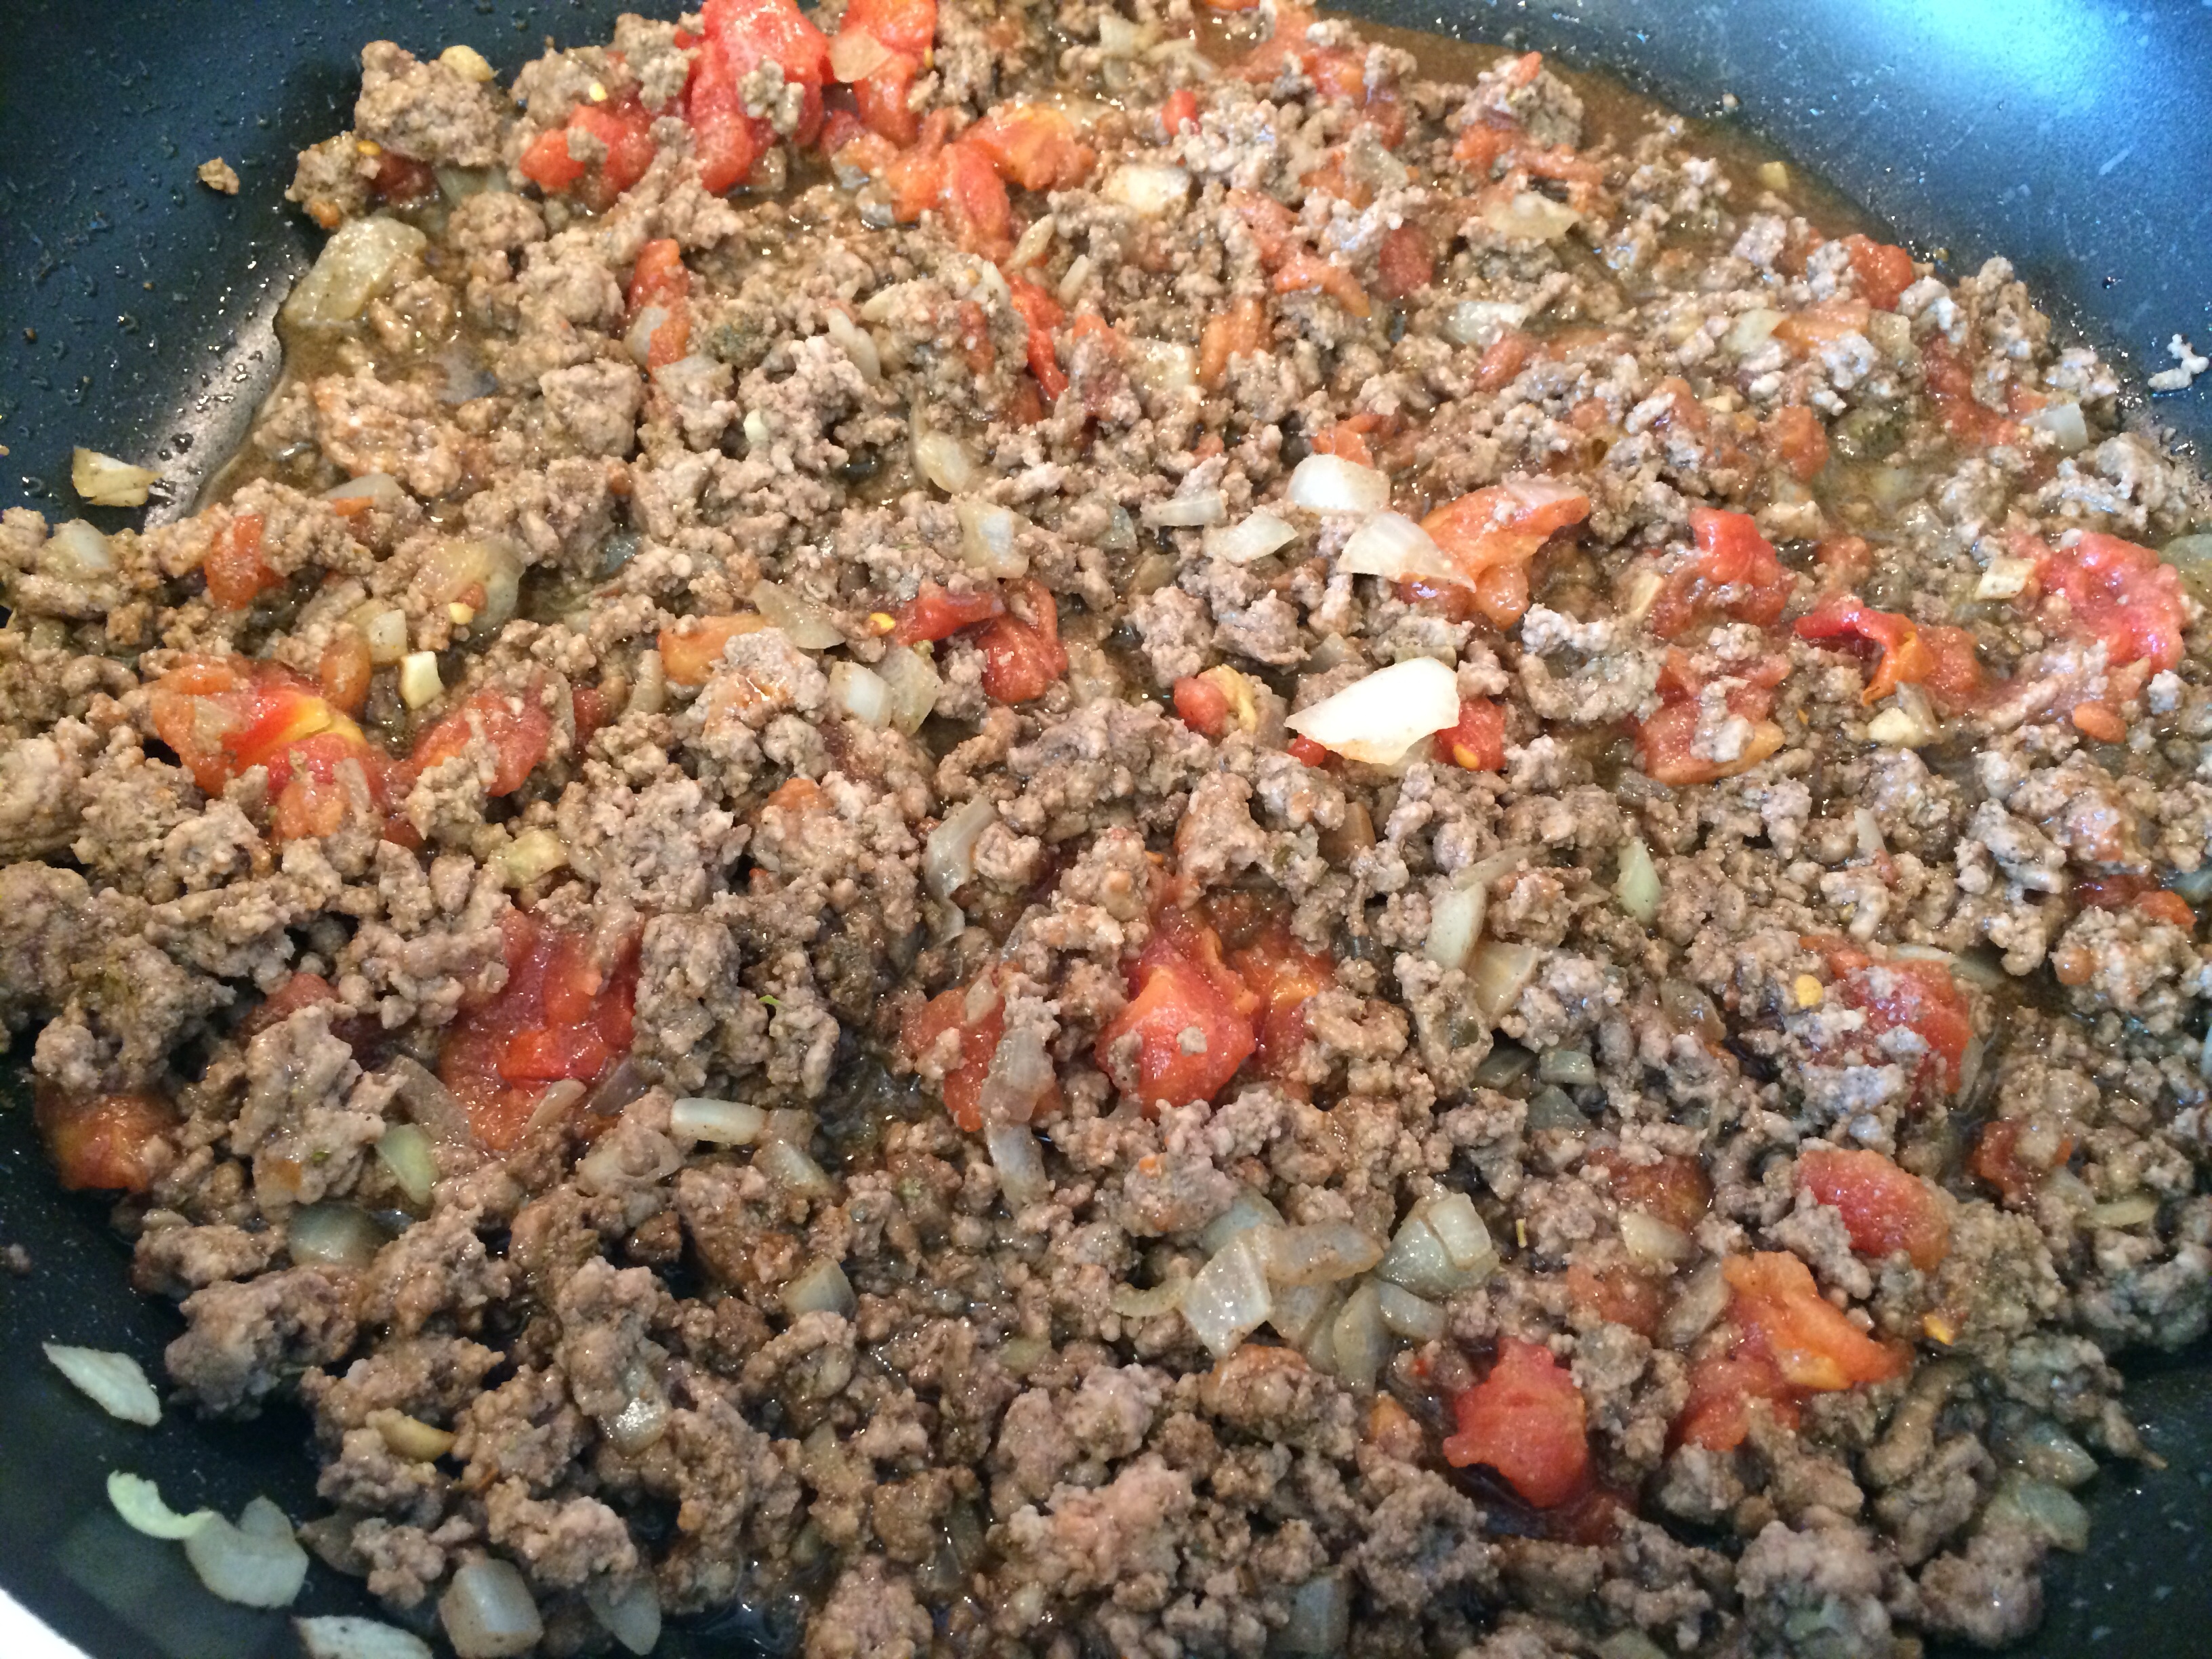
Ground Beef and Tomatoes
by The Nomad Cook from “Helathy Venezuelan Cooking”
The Nomad Cook’s notes:
“This recipe is a Latin version of the Italian Bolognese sauce. It is used as a filling for arepas, empanadas, and as a main course with rice. The empanada filling should be on the dry side to avoid the empanada from breaking apart while being cooked.”
Directions:
Rinse the ground beef with water in a colander before cooking. Beef will lose somew of its color, turning pinkish. Heat olive oil over medium heat, add the onion and garlic and cook until soft, about 5 minutes.
Lightly brown the ground beef with the onion for 10 min. Add Worcestershire sauce, cumin, salt, and oregano. Stir to combine and add the tomato, beef broth and tobasco. Stir and simmer on medium-high heat until sauce thickens, about 15 more minutes.
Here is my empanada recipe! I did not use the rosemary for these empanadas. A basic pizza/Stromboli dough.
http://www.parmesanprincess.com/2014/03/25/my-nunis-sicilian-empanadas-broccoli-pies-a-quick-and-easy-rosemary-pizza-dough-with-a-broccoli-filling/
Notes from the cooks!
-I used 93/7 ground beef and Nicky used an organic ground beef that was 80/20. Her beef and tomatoes contained more liquid that could easily be strained with a slotted spoon.
– I doubled the recipe but less than doubled the beef broth. I was scared of a runny empanada filling. Nicky quadrupled the recipe with no differences in taste.
The liquid cooked off and left a beautiful empanada filling. Just fold dough over and pinch and tuck to seal!
– I used fresh oregano and she used dried. We saw no difference.
The Final taste!
Both recipes were delicious! I would say the majority of the taste testers liked the beef and tomatoes in the empanadas more than over rice.
You can easily add a spicy kick to this recipe by adding more tabasco or Sriracha. (My husband dipped his empanadas in a mound of Sriracha – we are a spicy family!)
I stopped myself from adding shredded cheese!! Oooh this would be so good! Next time!
If you like healthy, delicious, authentic recipes grab this cookbook! Thank you to the Nomad Cook for your contribution to the food world. Your concern for the healthy while keep the delicious is contagious! “Healthy Venezuelan Cooking” is wonderful! Congrats!
Enjoy!
Ciao!
The Nomad Cook’s “Healthy Venezuelan Cooking” is available on Amazon!
http://www.amazon.com/gp/aw/d/1500441317/ref=mp_s_a_1_5?qid=1409766303&sr=8-5&pi=AC_SX110_SY165_QL70
Another quick back to school meal is a 20 minute pan sauce! Throw in some veggies and superfoods and you have a healthy, easy dinner!
We enjoy superfood kale in a pan sauce, on our pizza, and even baked into kale chips!
Kale chip recipe:
http://www.parmesanprincess.com/2014/04/10/super-chips-garlic-parmesan-baked-kale-chips/
My kids love to pick out pastas when we are at the store. One of their favorites is orecchiette, Italian meaning ears, or spaceships, or planets, so they say.
The names the kids come up with are so funny! Big springs, little springs, little seashells, tubes, strings!
When kids get involved in the dinner process, they are more likely to eat the meal, even if it is full of healthy vegetables!
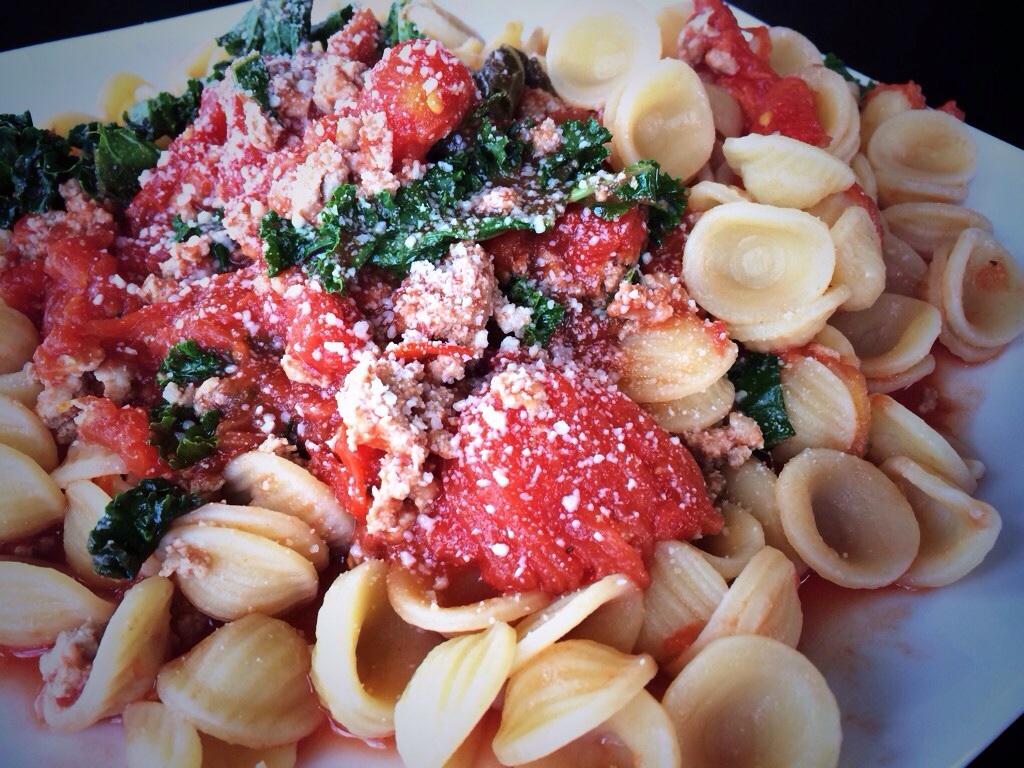
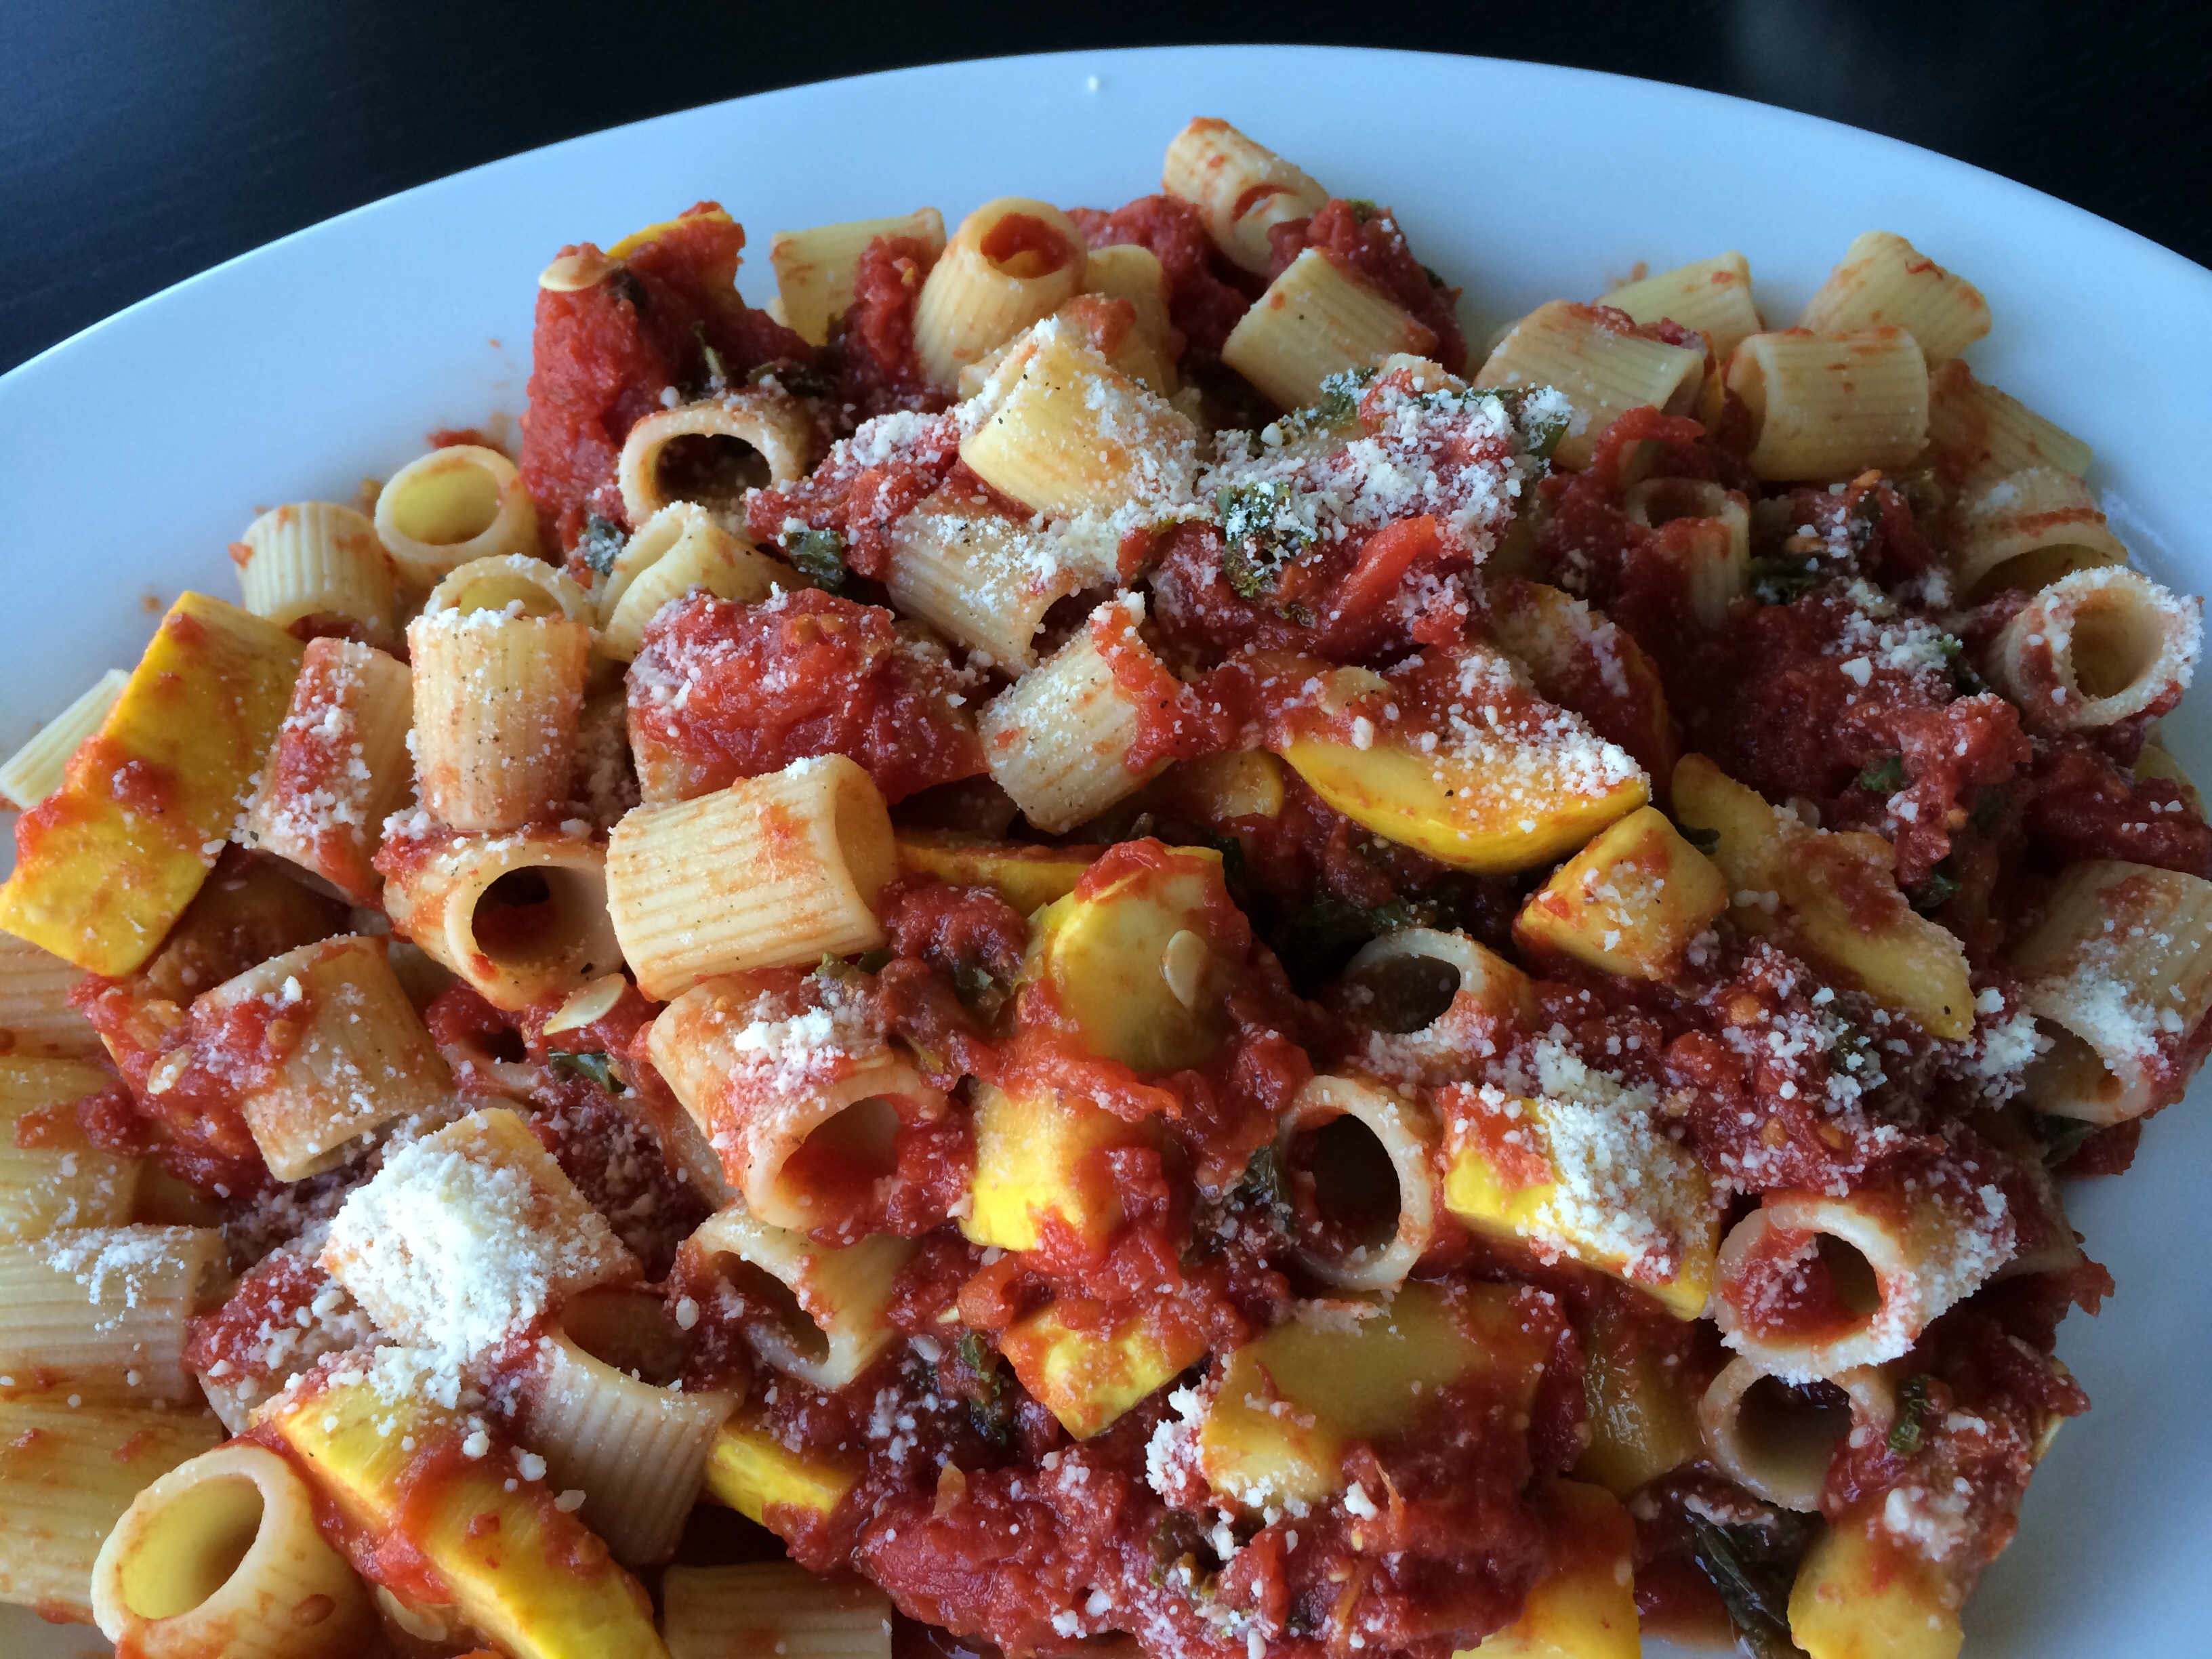
Tomato Kale Orecchiette!
Turkey Kale Orecchiette
Ingredients:
2 tbsp. Olive oil
2 cloves garlic, pressed
1 small onion, chopped
1 lb. lean white meat ground turkey
1 35oz. can San Marzano tomatoes
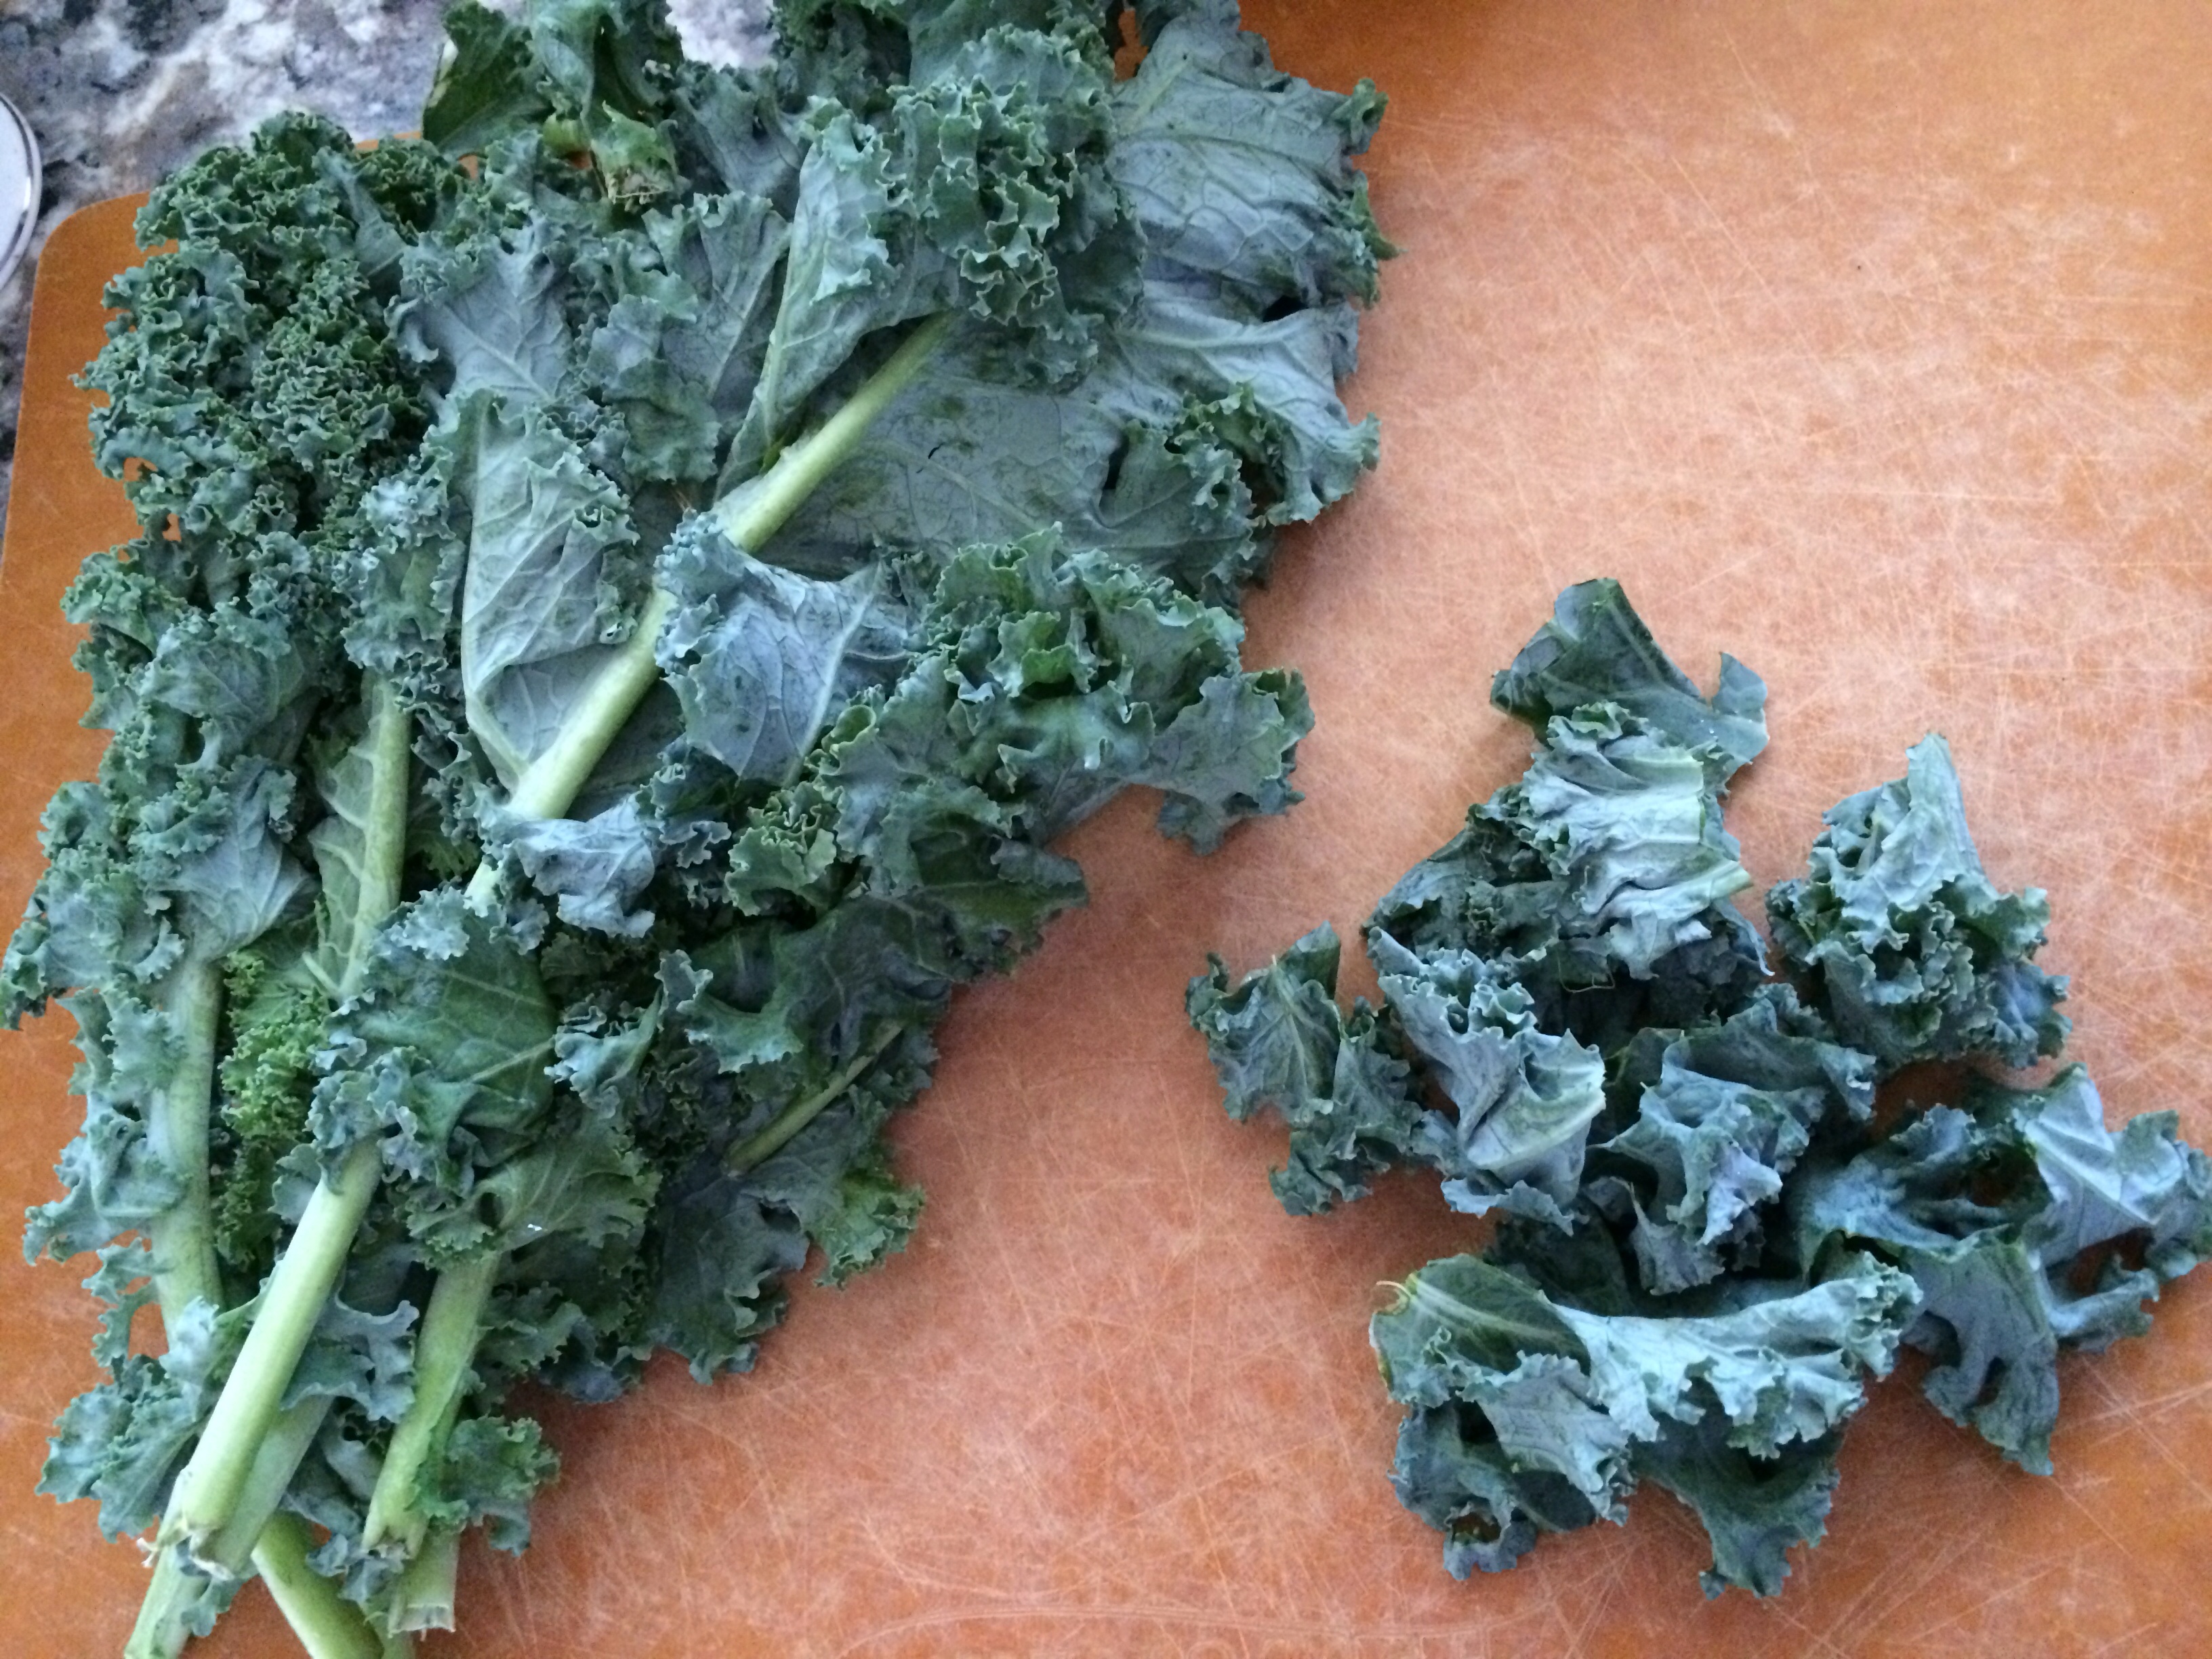
1 -1/2 cup kale, washed and chopped
1 tbsp. Chopped basil
1 tbsp. Chopped rosemary
1 tbsp. Chopped thyme
Salt/pepper
1 lb. orecchiette pasta
Fresh grated Parmesan cheese
Directions:
Heat oil on medium heat in a your deepest frying pan.
Press garlic and cook until softened, 5 minutes.
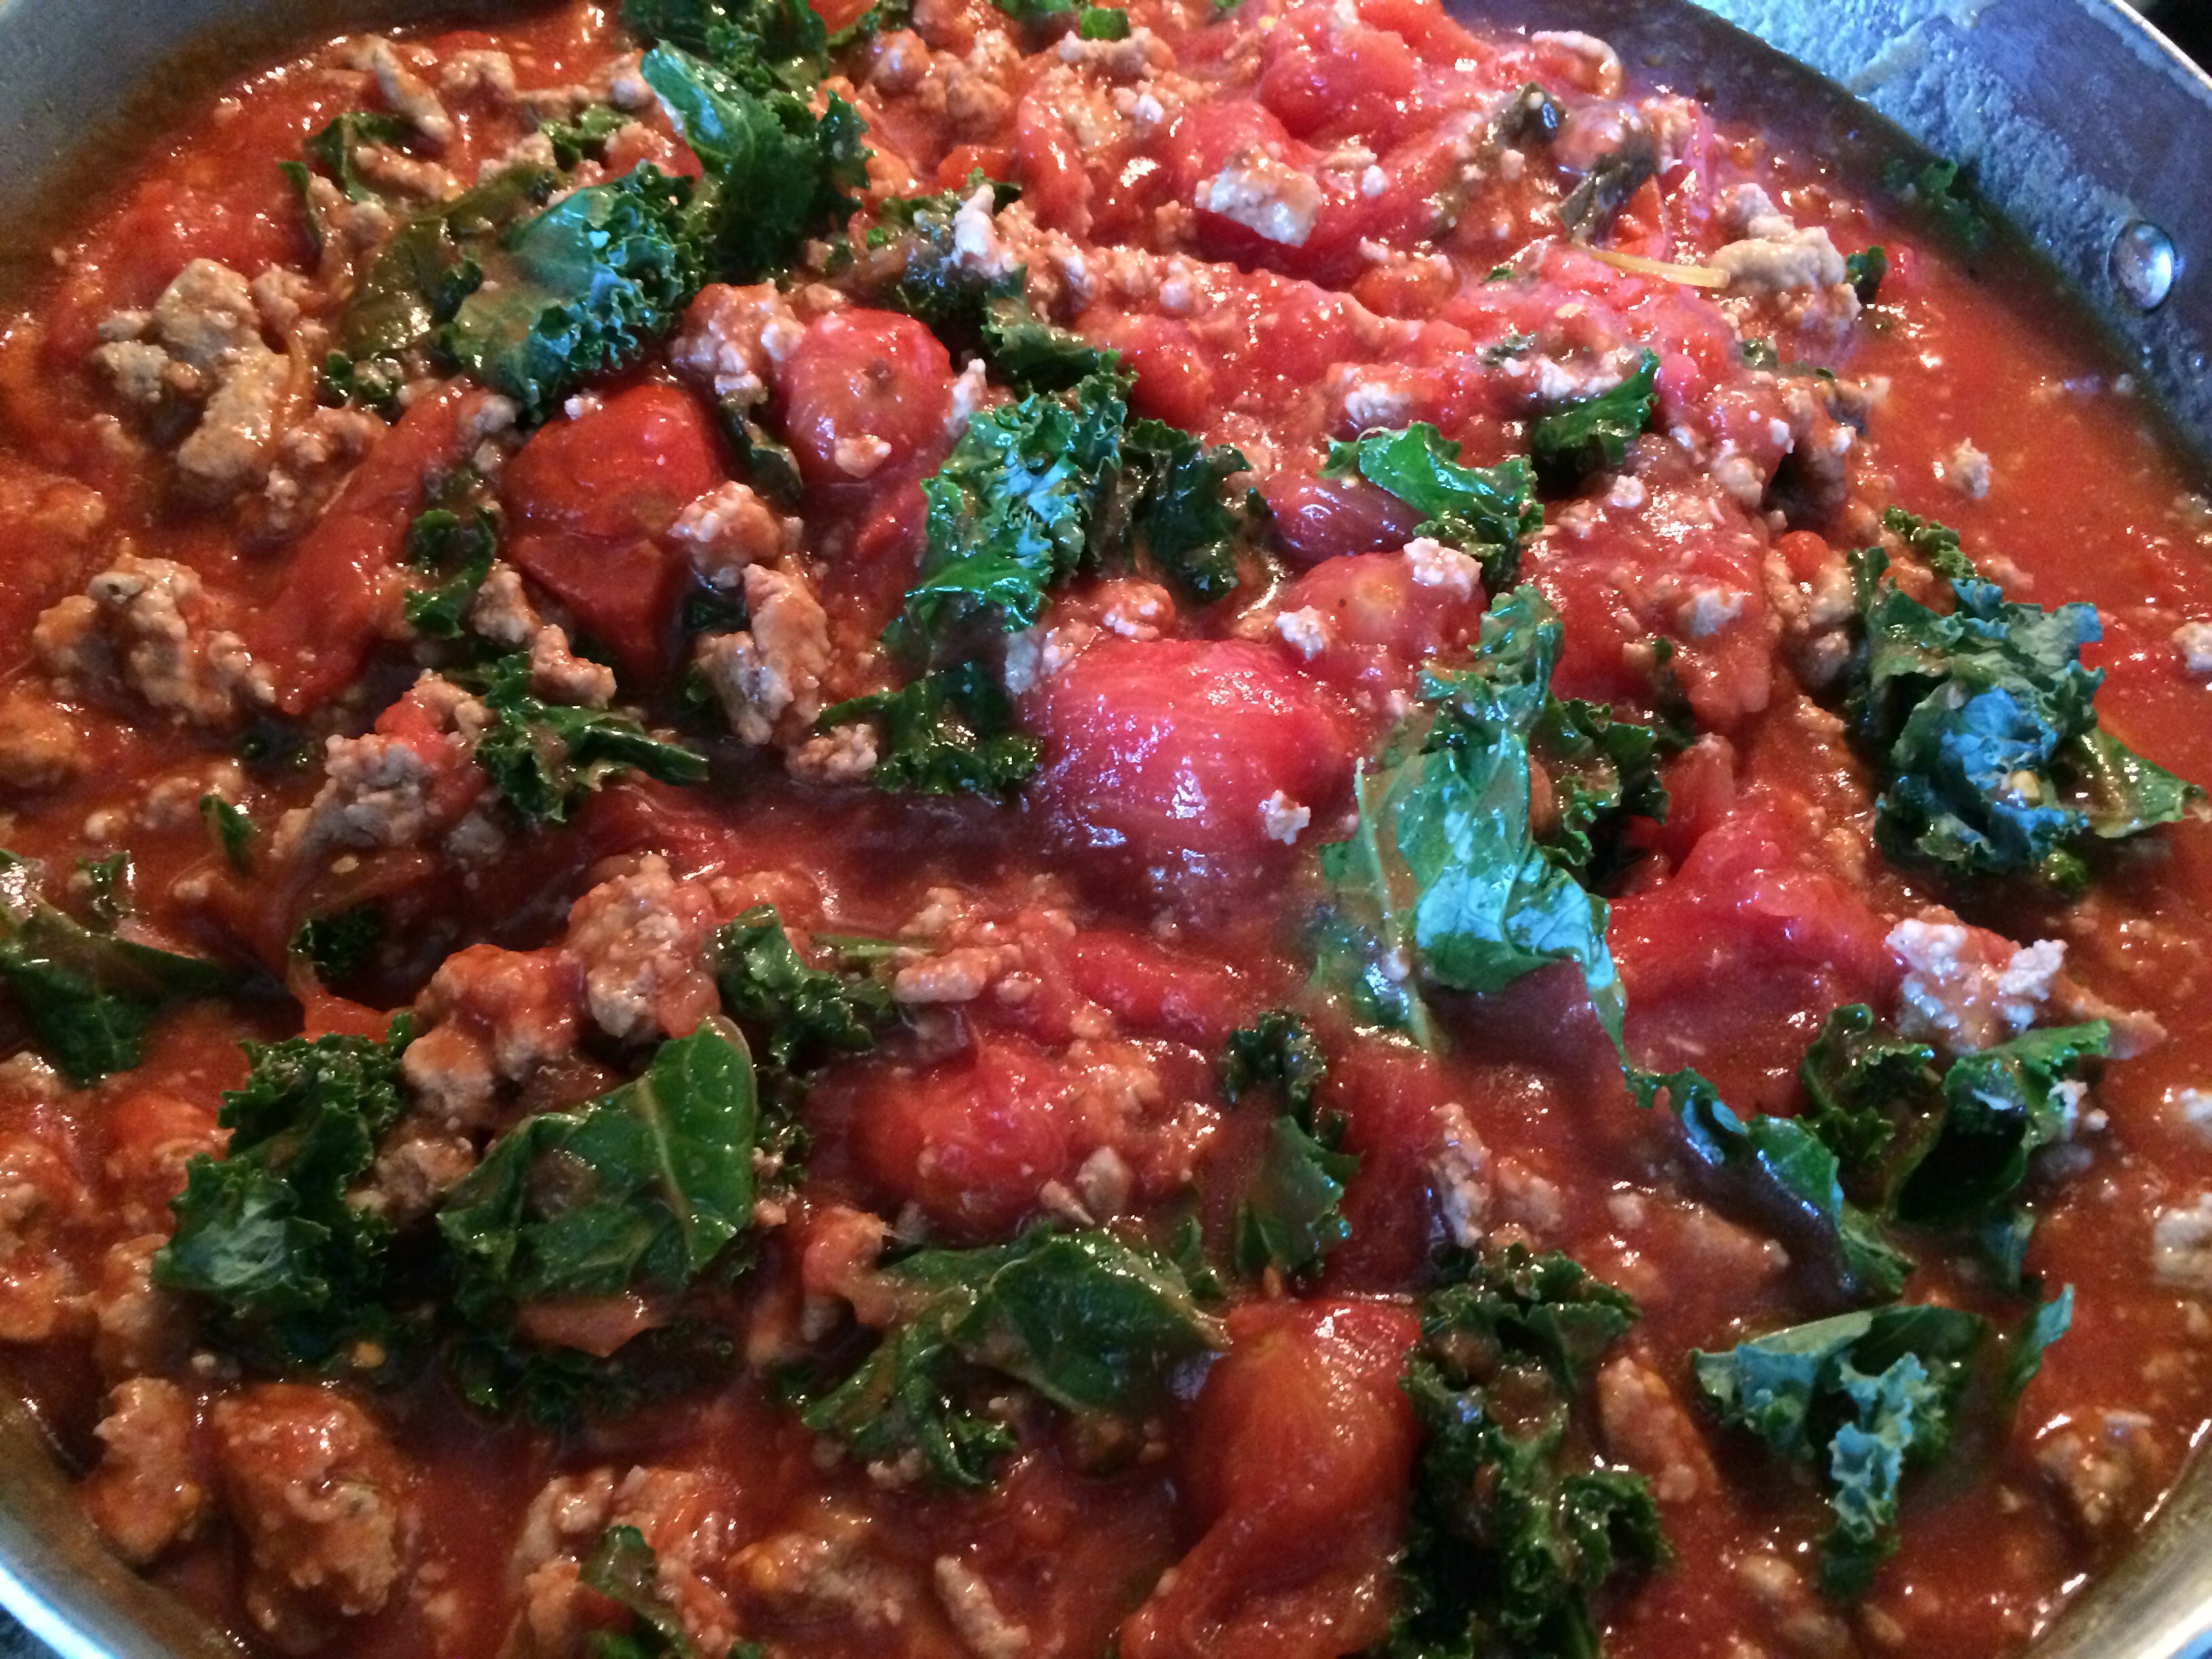
Add the turkey and cook until no longer pink. Drain any fat.
Add onion, tomatoes, basil, rosemary, thyme, salt and pepper and cook for 10 minutes until
Separate the curly kale leaves from the middle stem and chop.
heated trough.
Add the kale last and mix well.
Chop up the tomatoes while stirring.
Meanwhile, boil a pot of water to cook the pasta according to the package instructions and drain.
Add the orecchiette to the pan and mix.
Always top with fresh grated Parmesan cheese! Enjoy!
Photo by Amy Wilson Photography http://amywilsonphotography.com
Back to school for a mom of a preschooler and a half-day kindergartener means pick ups and drop offs all day long. Other than 4pm-5pm, there is little time to prep and cook dinner! Oh yeah, and on Mondays with baseball at 4:30 and dance at 5, there is absolutely no time!
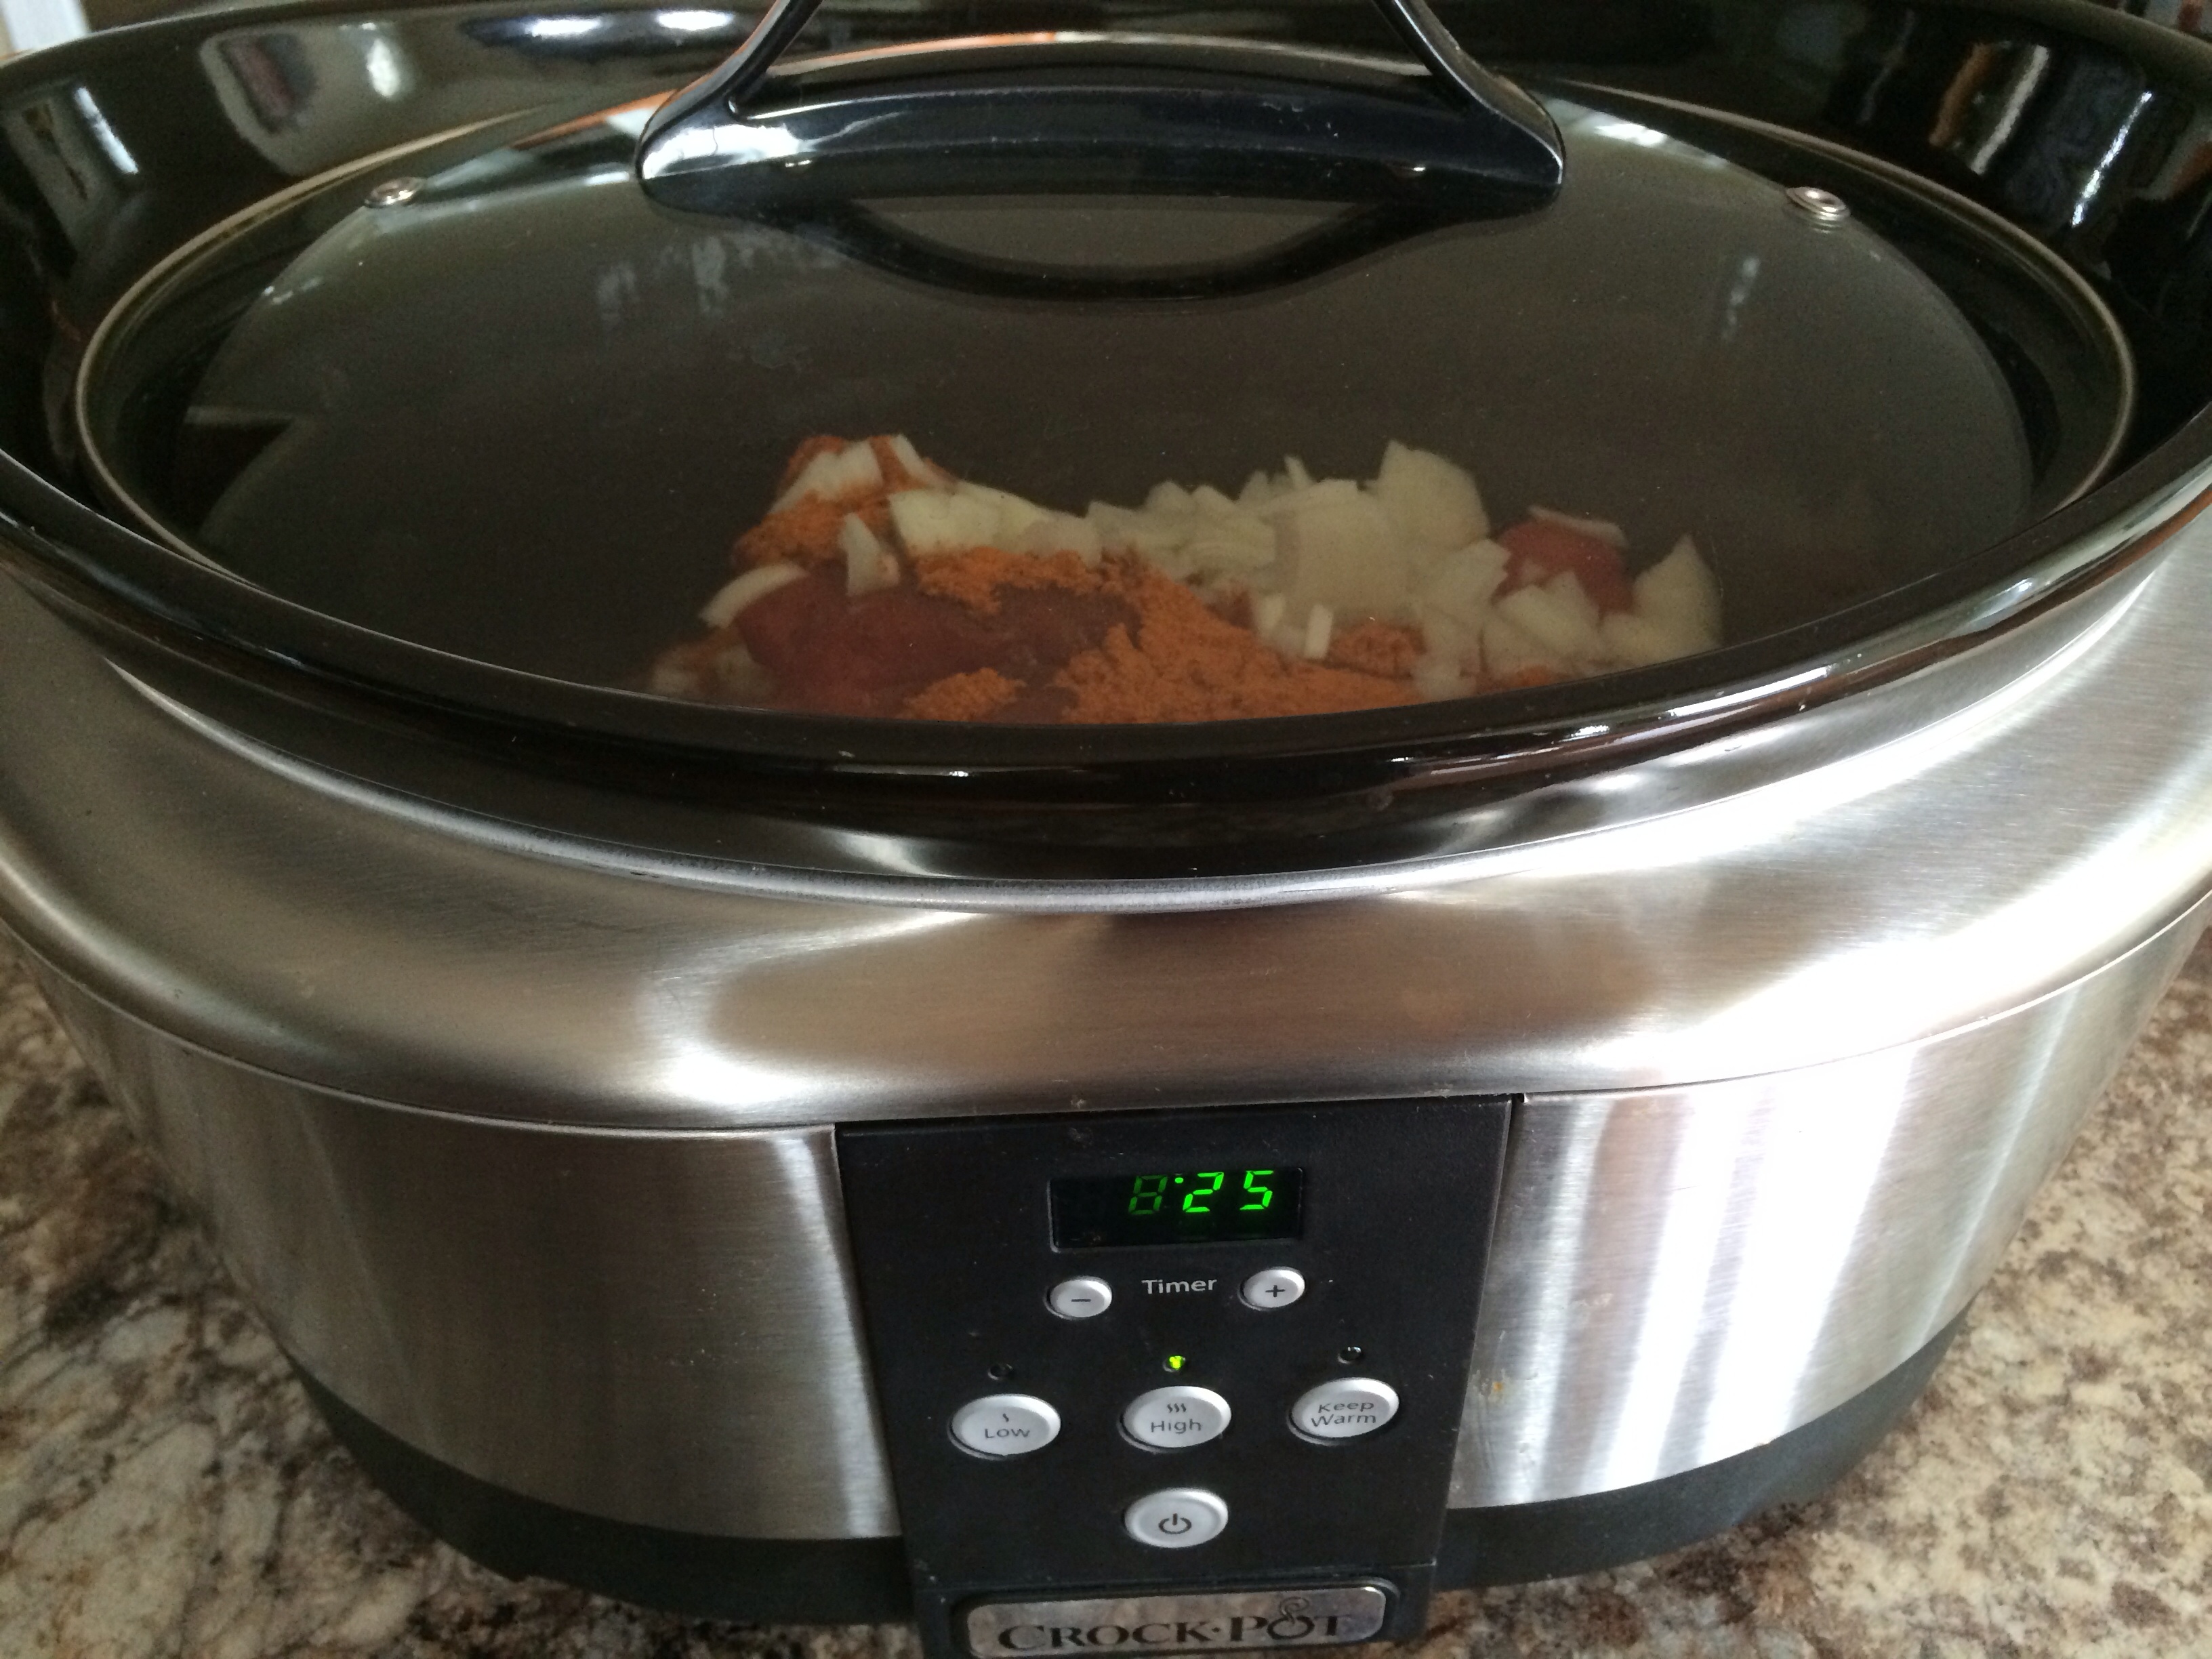
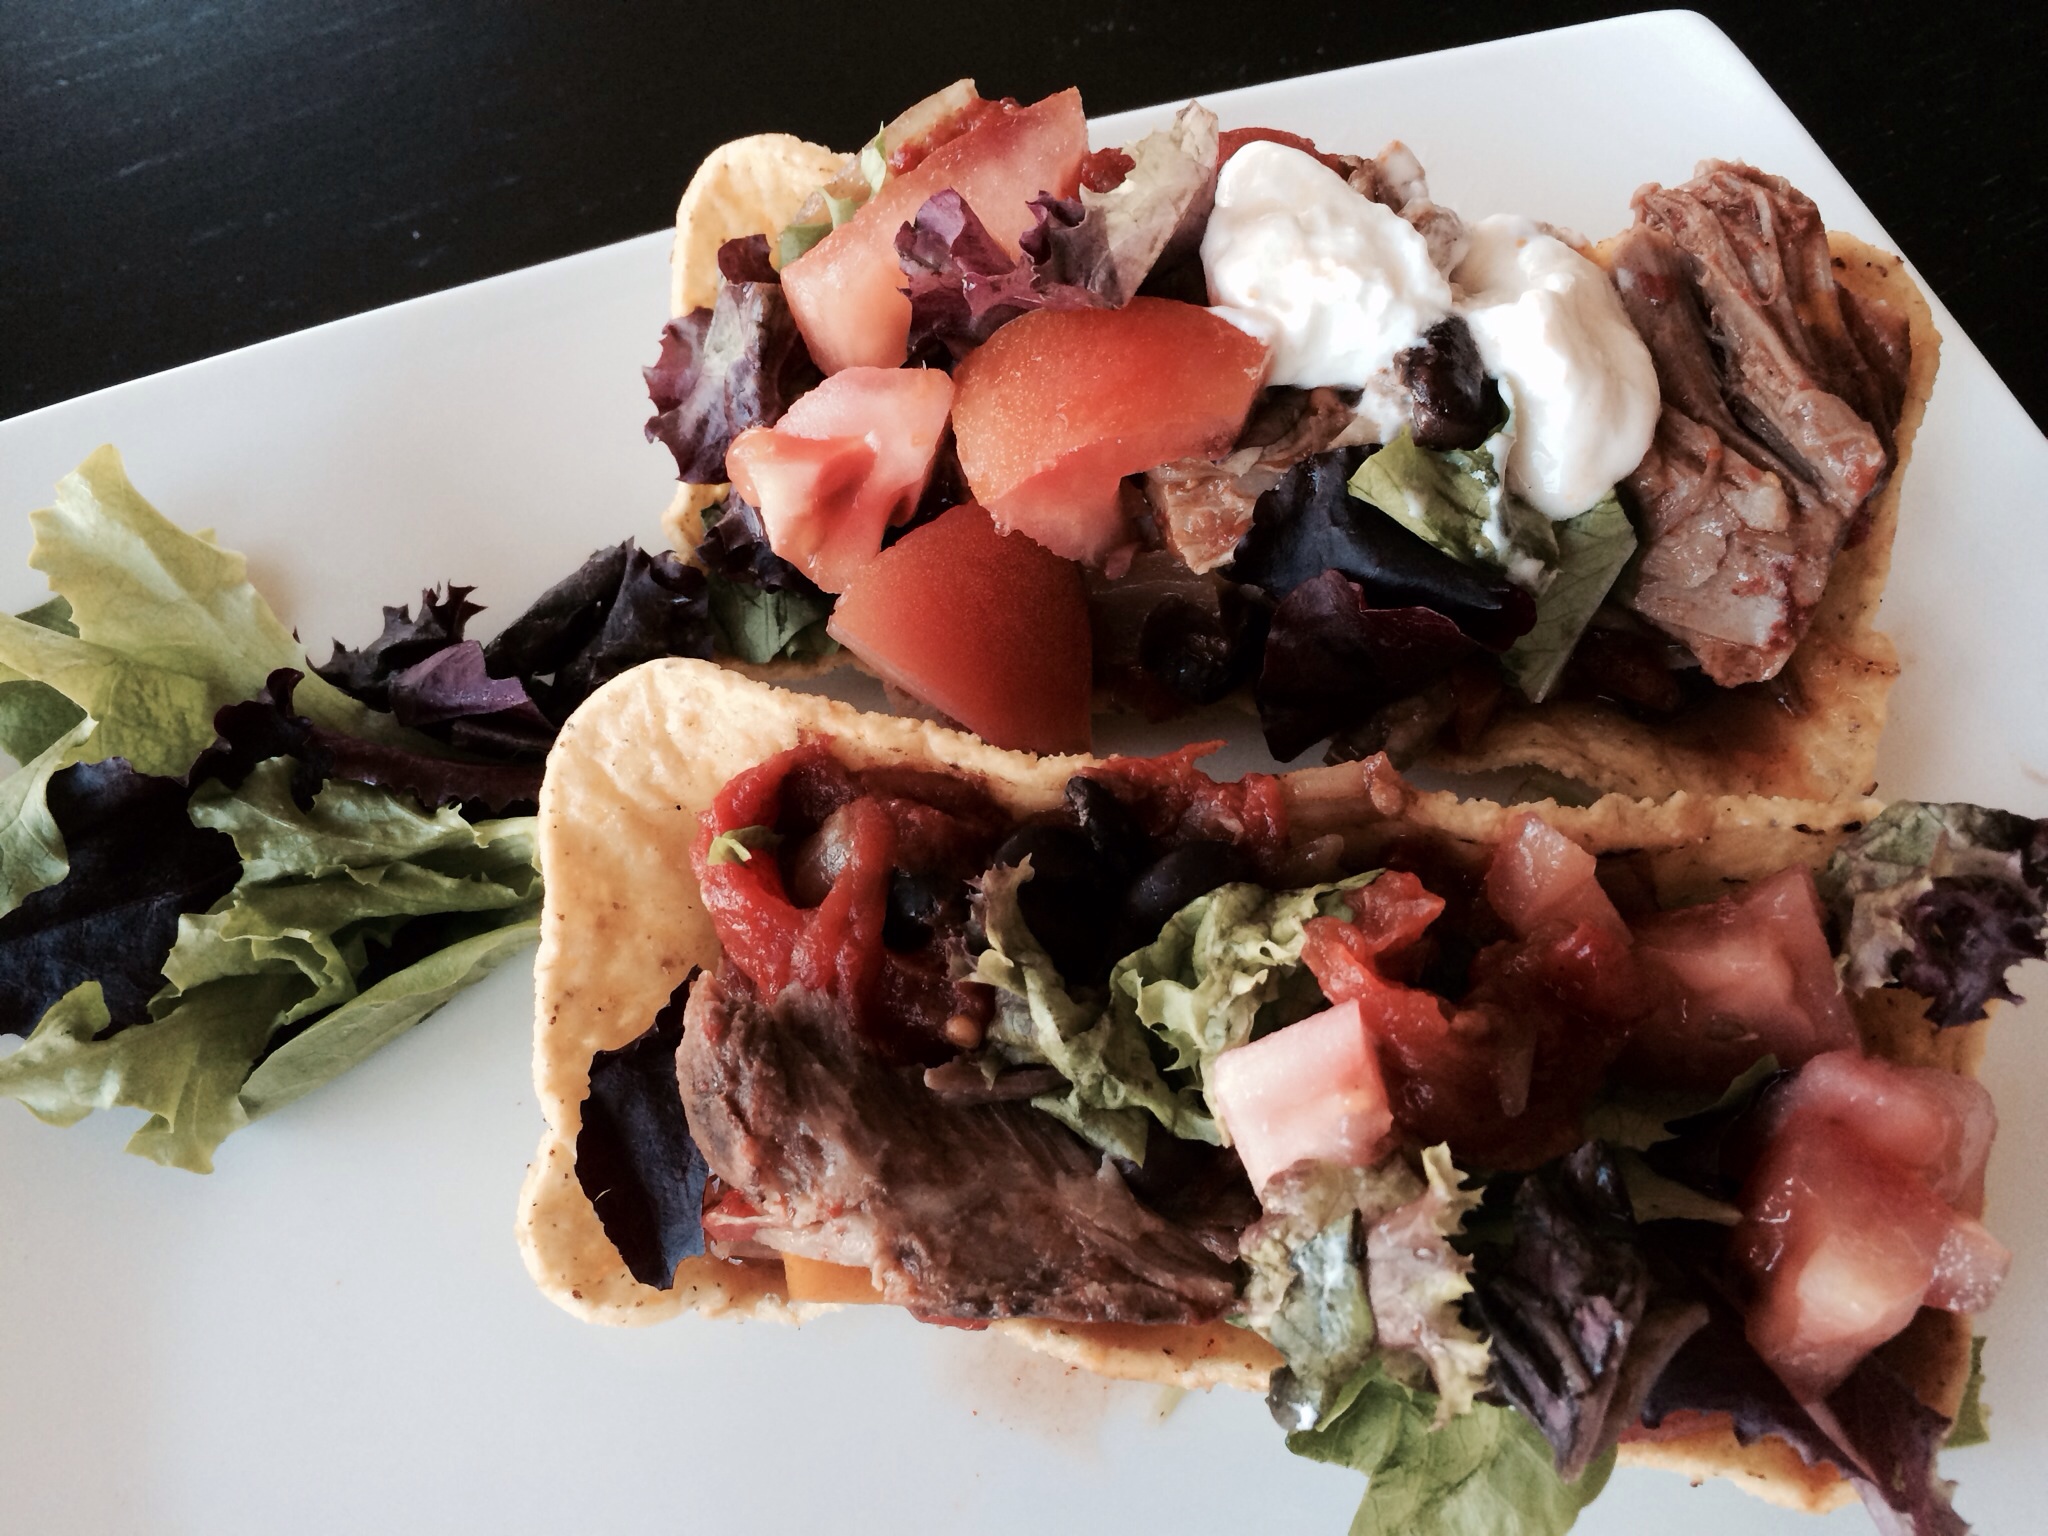
Mexican is great in the crockpot! Make enchilada, taco, empanada, and burrito filling!
On these busy days, a crockpot meal is a perfect option! And Mexican is healthy and super easy in the crockpot! Throw in frozen chicken or beef, pork, with the ingredients that you have onions, peppers, corn, beans, taco seasoning, salsa, etc. Let it cook for the day and your crockpot mixture is ready to be stuffed into fresh tortillas!
Ingredients:
1 lb. Frozen boneless chicken (use any meat or no meat!)
1 35oz. can whole tomatoes
1/4 cup taco seasoning (you can substitute chili powder)
Salt/pepper
1/2 cup salsa
1-2 bell peppers, chopped
1 medium onion, chopped
1 can black beans
1 8oz. bag frozen corn
10 of your favorite tortilla shells
For extra spice, add 1 tbsp. Of cayenne pepper and 1-2 tbsp. Red pepper flakes and/or chopped habanero peppers.
Additions: Making burritos? Add quinoa or rice-1 cup uncooked.
Directions:
Throw it all in and cook all day 8 hours + on low or 4-6 hours on high!
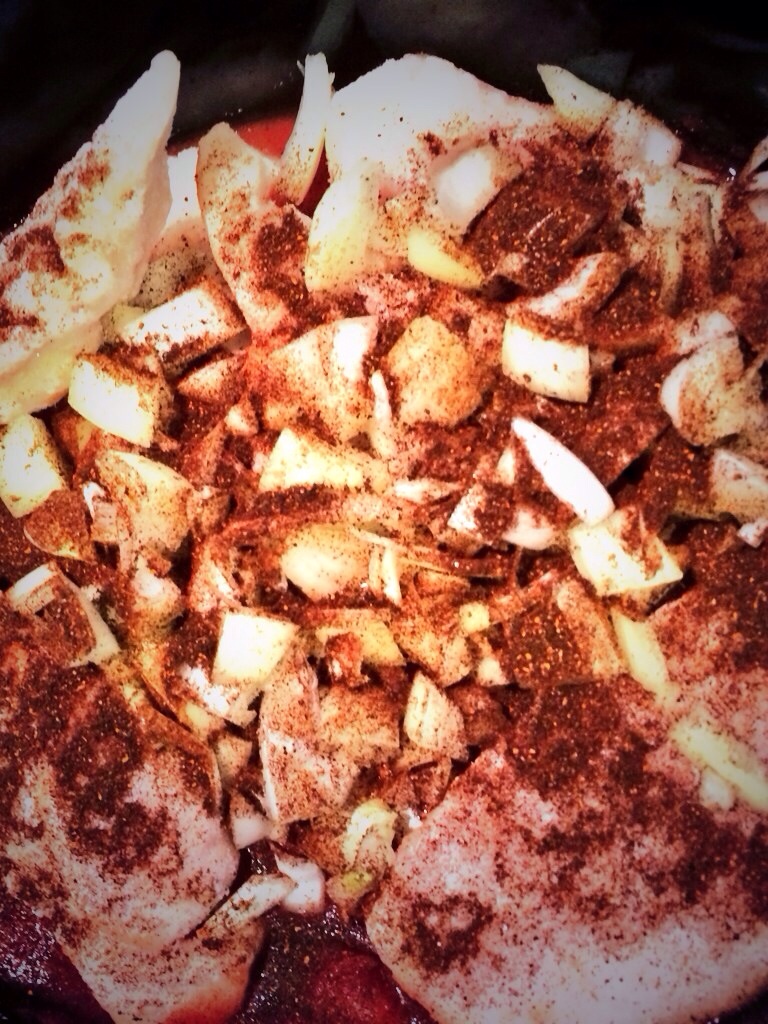
Take the lid off when you get home to thicken if it is runny. The amount of liquid varies based on the brand of tomatoes and by the amount of absorption of the additions!
Chicken and pork will shred easily with a fork.
Chop fresh tomato, lettuce.
Top with sour cream, shredded chihuahua cheese and guacamole.
Easy, delicious, healthy dinner! #backtoschool
The ingredients can vary based on your family’s preferences!
Enjoy!
Ciao!
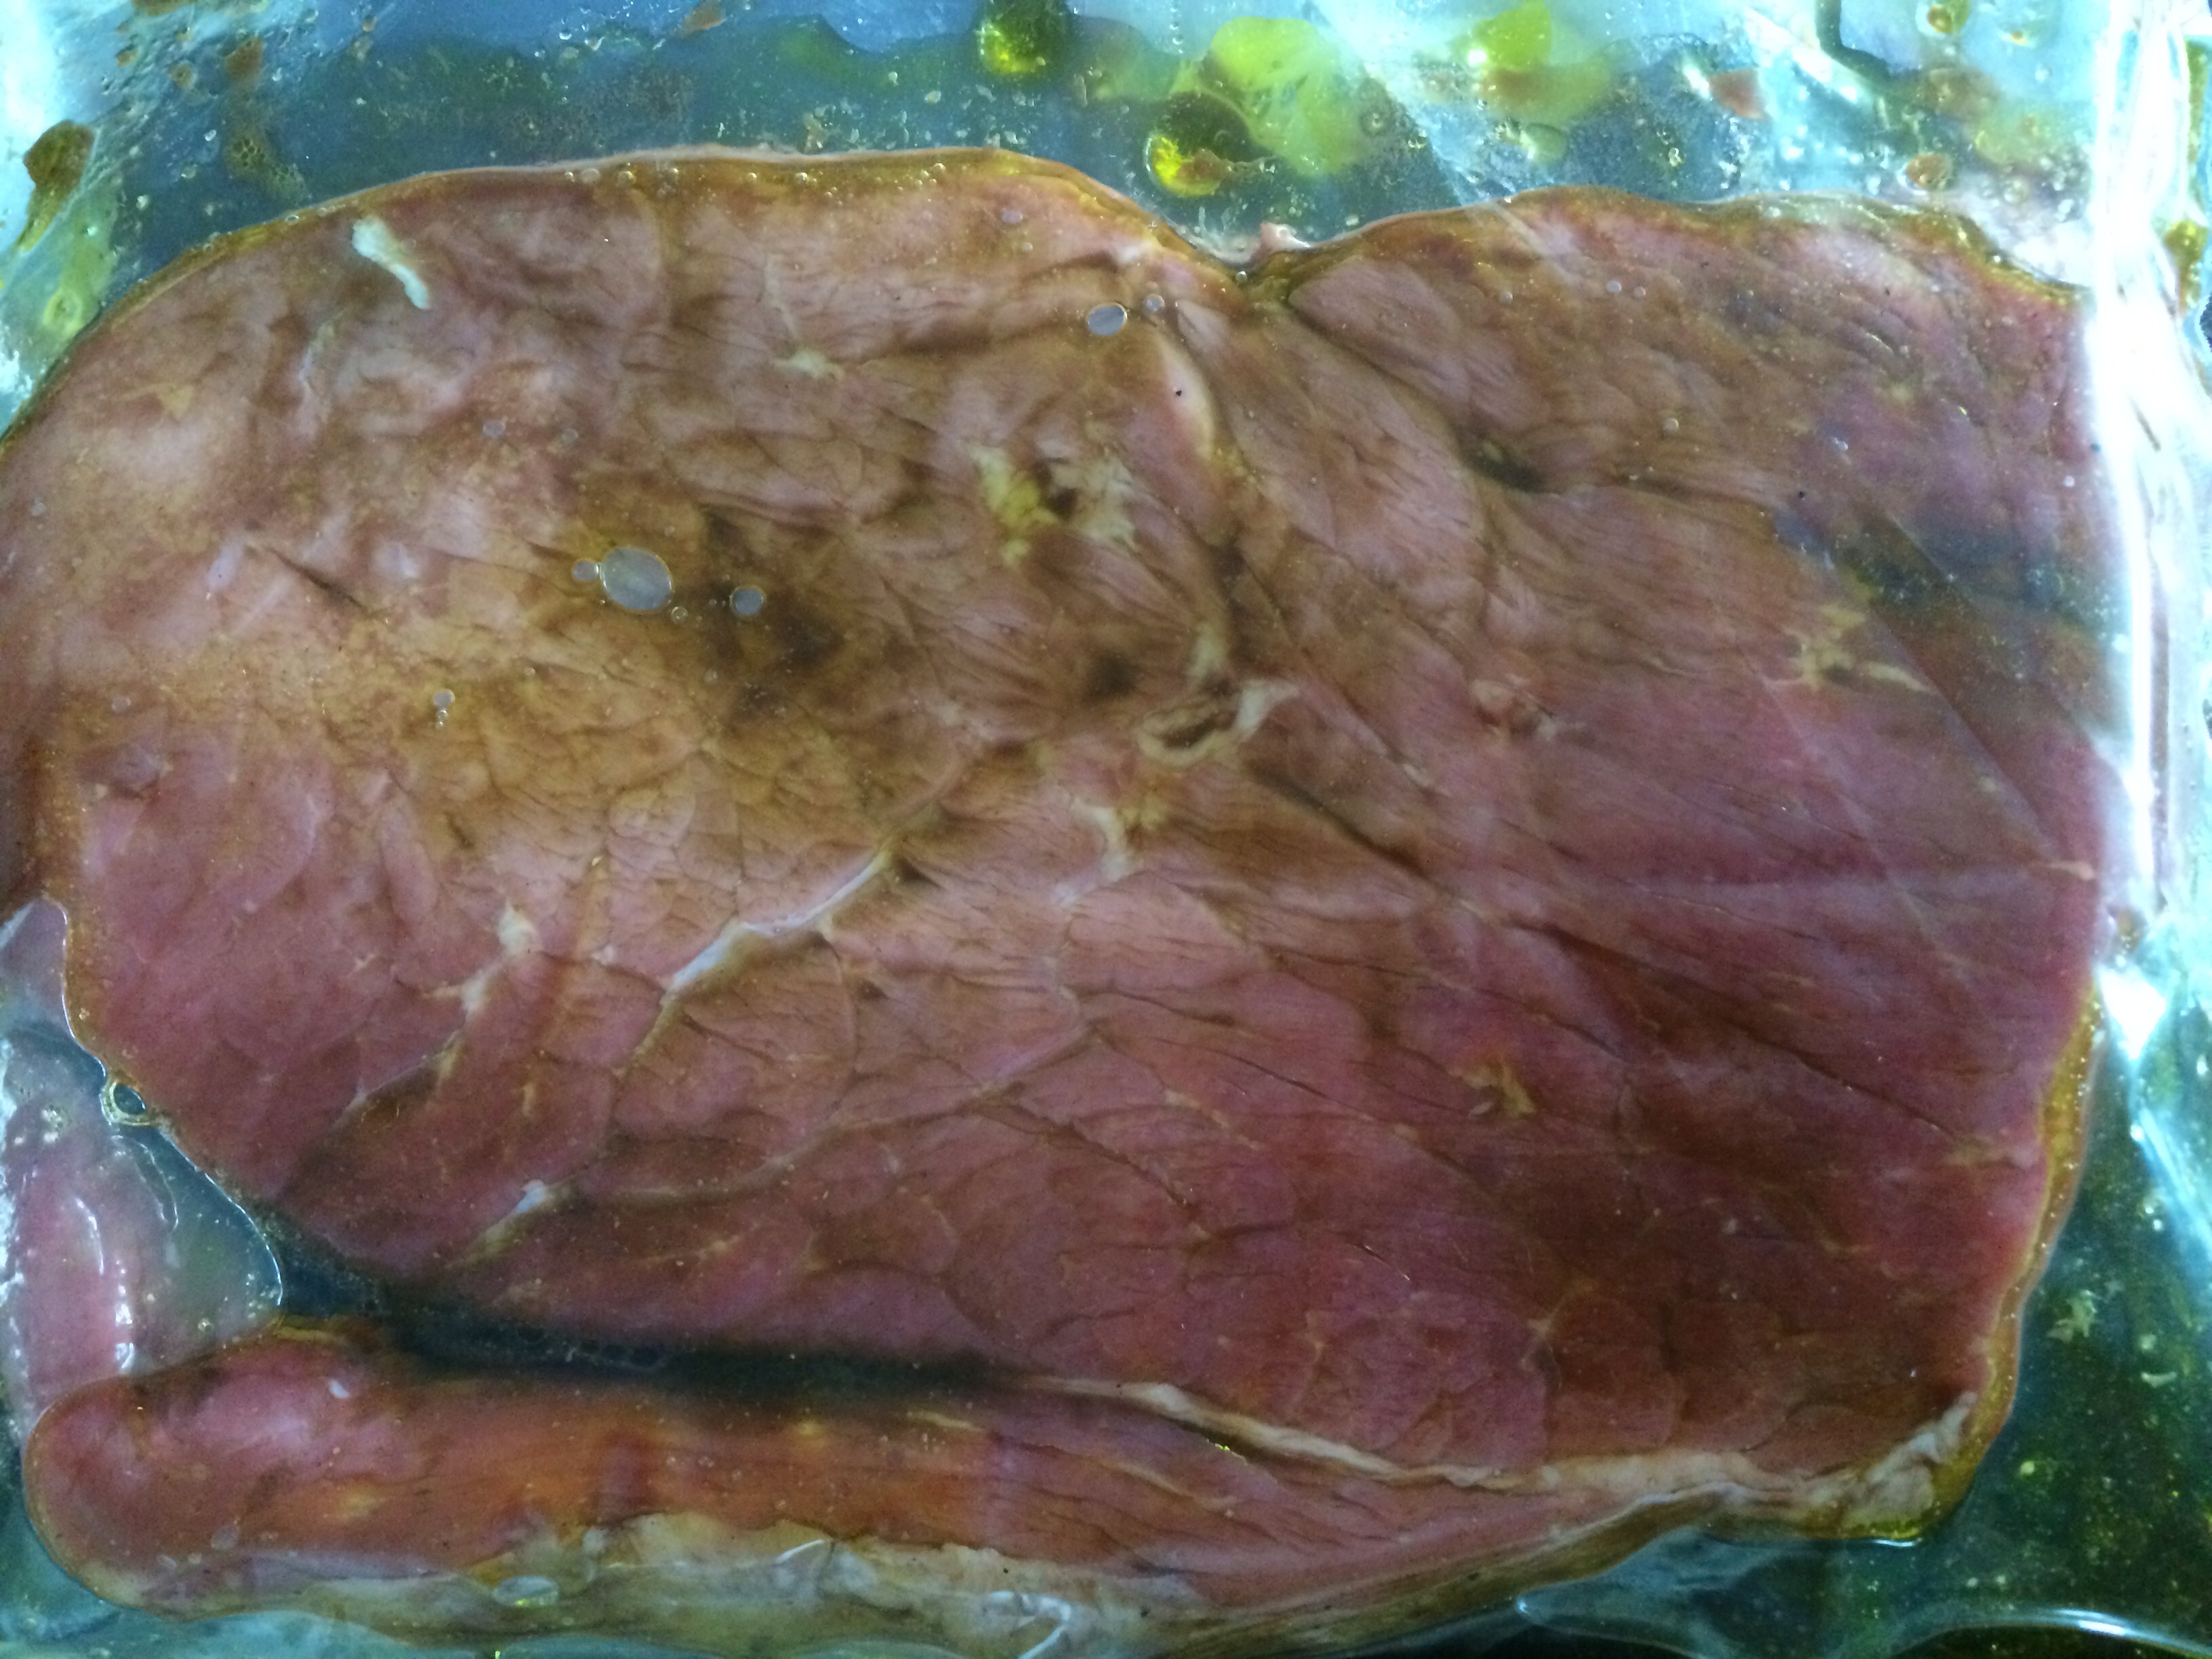
London broil is actually the preparation of a cut of meat, not the name of a cut of meat. The definition? To sear a cut of meat and serve medium rare sliced on a diagonal against the grain. The one I bought this week was labeled London Broil Top Round. Thus, the misconception that the cut of meat is london broil.
The London broil method creates a perfectly medium rare center that is tender and juicy.
London broiled meat looks beautiful on a plate, and is sure to wow your guests when entertaining. Serve anything from sautéed vegetables to corn on the cob! Anything goes!
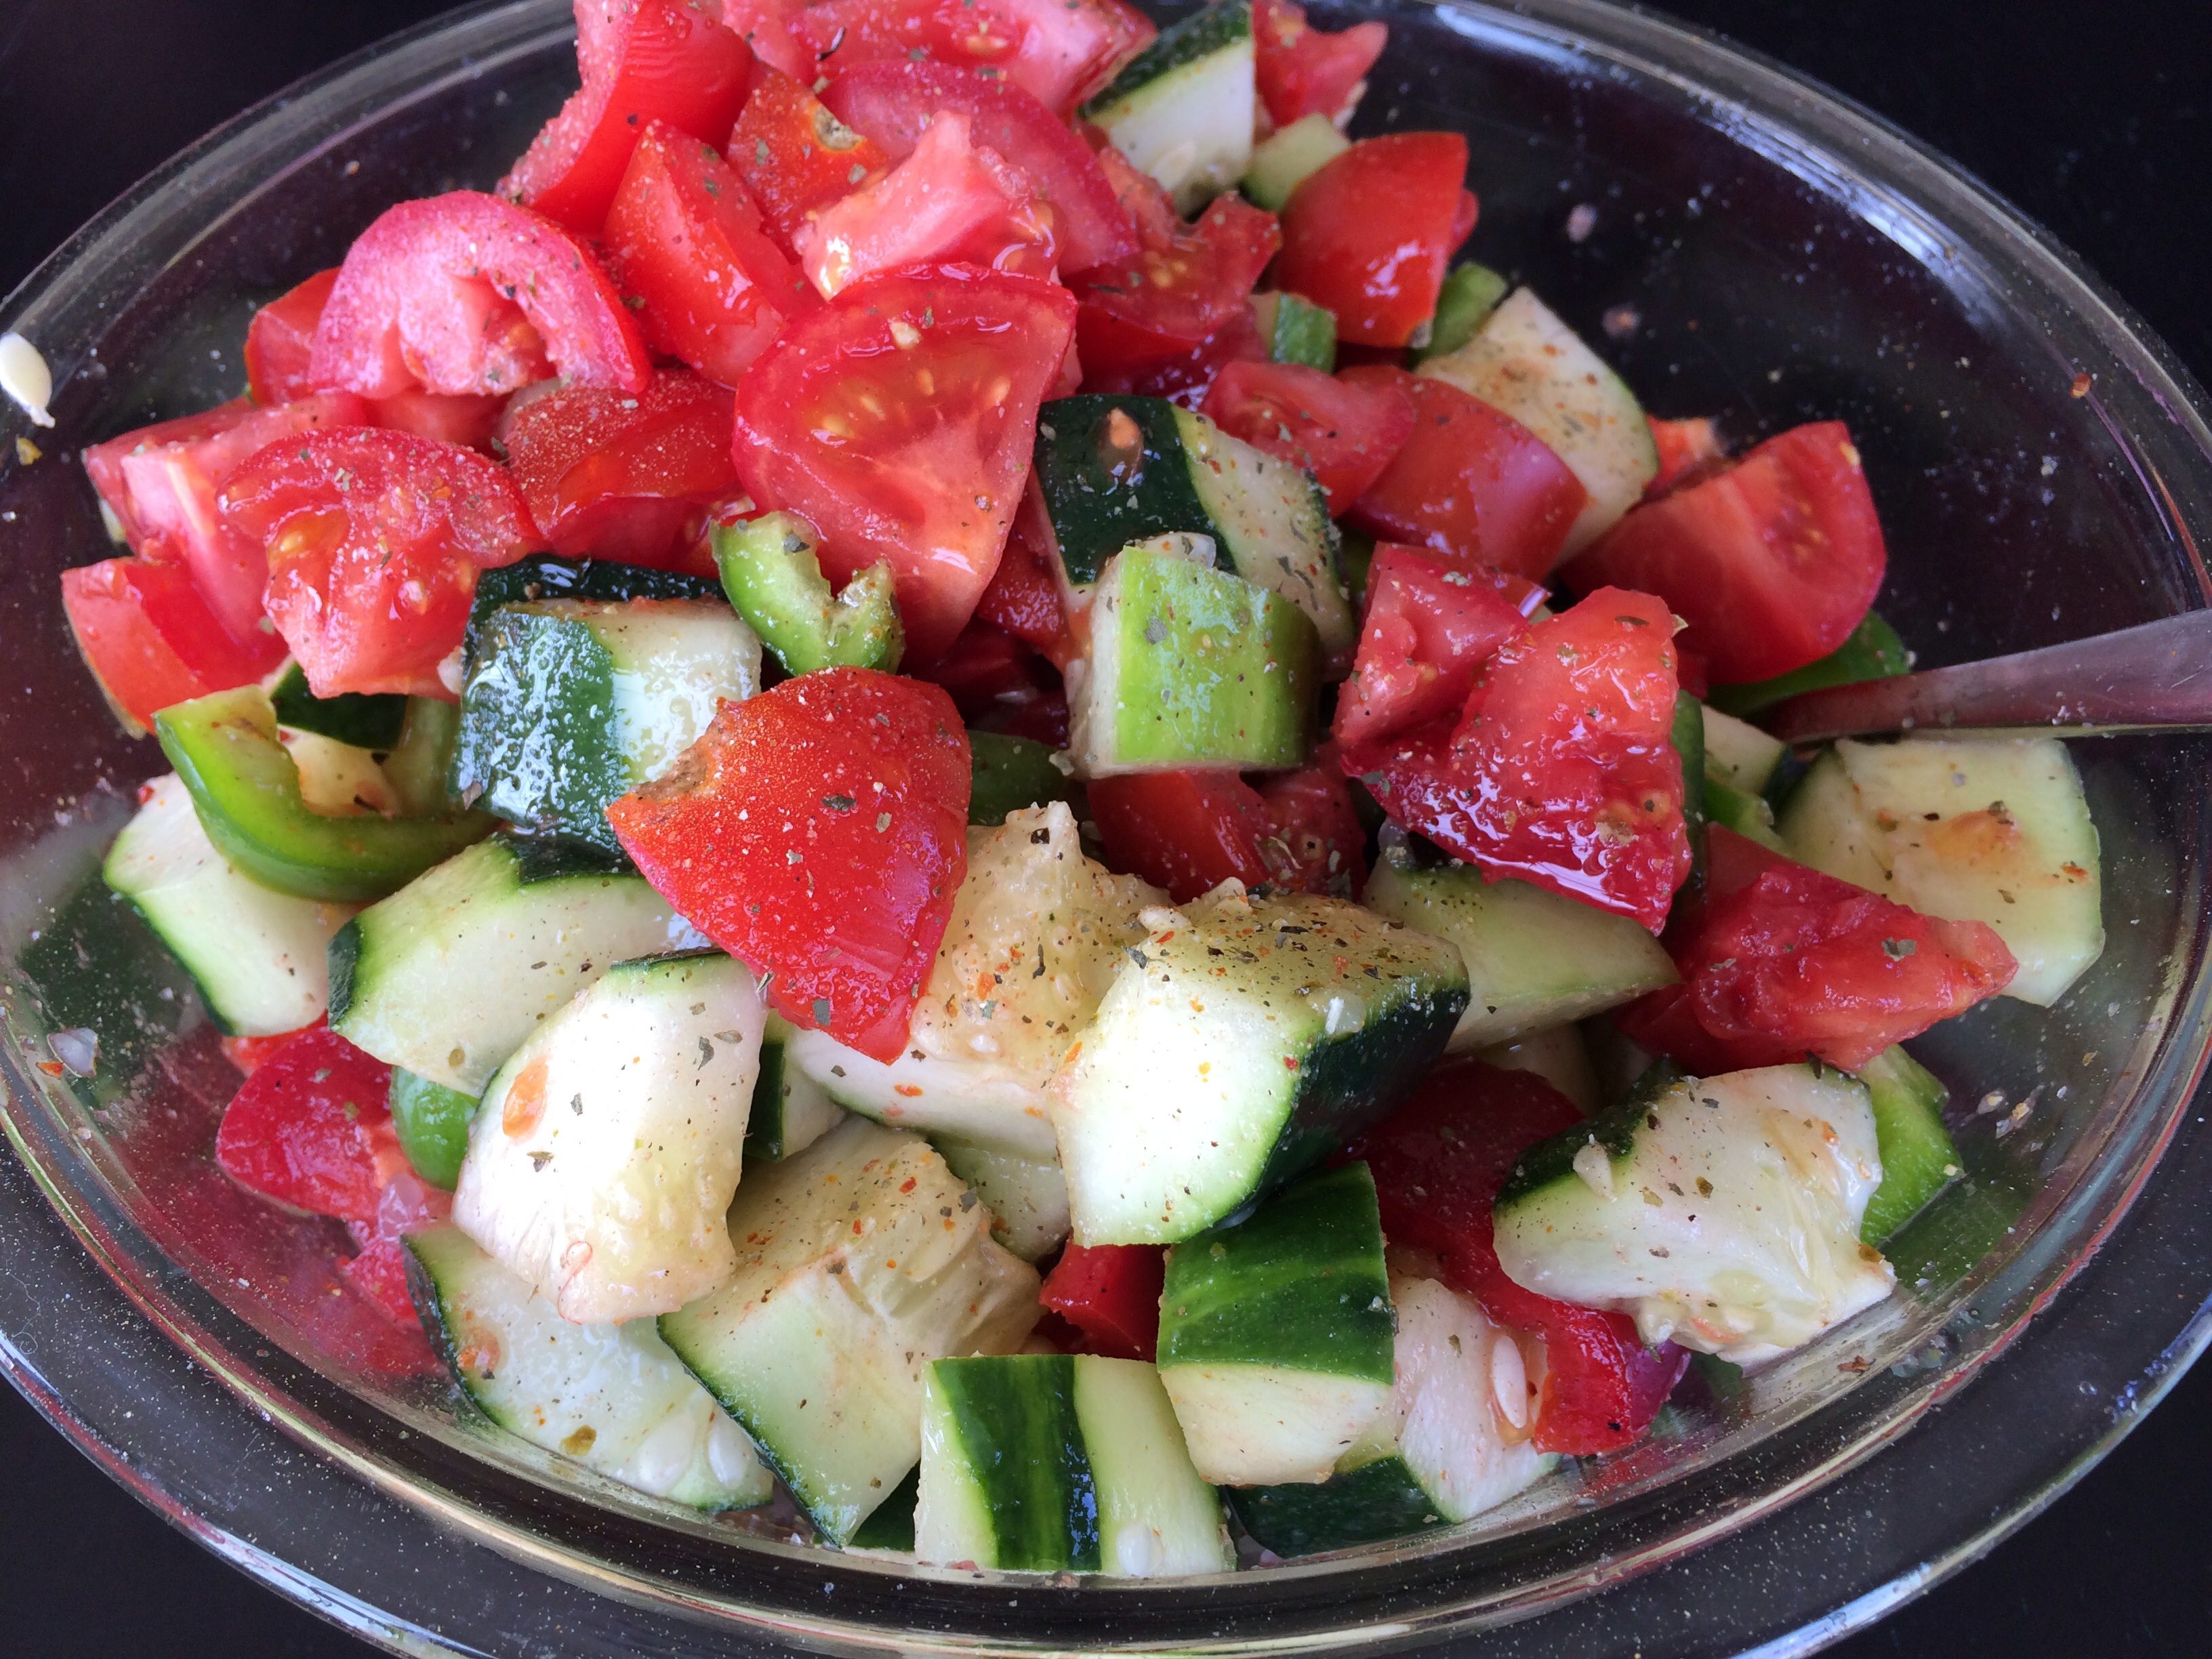
In the summer, I love to serve a crisp, cold salad with steak. Here is a cucumber-tomato-pepper salad with a few splashes of olive oil and fresh herbs!
London Broil Tips and tricks:
Thickness:
The meat you choose for london broil should be at least 1-1/2 – 2 inches thick.
Marinade:
The marinade should be a tenderizing marinade just in case the cut of meat is on the tough side.
Cooking:
Giving the meat a london broil requires a high heat broil for approximately 5 minutes on each side to produce the medium rare center. If the heat is too low, or it is cooked for too long, the meat will overcook.
Slicing:
Slice the meat against the grain on a diagonal and serve.
London Broil
Ingredients:
1.5 lb. 1-1/2 – 2 inch top round cut labeled London Broil
1/2 cup Worchesterschire sauce
1/2 cup red wine
3 cloves roasted garlic finely chopped
Salt/pepper
Directions:
Place the fat trimmed meat in a Ziploc bag with all ingredients for 1-3 hours.
The meat absorbs the liquid. Really tenderizing the meat before searing.
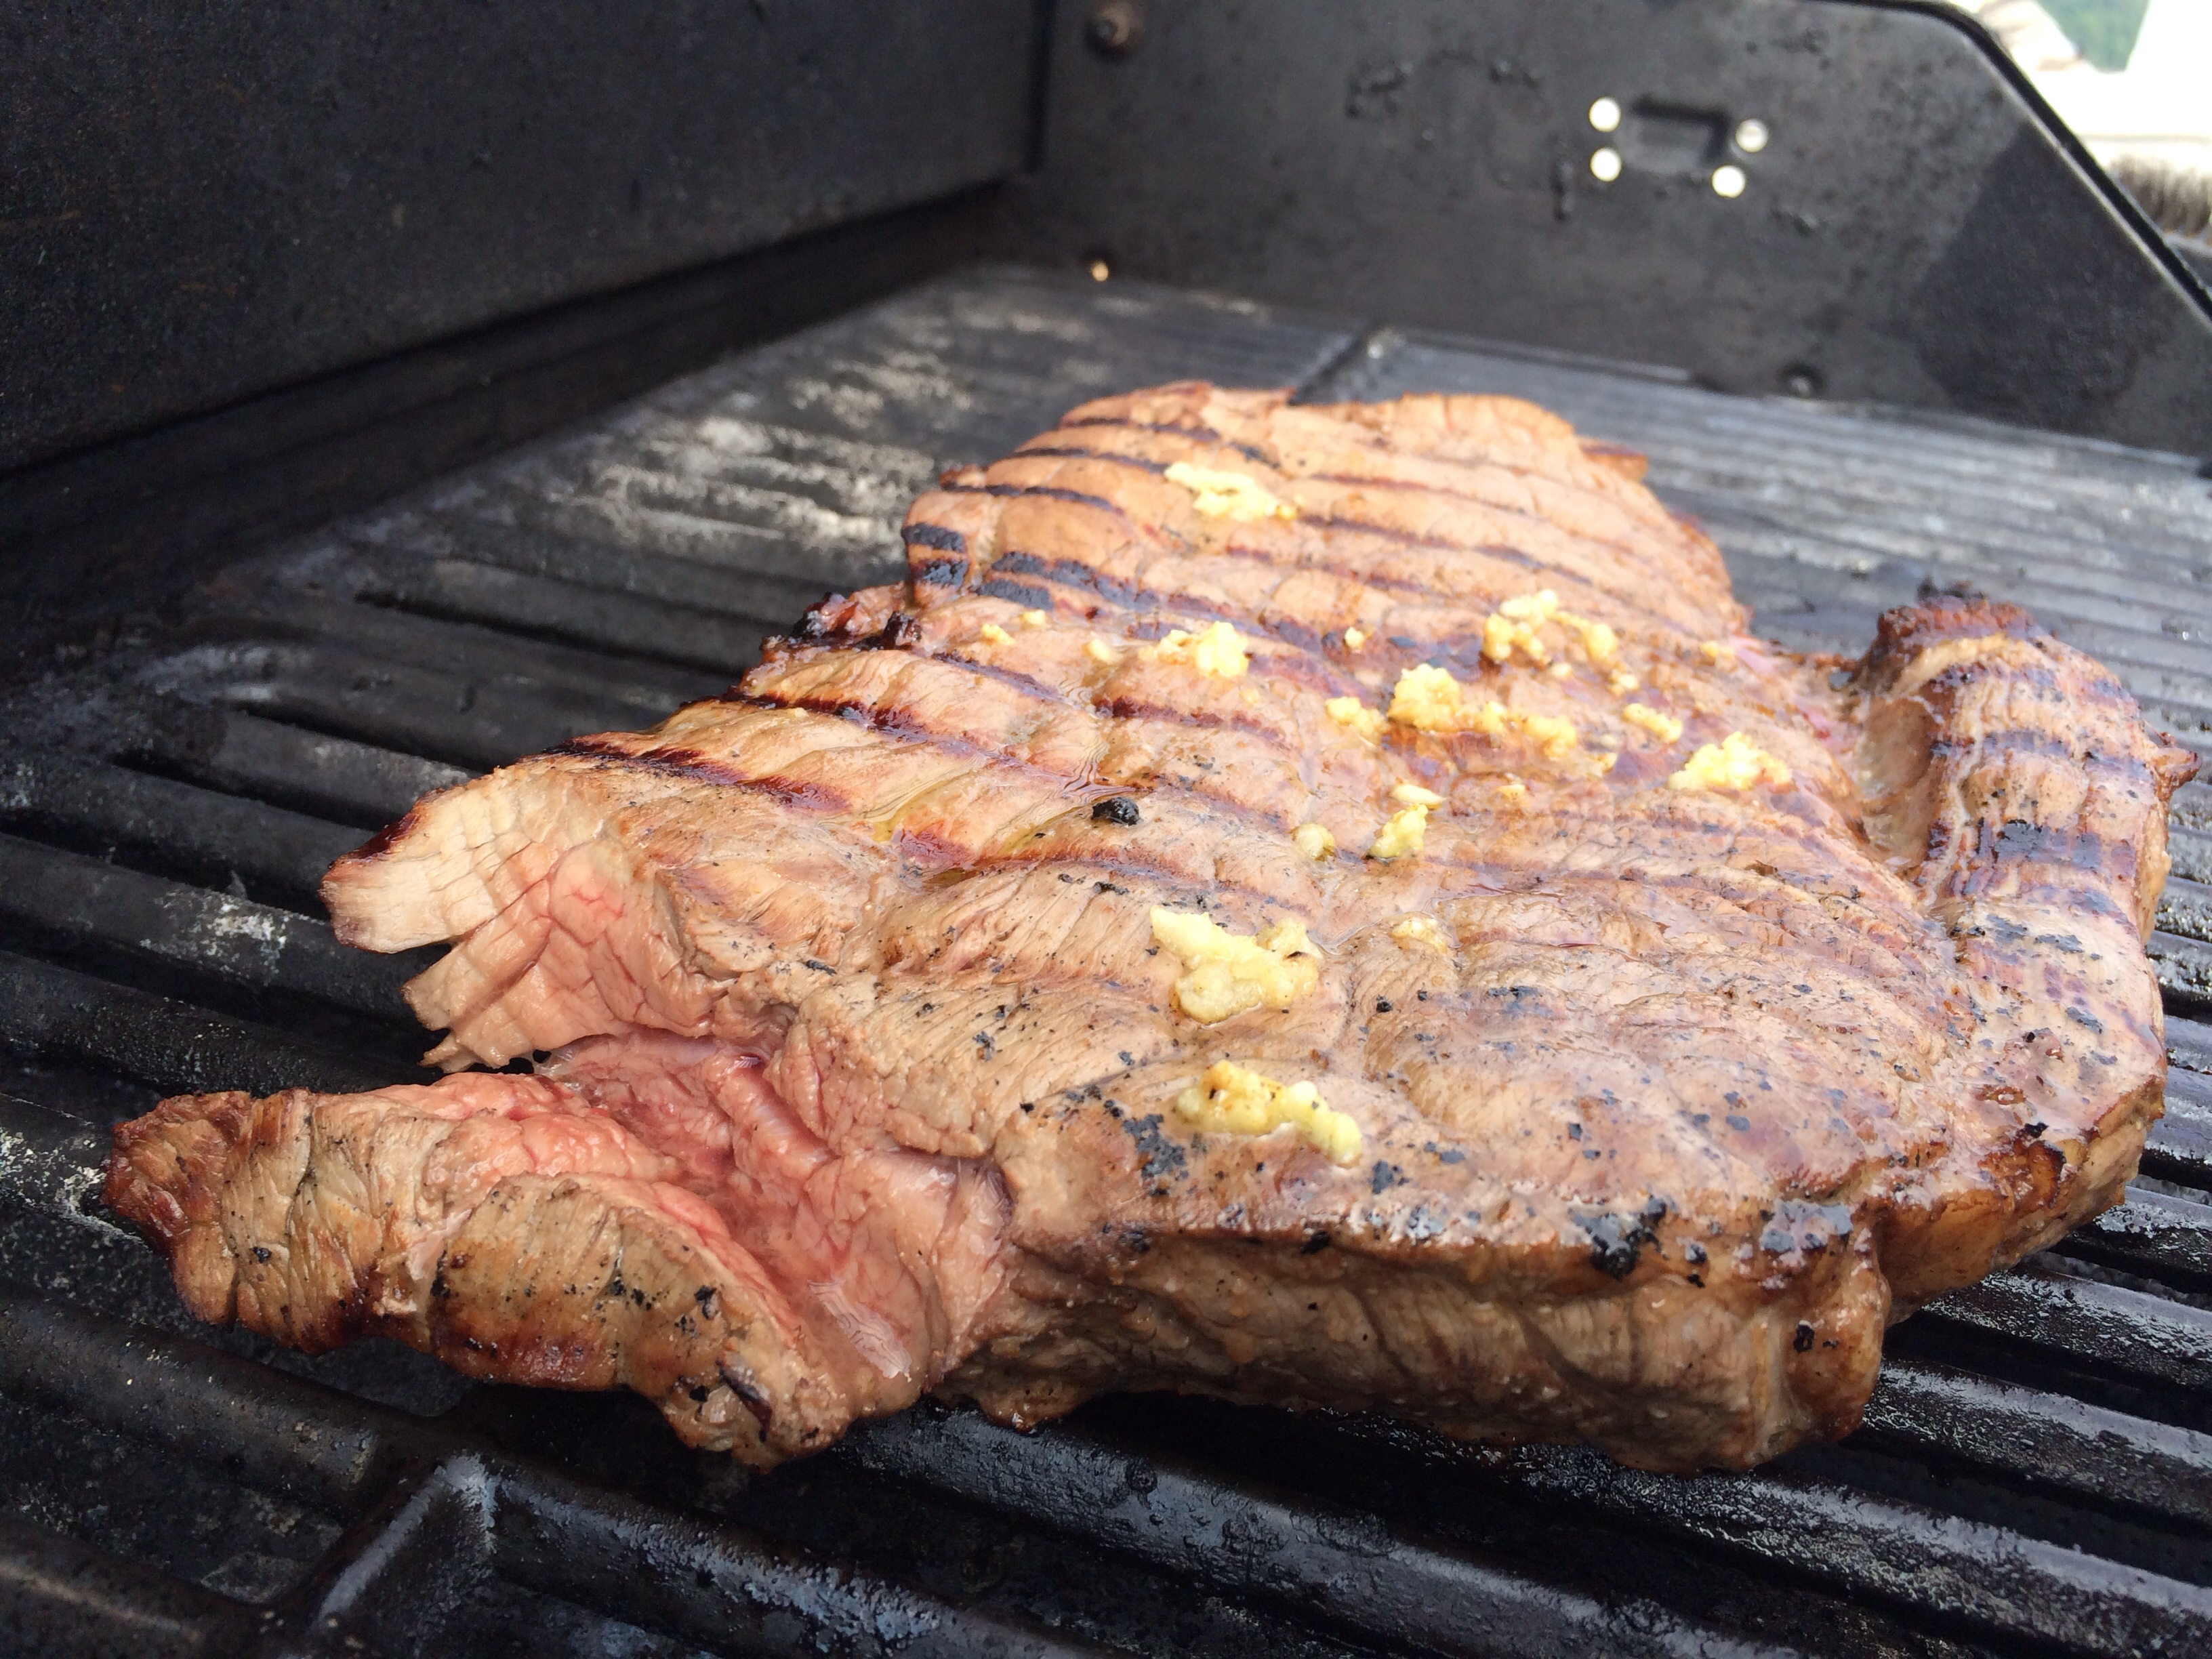
Place meat 3-4 inches under broiler and broil for 5 minutes.
Flip and broil for an additional 5 minutes.
(The same method can be used on a grill. However, the temp must be high 375-400 on the grill and it requires close attetion as to not overcook the meat.)
Don’t be afraid to slice the meat while on the grill to make sure it is not overcooked. The grill temps are harder to control. Grilling thick cuts of meat takes some practice and definitely a willingness to eat well done meat every once in a while ; )
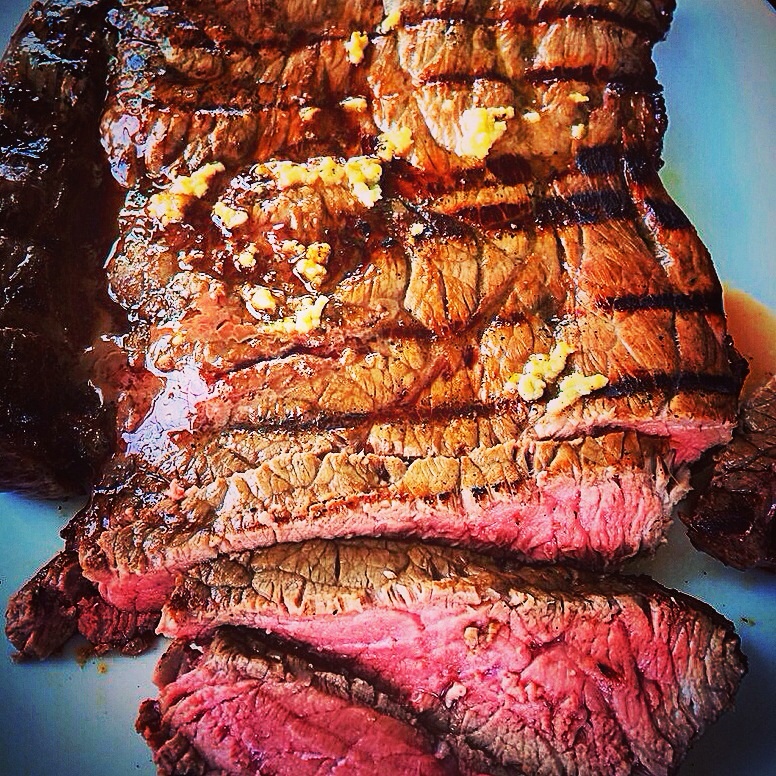
Remove and let the meat sit for 5 minutes.
Slice in a diagonal against the grain.
Yummy! Perfecto!
Serve with your favorite sides!
Enjoy!
Ciao!
Reference: From Julia Child’s Kitchen 1975 Julia Child
Don’t mess with my sauce! For those of us who make homemade pasta sauce, more than likely, we are in agreement about one thing: Our sauce is the best sauce. Whether it’s grandma’s recipe, Giada’s recipe, or from the internet ; ), we take possession and will defend our sauce anyday, anytime. Back up.
Ok, maybe too strong.
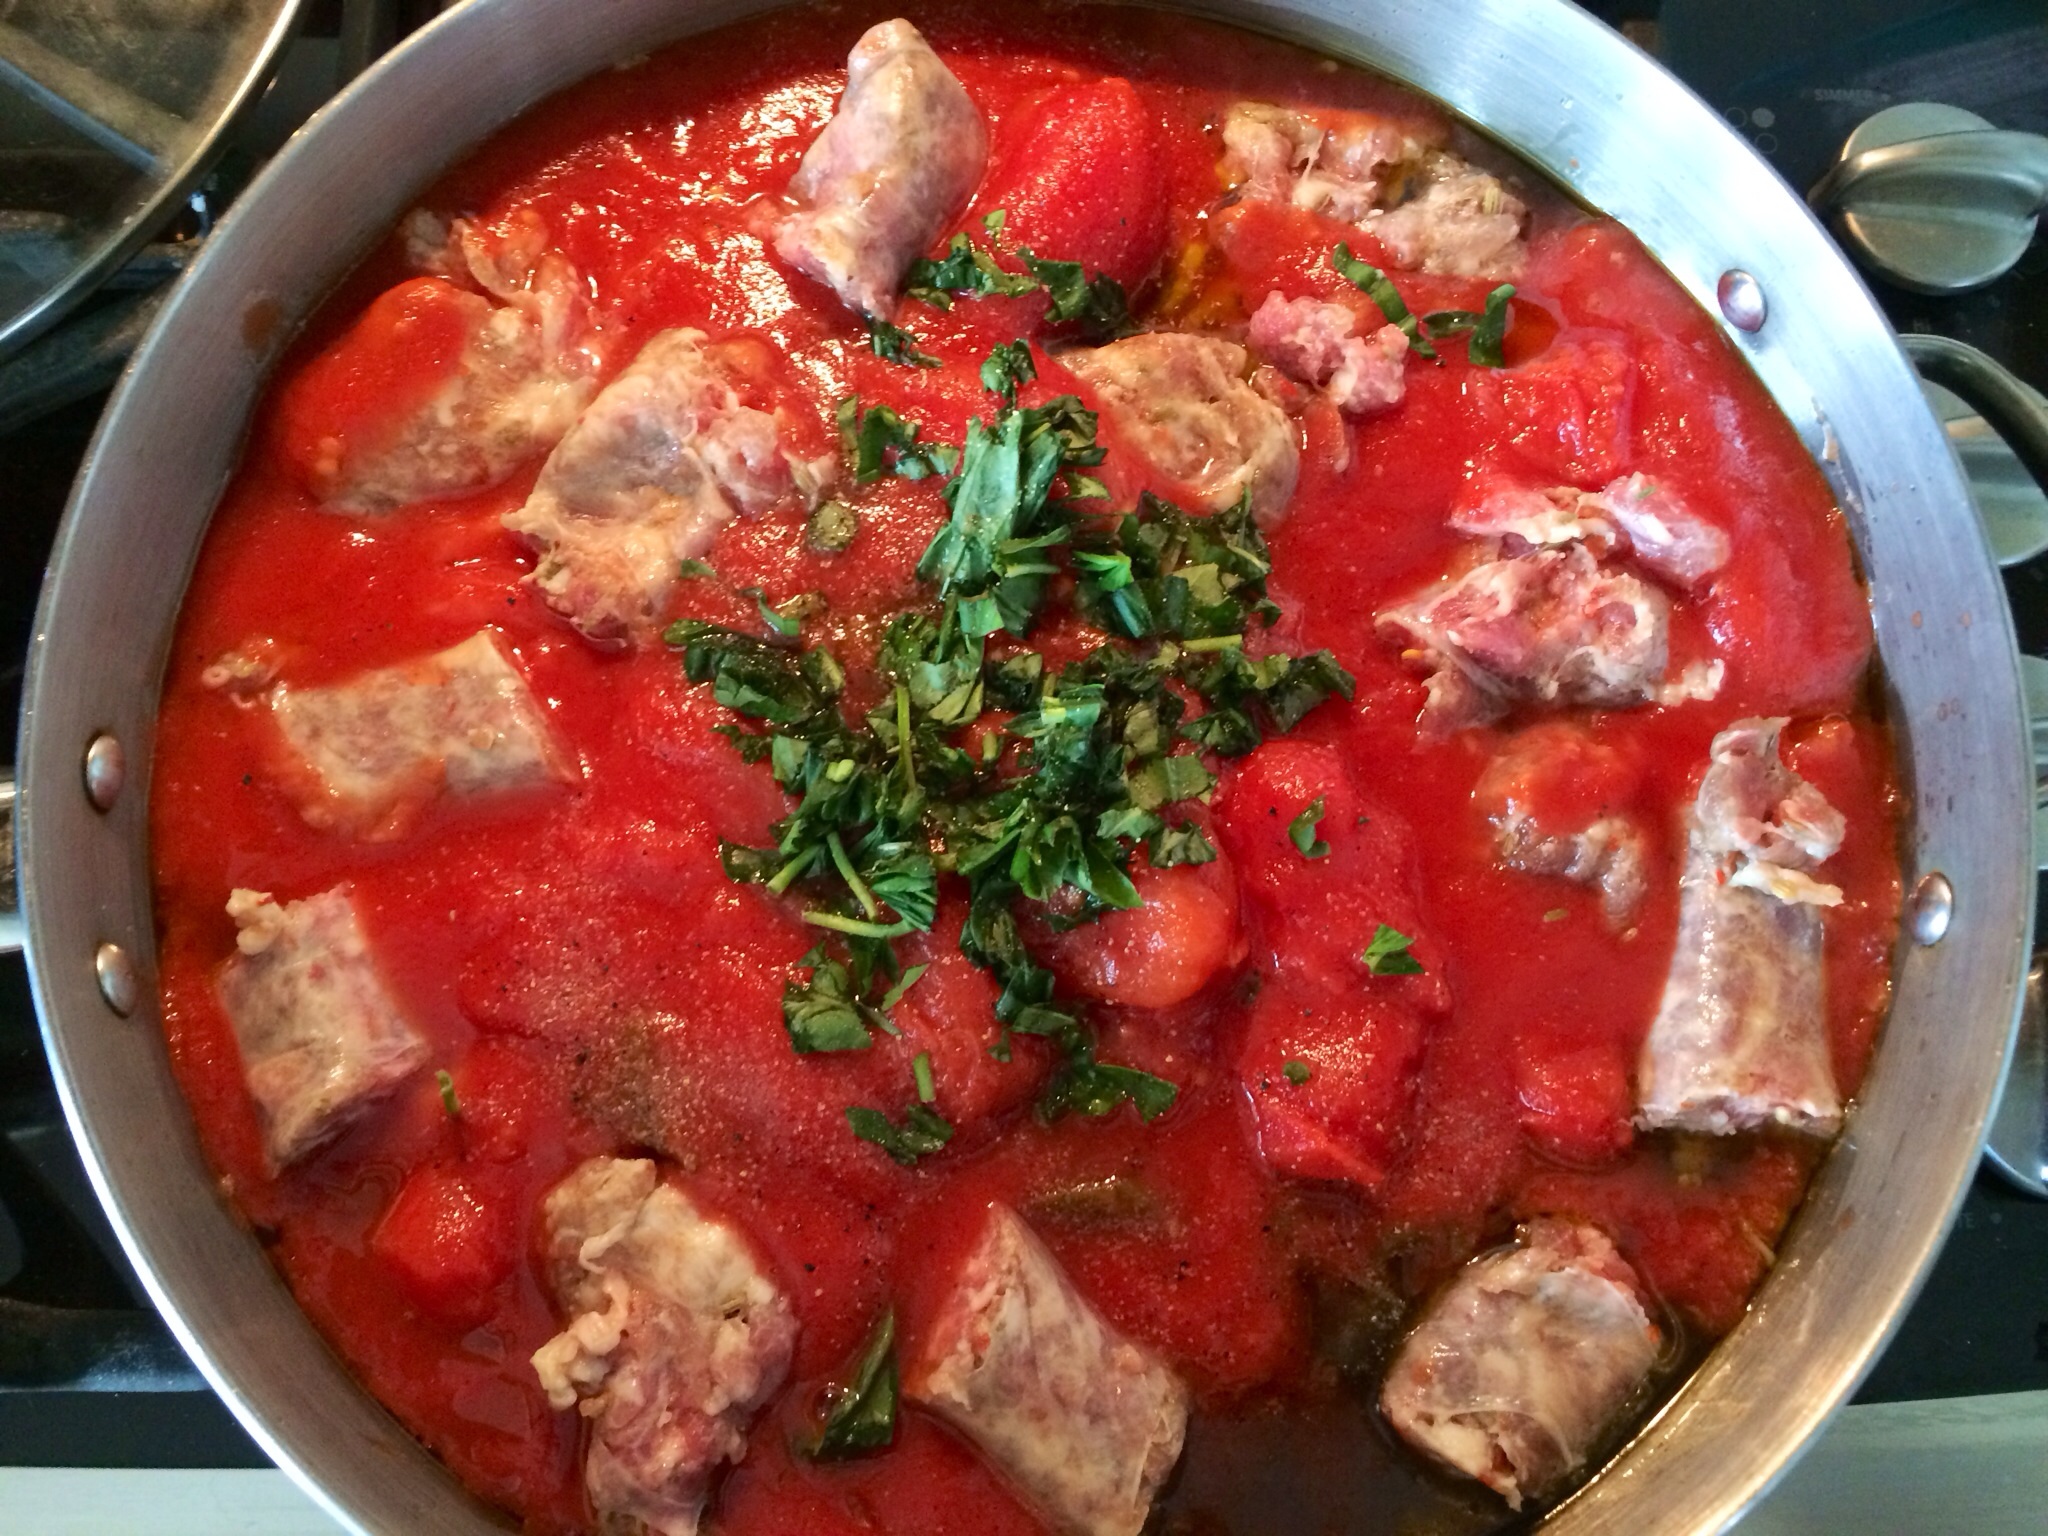
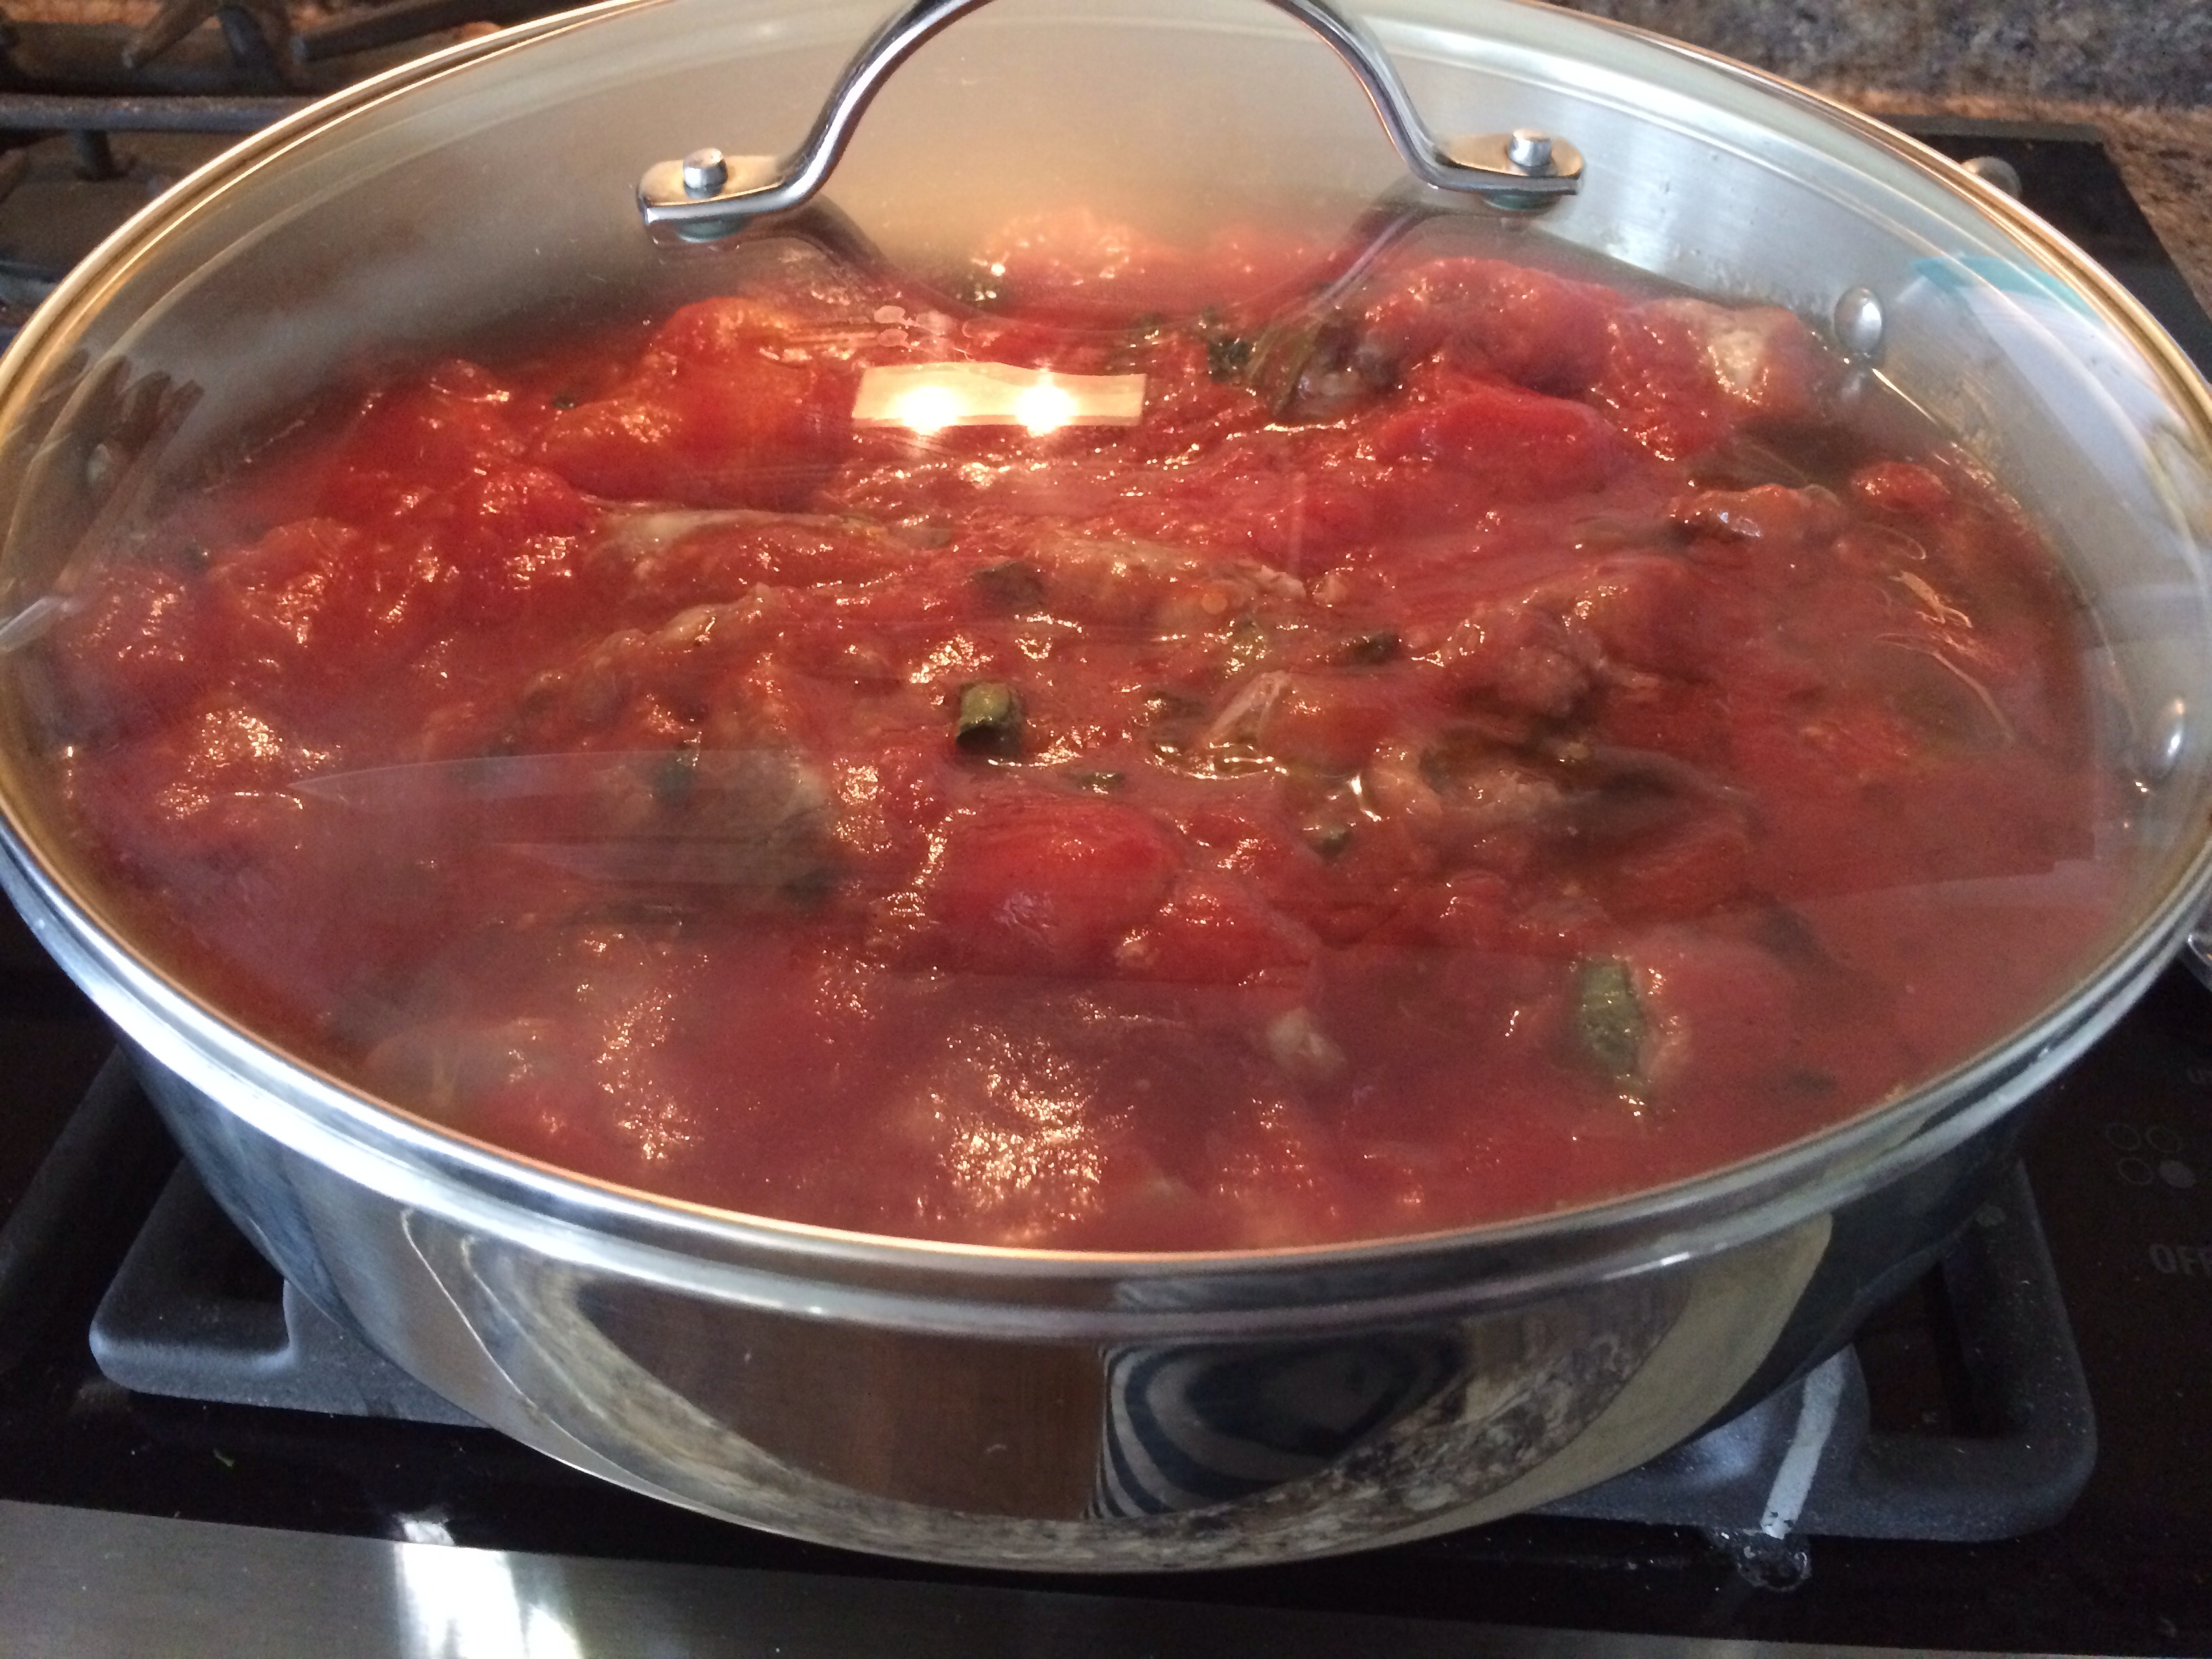
Sunday Sauce with Homemade Italian Sausage
So many different recipes and ingredients all yield a great sauce! From crushed tomatoes, whole tomatoes, and San Marzano tomatoes, to veggies, meat, and spices, there are many different types of sauce and cooking variations.
I get many questions and comments regarding sauce do’s and dont’s. The latest question is “Should I brown my meat before putting it in the sauce?” Great question!
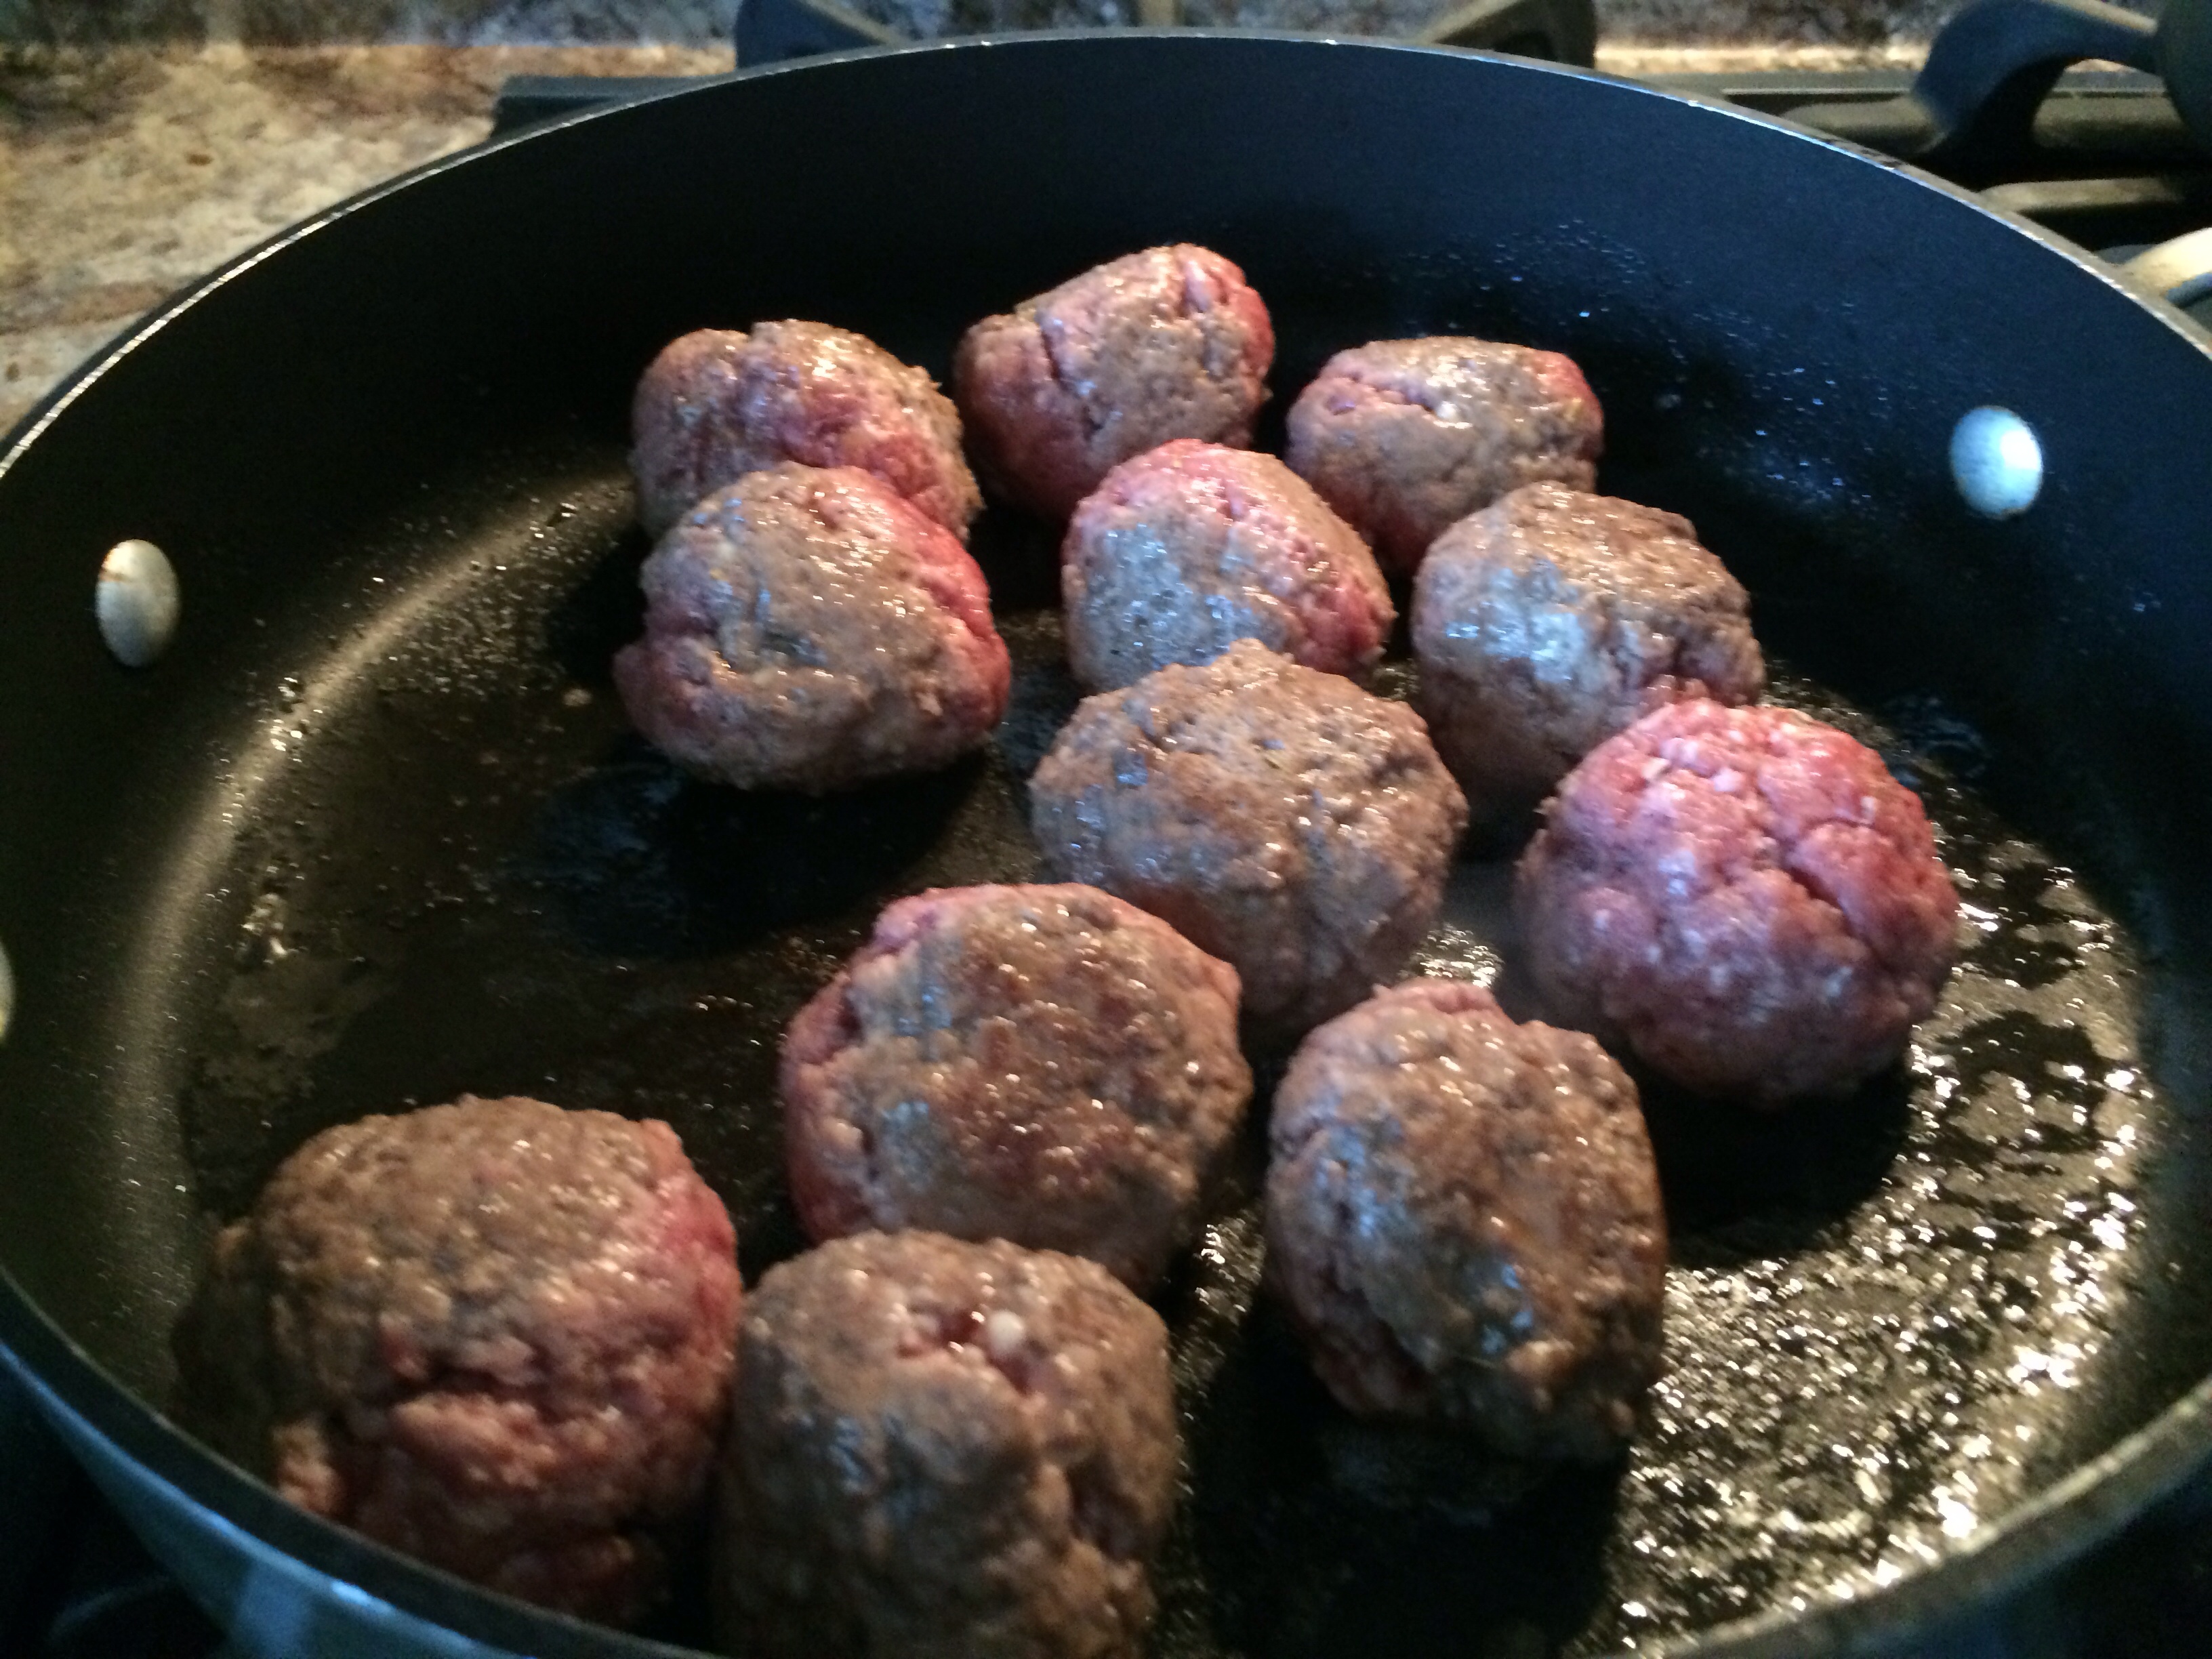
I don’t brown…but there are great reasons for both methods! Ground meatballs, Italian sausage, pork, or ox tail, can all be put directly into the sauce raw as long as you are cooking the sauce until the meat is cooked. I cook my sauce for approximately 4-6 hours.
Here are 5 observations I have made after trying both methods:
1. I love putting my round meatballs into the sauce and having them come out round! I have tried browning meatballs and it caused some kind of cone head problem. My meatballs ended up like triangles.
I have browned when I didn’t have 4-6 hours to cook the sauce! If you don’t mind 3-sided meatballs!
2. Cooking raw meat in the sauce for 4-6 hours creates the yummy tender tiny bites throughout that surprise our palates.
Cover while cooking on low heat and stir every hour or so. Take lid off for the last 30 mins to thicken sauce.
3. The carmelaization during browning will help hold together the meat as it cooks in the sauce.
4. Browning adds flavor and texture to the meat.
5. The fat can be drained after browning. Shhhh! (The fat adds and irreplicable flavor!!)
Do you brown or sauce? I would love to hear from you! Please share!
Of course, both methods are great! I encourage you to try them, get creative, and don’t forget to add fresh grated Parm!
Ever hear of Monterey Bay Aquarium Seafood Watch? If you are worried about seafood safety, this is your app! Whether you are buying fresh fish or ordering in a restaurant, the Seafood Watch app recommends ocean friendly seafood and gives up to date information regarding how each item should be fished or farmed.
My fish mongers at Penn Avenue Fish Company in Pittsburgh’s Strip District introduced me to this cool app! Have you found your fish monger, yet?
Enjoy another easy fish week dinner! On the table in 30 minutes!!
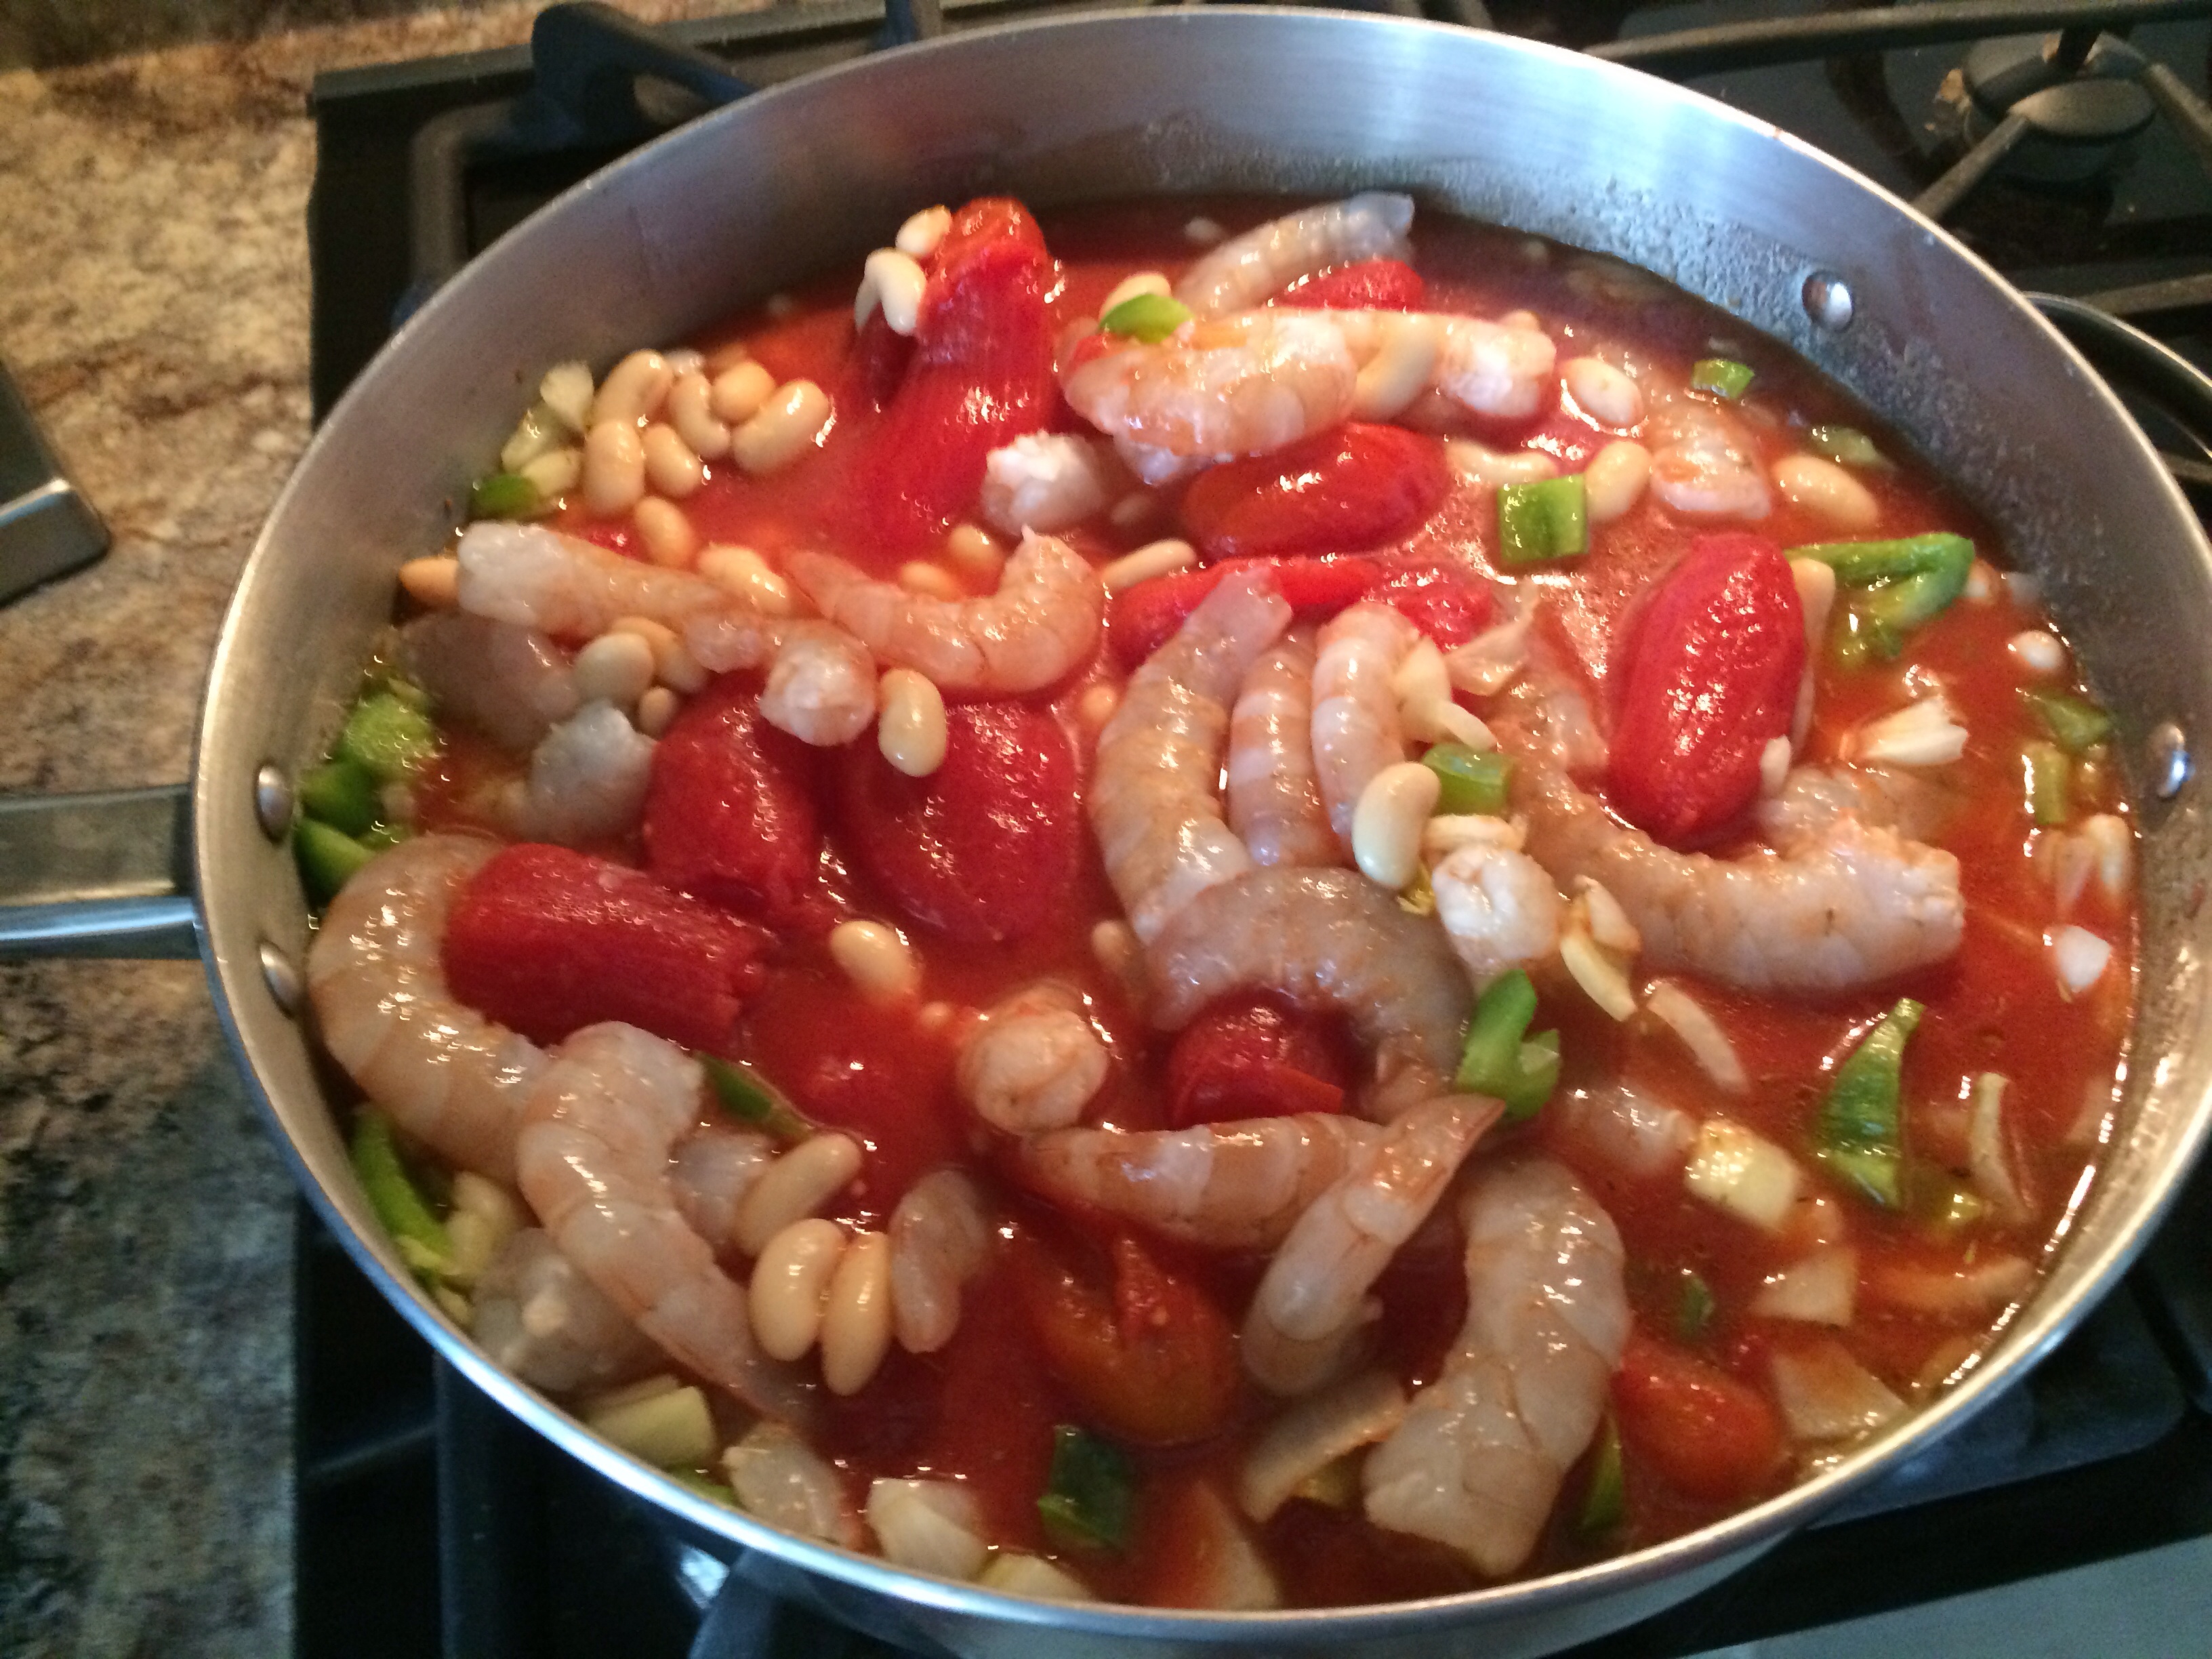
Shrimp jambalaya served over red quinoa!
Shrimp Jambalaya
Ingredients:
2 cups shrimp, cleaned and deveined.
1 35 oz. can whole peeled San Marzano tomatoes
1 tbsp. chopped thyme
2 garlic cloves, pressed
1 small onion, chopped
1 bell pepper, chopped
1 15oz. can white cannellini beans
2 tbsp. cayenne pepper
1 tbsp. chili powder
Salt/pepper
1 tsp. Red pepper flakes ( and a little extra to sprinkle on top)
Directions:
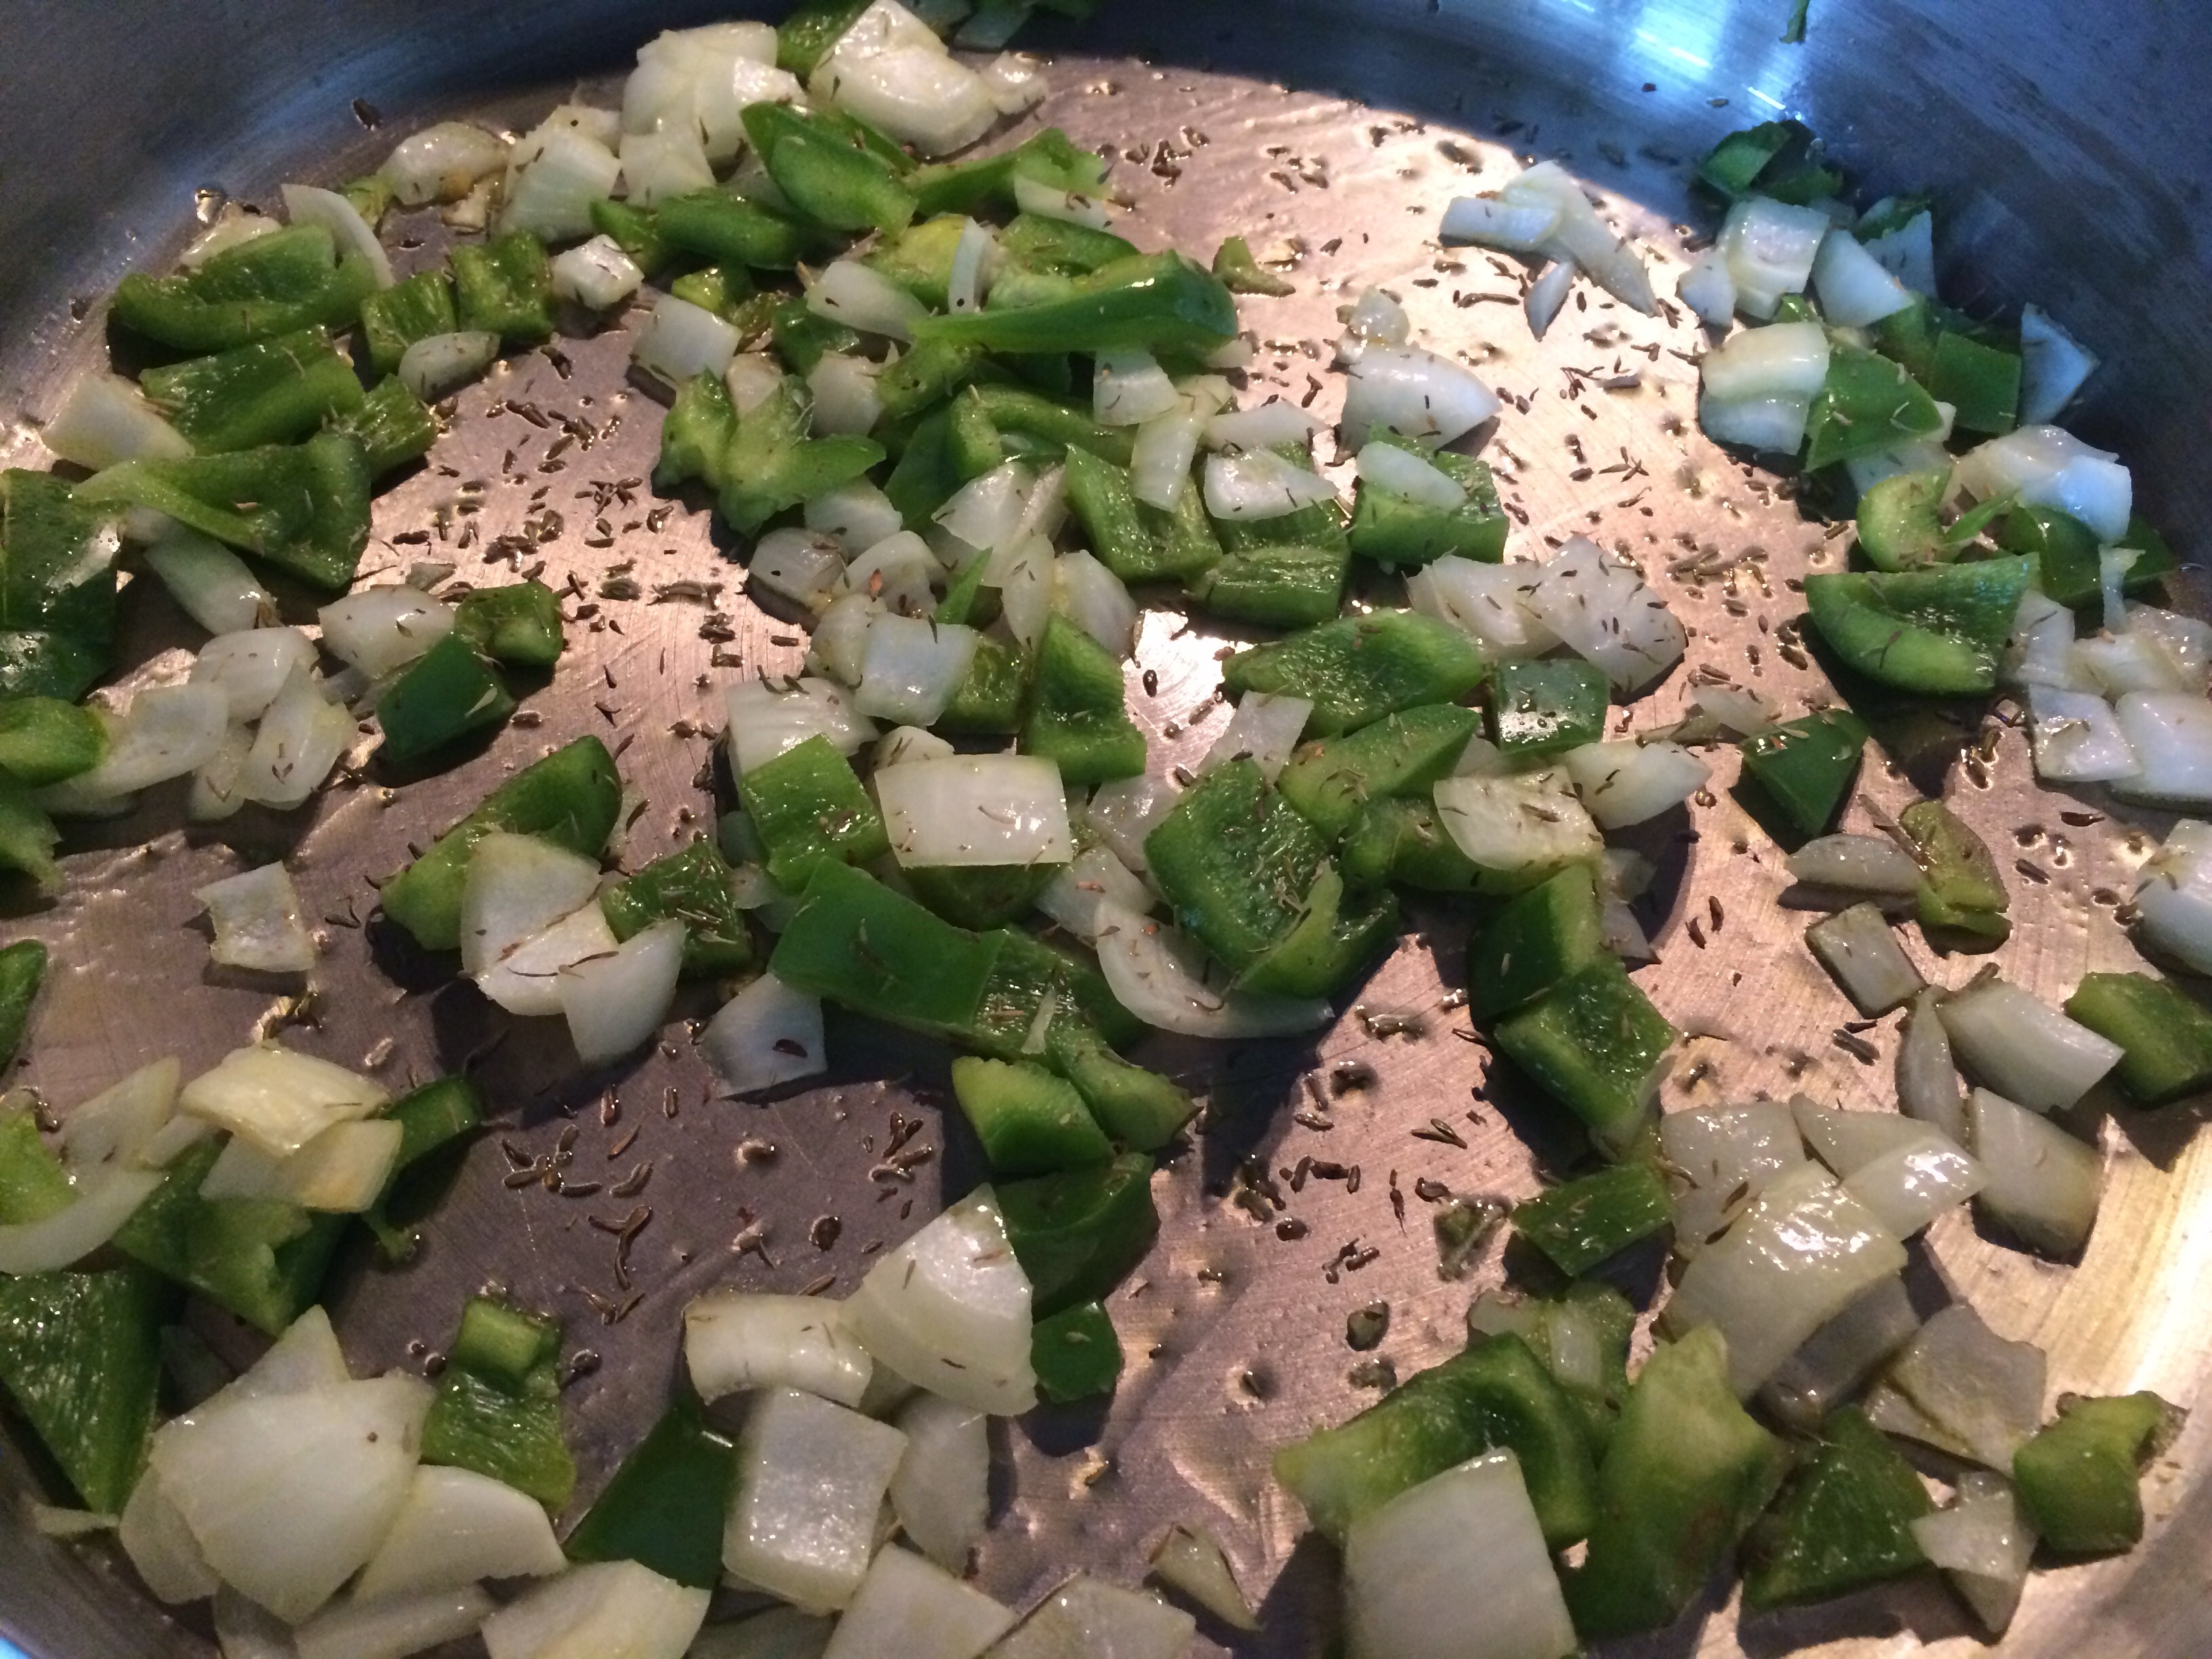
Heat olive oil in your deepest frying pan on medium heat.
Add garlic, onions, pepper and cook for a few minutes to soften the veggies.
Remember, if the heat is too high you will burn the garlic! Start over! No shame. I do this weekly.
Add tomatoes, shrimp, beans, herbs, and spices.
Let it cook and stir after a few minutes. Mix up the shrimp so they cook evenly. Shrimp on the bottom will cook faster.
Cook until shrimp are cooked through -approximately 7 minutes with the lid on. The shrimp will lose their translucency and pink/whiten up when cooked.
Red Quinoa
Directions:
1 cup uncooked quinoa, rinsed and drained, for 1-1/2 cup water.
Heat water and quinoa to a boil.
Simmer until liquid is absorbed.
Serve the shrimp jambalaya over the red quinoa and top with extra red pepper flakes for an extra kick!
I have been watching Food Network’s “Beat Bobby Flay,” have you? This dish could totally win! Delicious!
Ciao!
Penn Avenue Fish Company
2208 Penn Ave. in the Strip
http://pennavefishcompany.com/fresh_fish.html
Why are we scared of fish? Is it our lack of fish knowledge? Our ability to overcook fish EVERY TIME!? (Yep, this was me!)
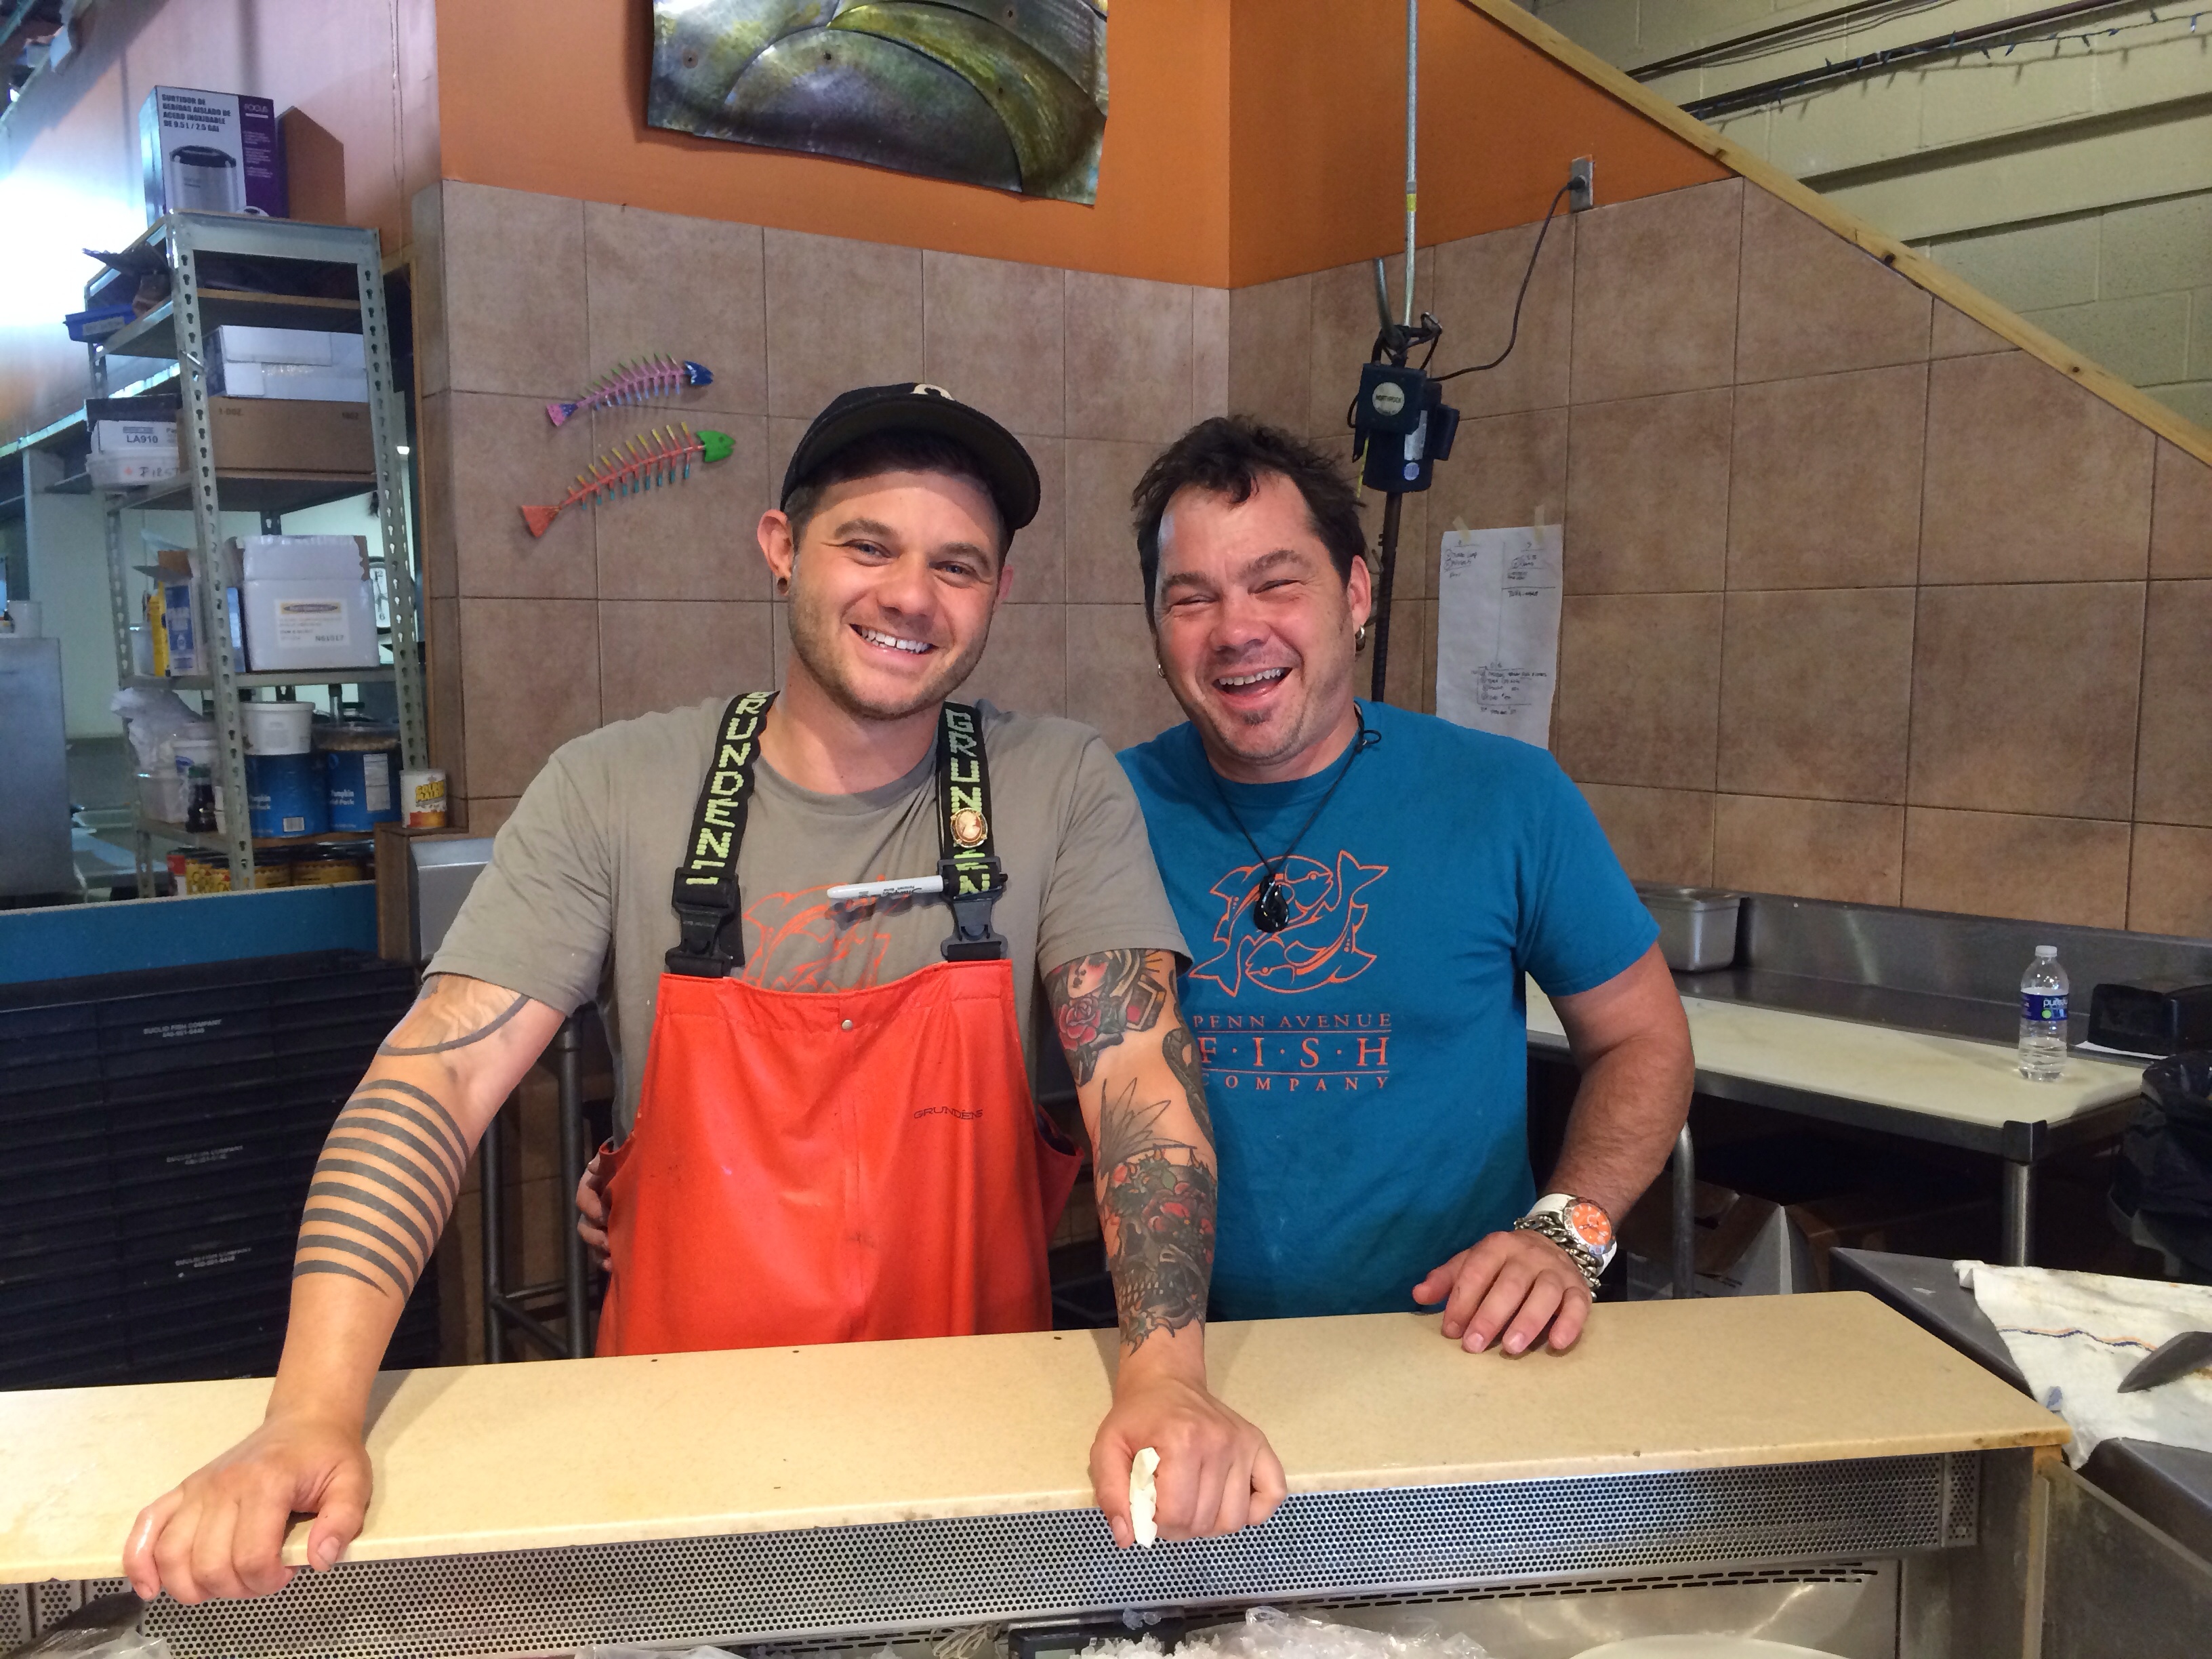
Meet Henry Dewey, co-founder of Pittsburgh’s hip fish market/restaurant Penn Avenue Fish Company! Pittsburgh is lucky to have Henry and his team of fish mongers!
These guys know their stuff, always providing excellent customer service as well as the highest quality product. Mark Clowney, left, Henry Dewey, right.
Henry explained that everyone needs a knowledgeable fish monger to navigate them through the fish buying ocean. “Find someone you can trust,” Dewey says, “and build a loyal relationship.” That way, there is no question about the origination or freshness of the fish.
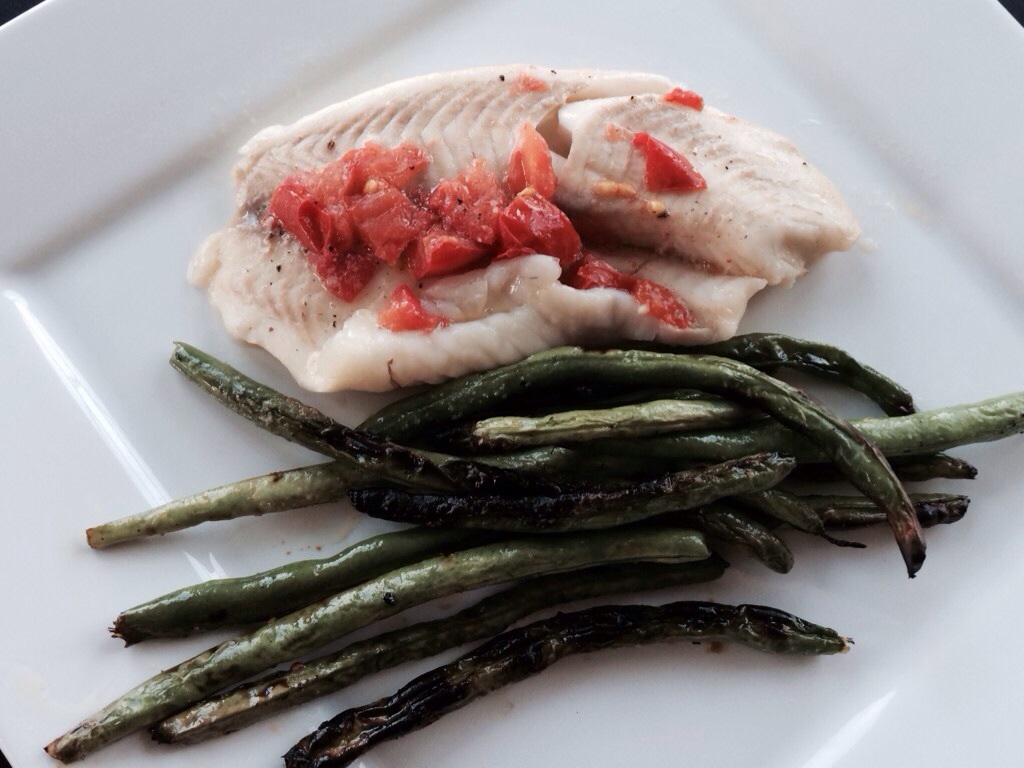
Tilapia is a great starting point when introducing fish on your menu. Tilapia does not have a fishy taste and is easy to determine when it’s cooked.
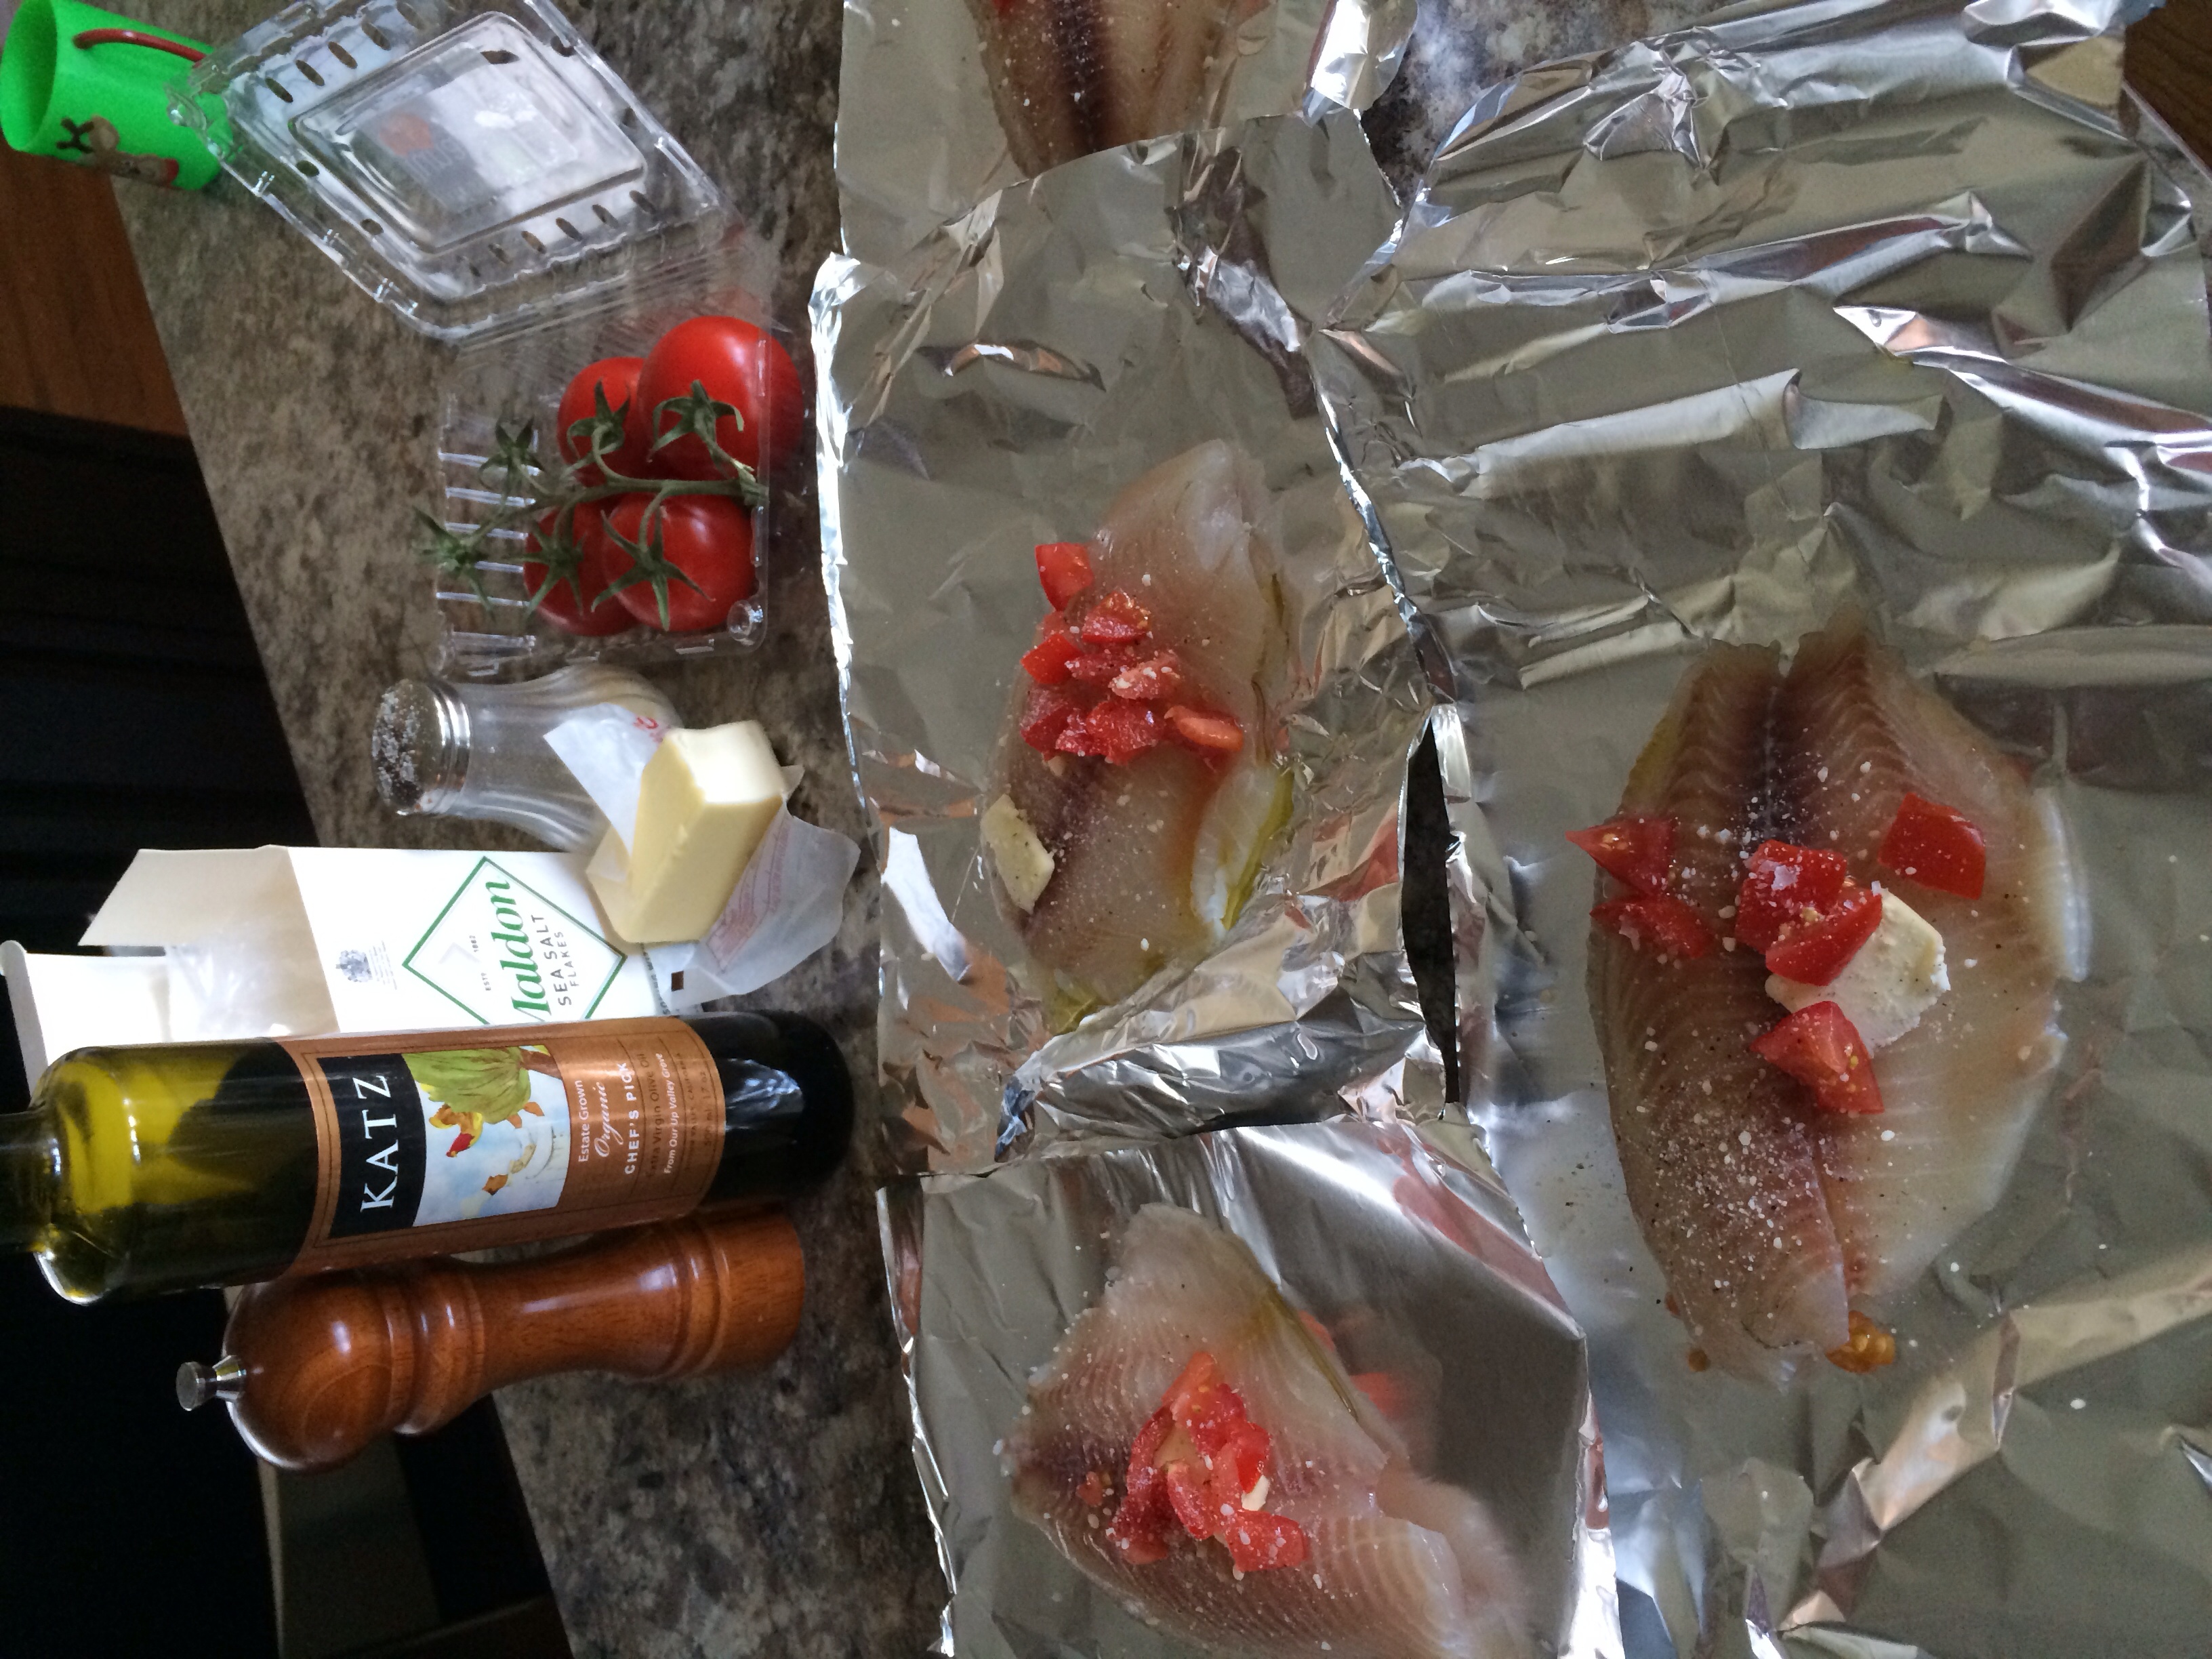
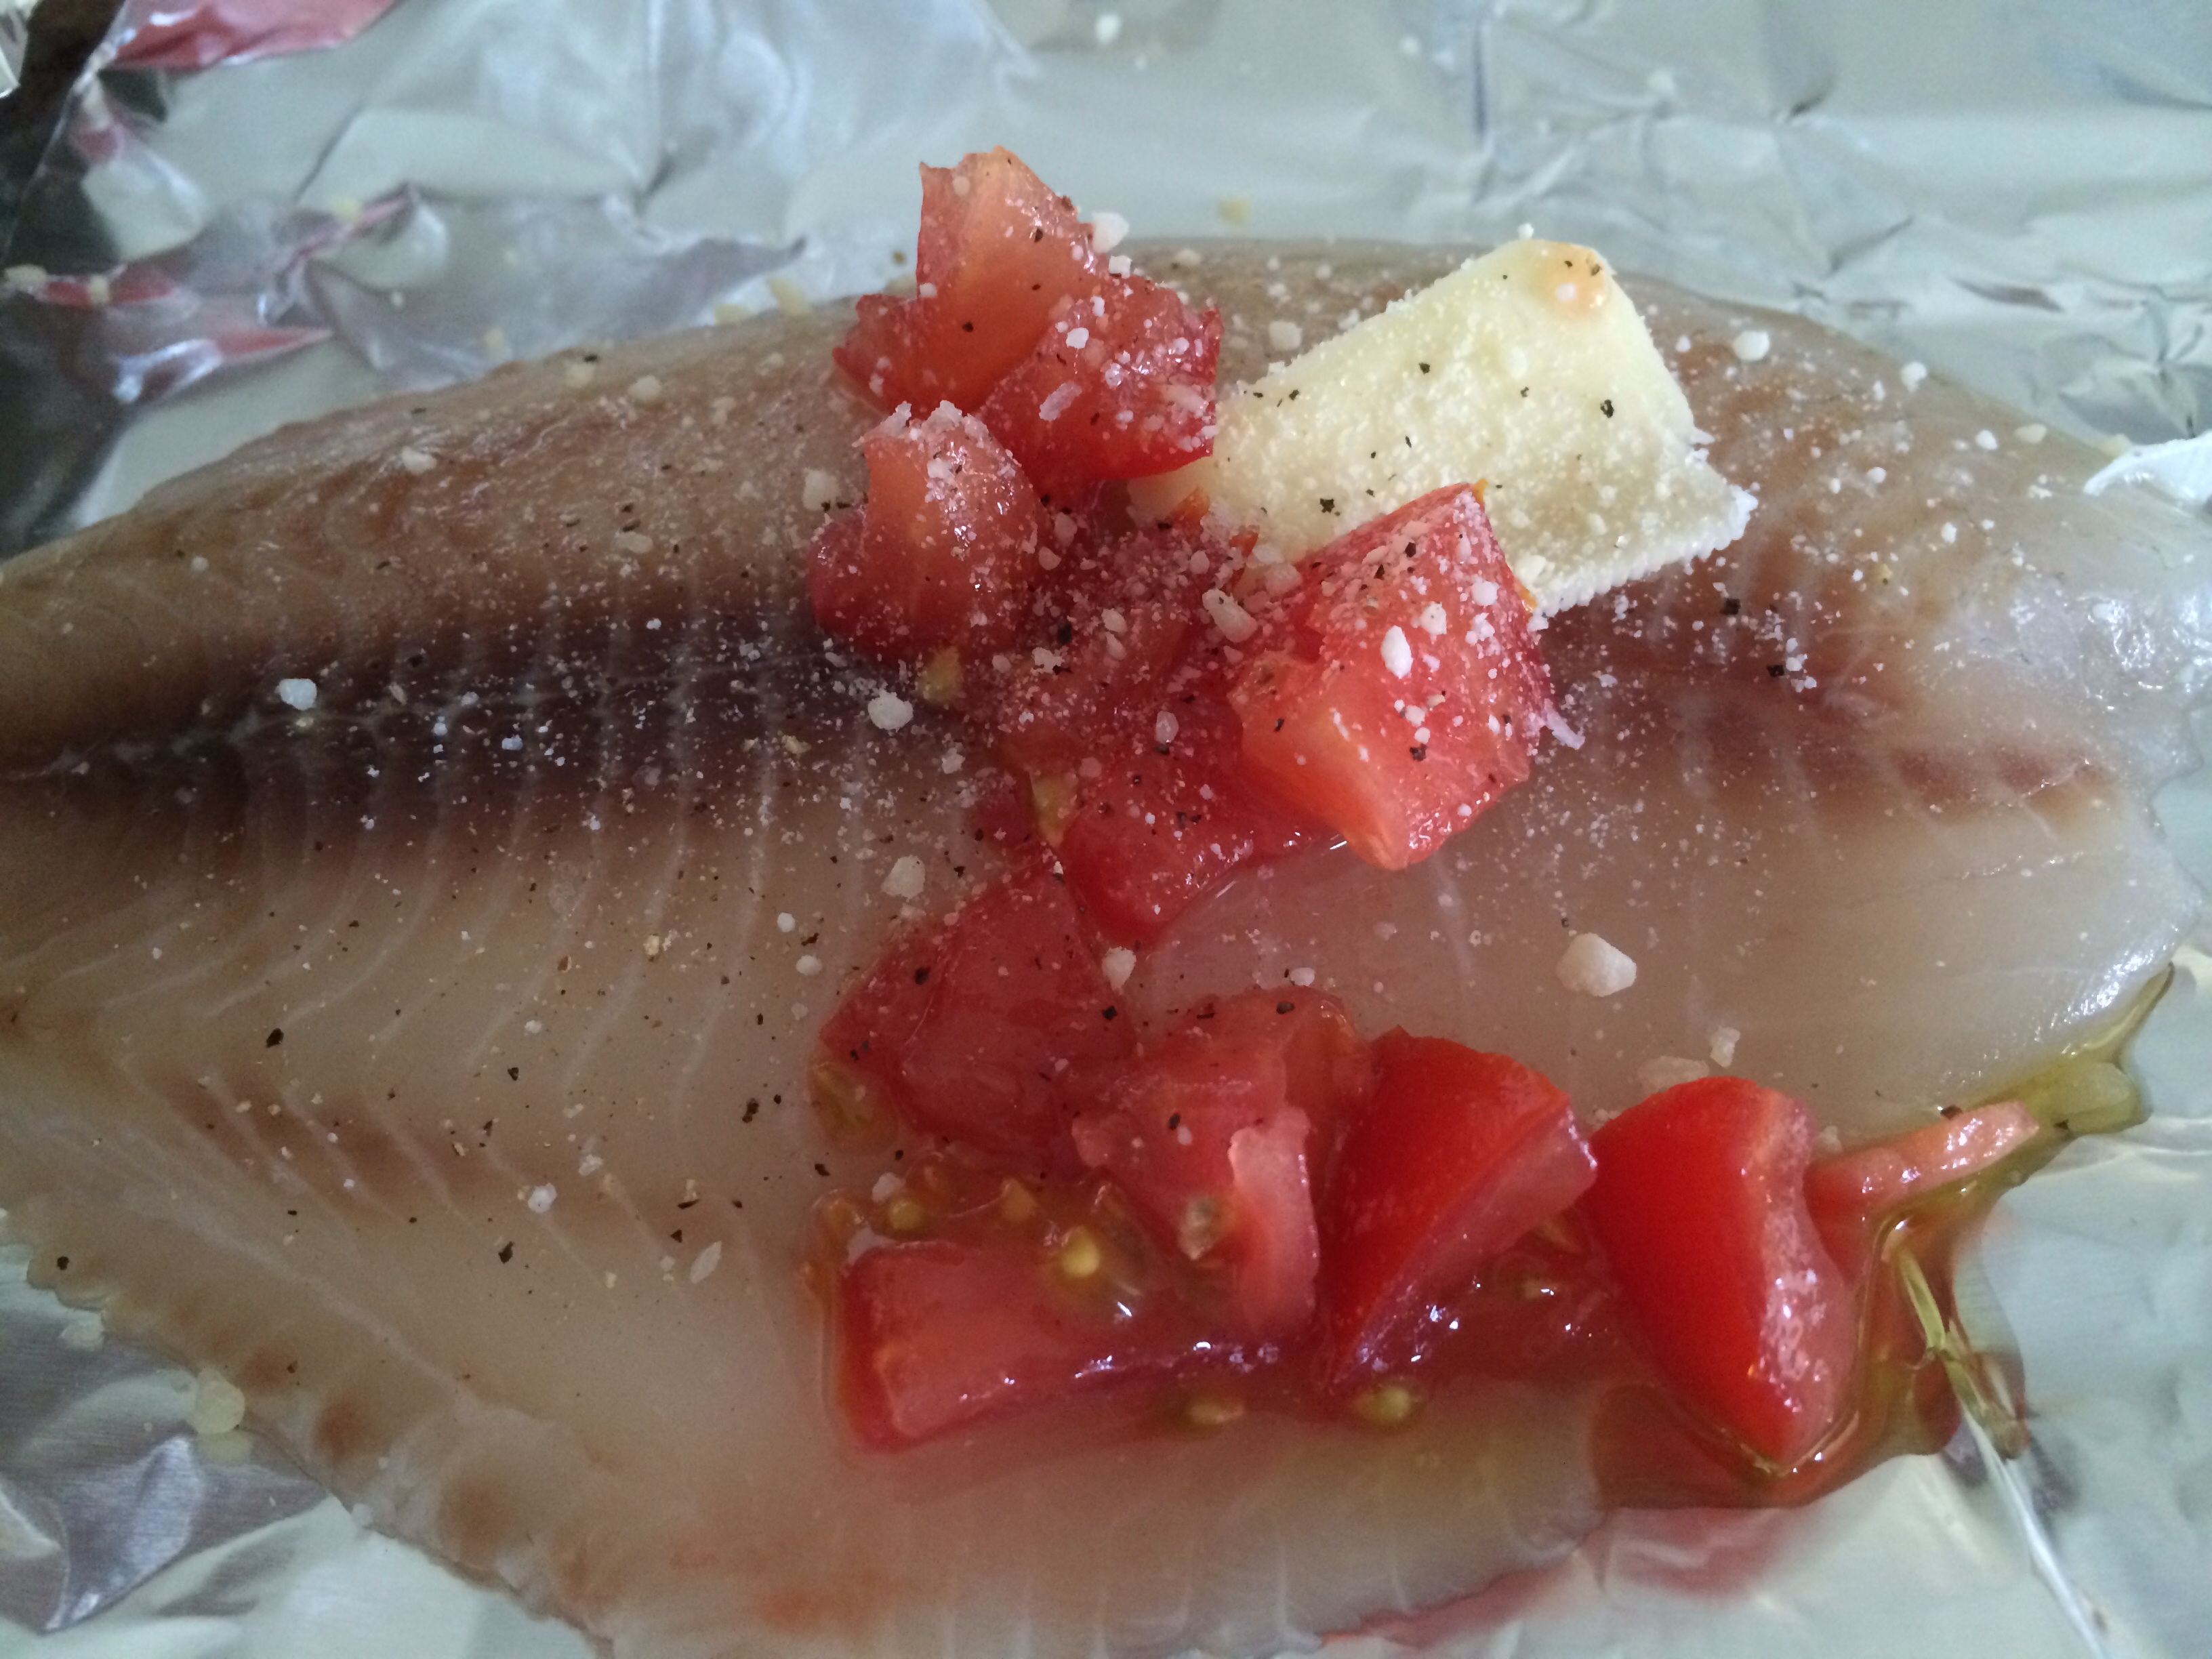
Grilled Foil Packet Tilapia
Ingredients:
1lb 8oz.-or 6 count tilapia fillets (thawed if fresh frozen)
1 large tomato chopped
2 cloves of garlic, roasted (foil packet on grill for 3- 5 mins. during grill heat up) and finely chopped
4 tbsp. olive oil
6 very small, thin pats of butter
Freshly grated parmesan
Course salt/pepper
Directions:
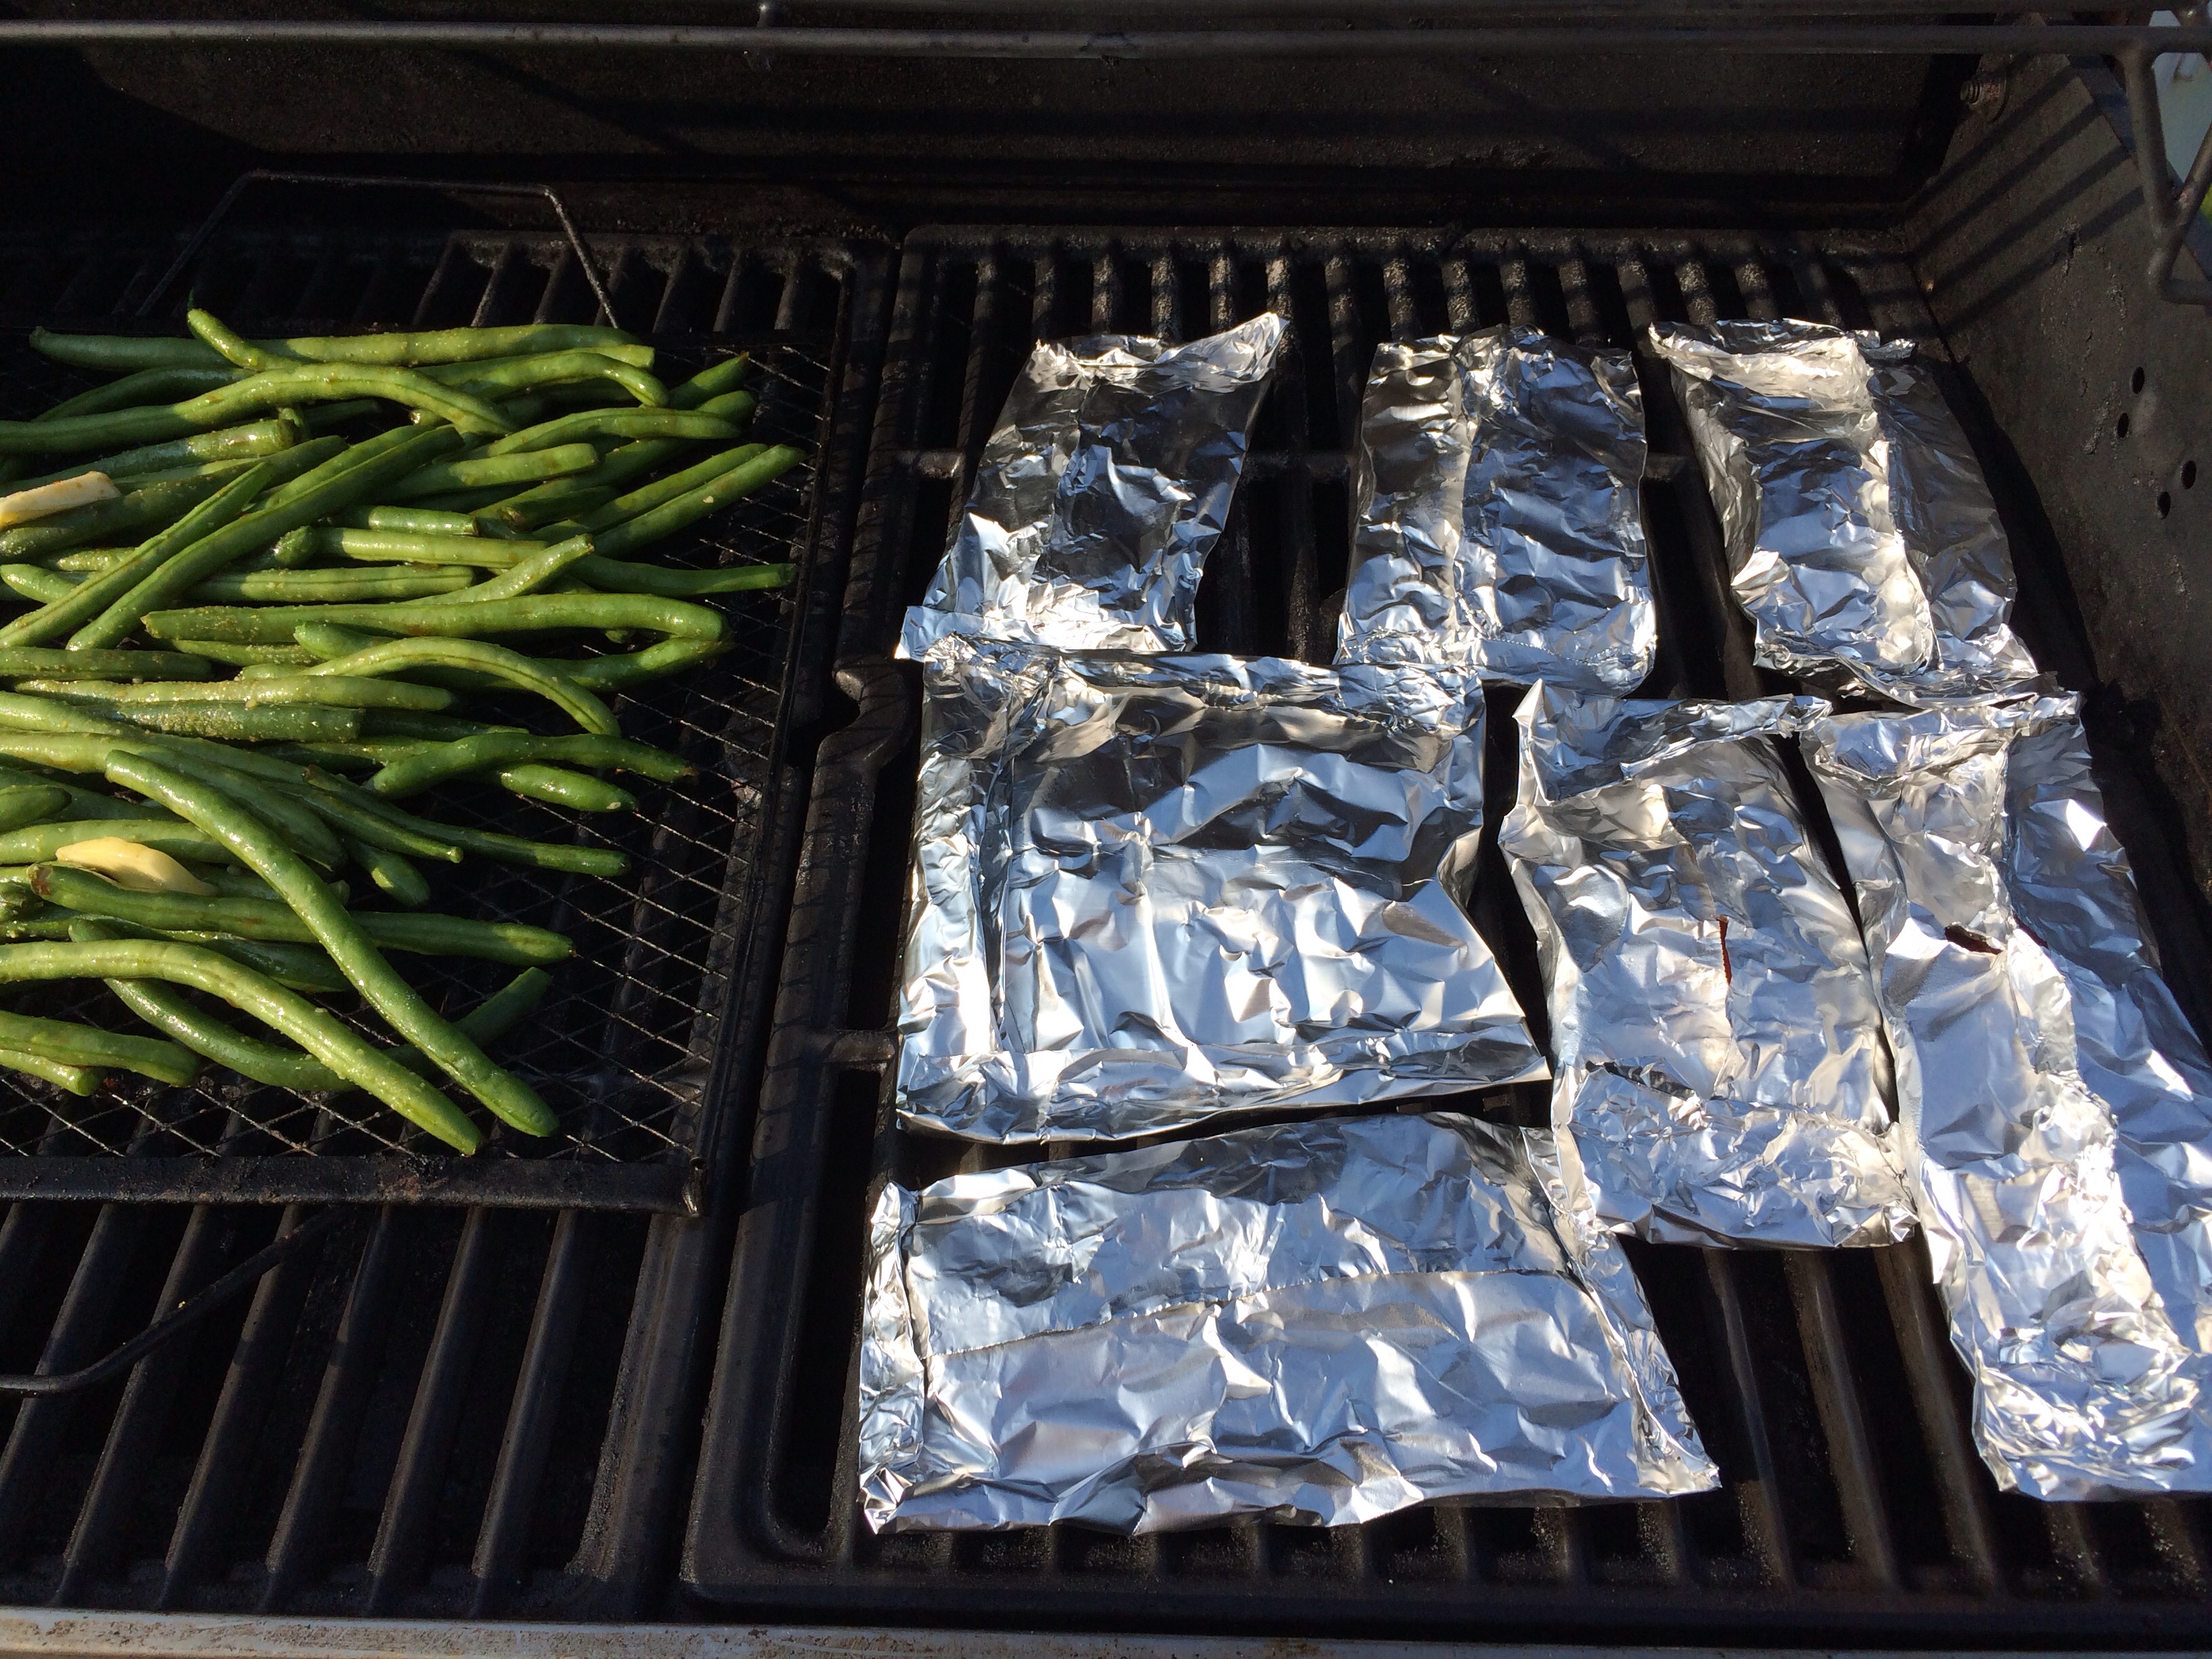
Heat grill to medium heat 300-350 degrees.
Place tilapia fillets on 6 aluminum foil sheets large enough to fold and seal.
Looking for portion control help? The packet grilling method ensures portion awareness!
Top each fillet with 1/2 olive oil, 1 small pat of butter, 1/6 chopped tomatoes, 1/6 roasted garlic,a shake of freshly grated parmesan, salt and pepper.
Fold foil to seal packets.
I chose to add chopped tomatoes to my packets this time. The fish is delicious with or without them!
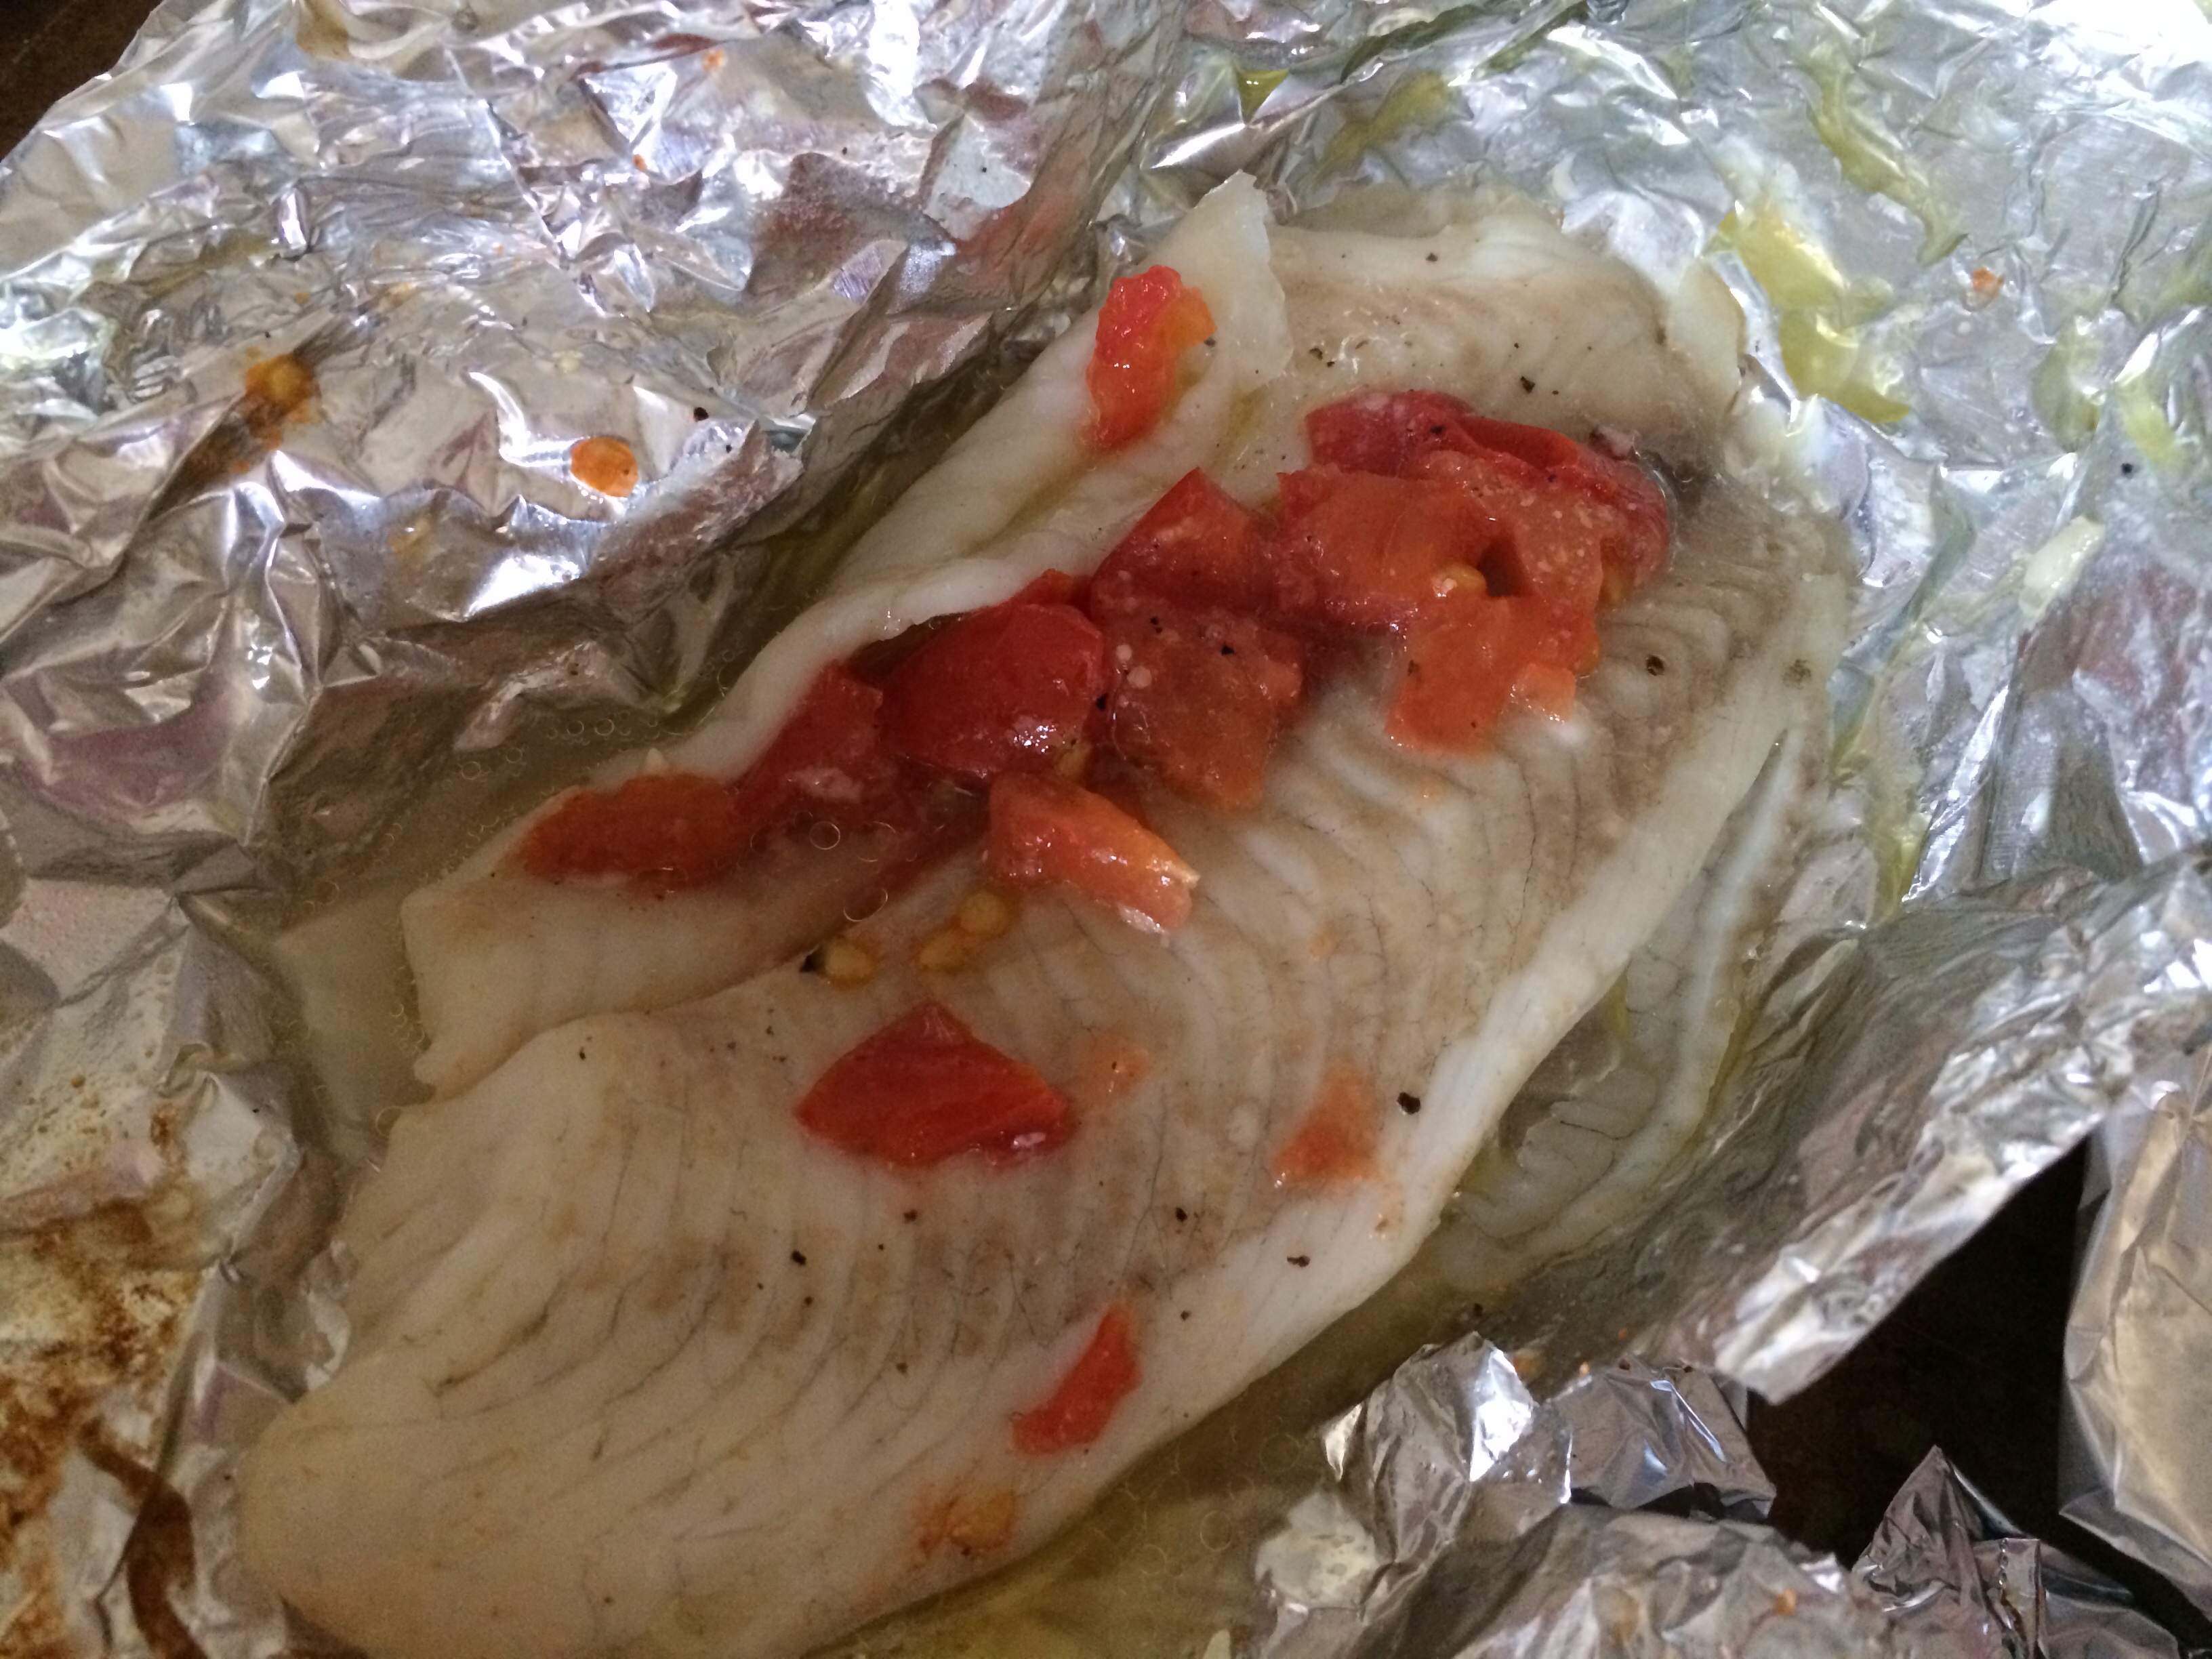
Place packets on the grill for 5-7 minutes or until the fish flakes and turns white, losing its translucency. (I guess that’s a word! Ha!)
Place packets a few inches apart on the hottest part of the grill- the lower grate.Perfect! The fish flakes when poked with a fork and has turned an opaque white! Done!
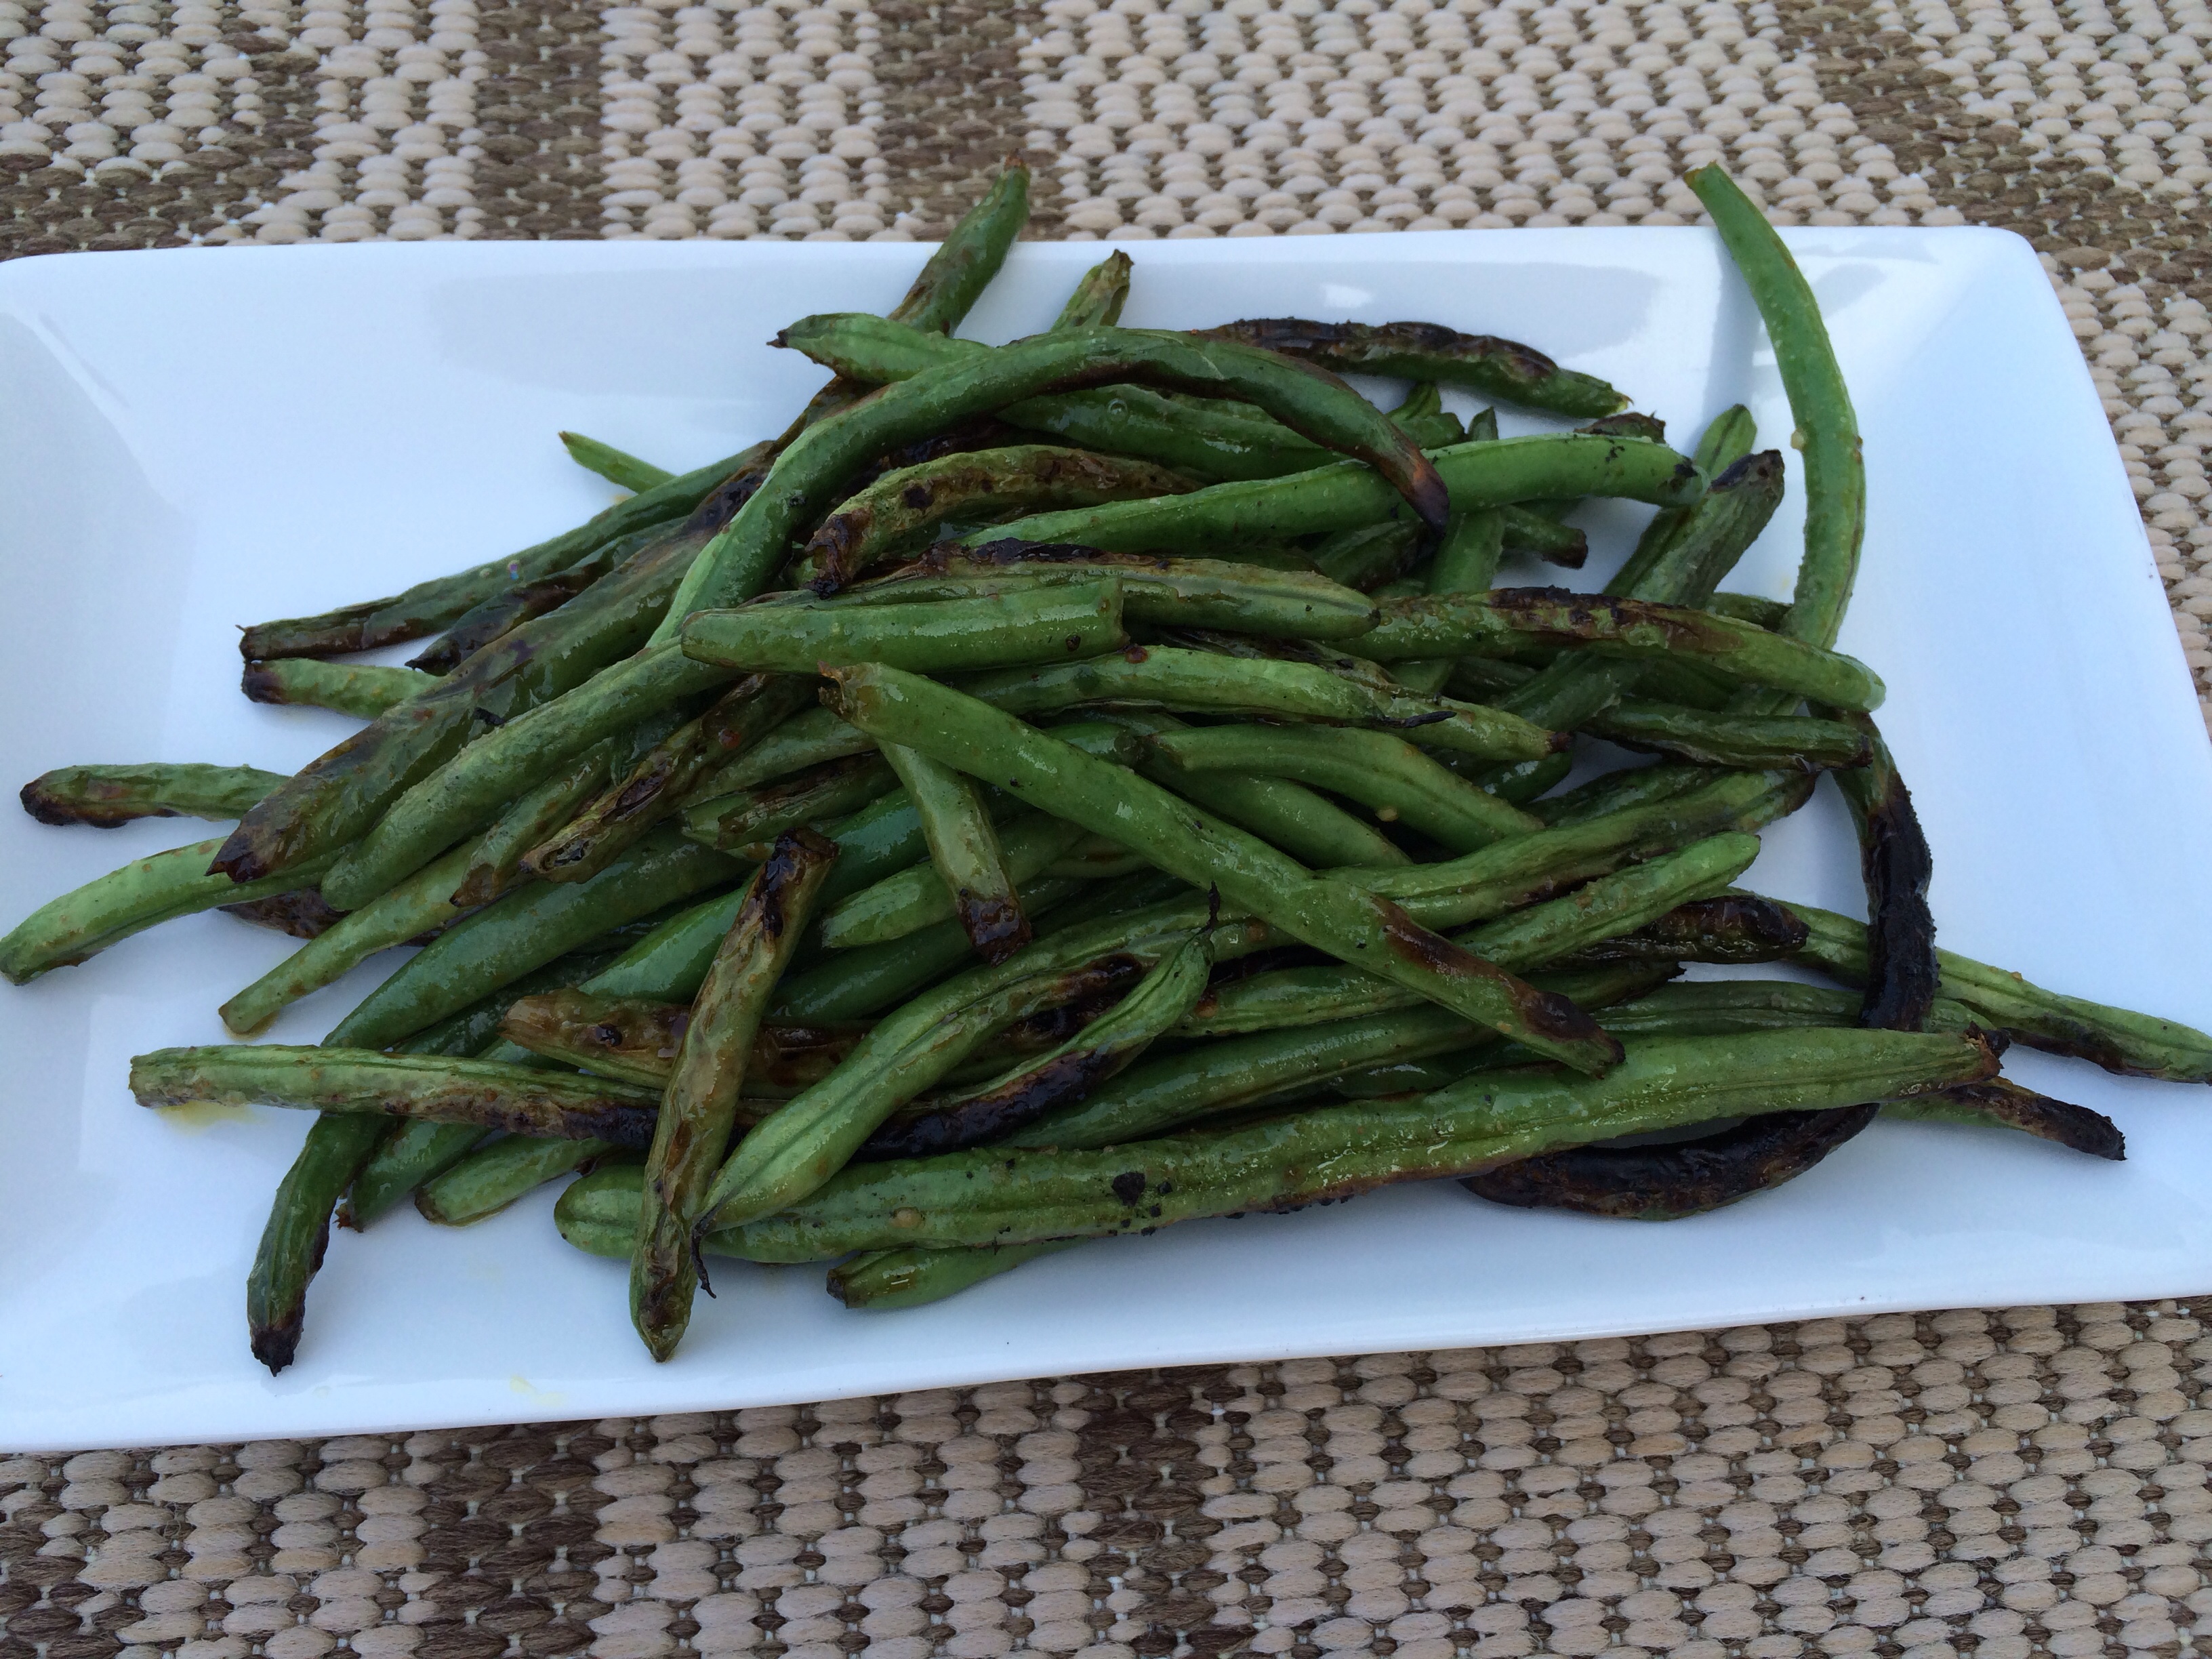
Spicy Grilled Green Beans
Mix one pound of fresh green beans with 2 tbsp. olive oil, 1 tbsp. Dijon mustard, and 1 tbsp. Sriracha in a Ziploc bag.
Coat the beans in the bag.
Place beans evenly on your grill’s vegetable grate or foil.
Cook for 5 -7mins. or until cooked and hot, but still crunchy.
Grilling vegetables on the tray or right on the grill gives them the extra char!
Enjoy!
Ciao!
Stop in and try the fish tacos! The kids and I think they are the best in the Burgh!
http://pennavefishcompany.com/home_strip.html
2208 Penn Ave. in the Strip!